In this tutorial, we’ll build a $65 Pipe & Flange Copy Stand Rig. It’s sturdier than a cheap tripod and takes up half the desk space.

Stop overpaying for professional equipment: build a $65 Pipe & Flange Copy Stand Rig. Learn how to constrConstruct a rock-solid, precision-leveled copy stand for museum-quality camera scanning using affordable hardware store items.
Continue with Care:Archiving is a manual process. Before starting, make sure your workspace is stable, your gear is secured, and your original files are backed up. You are the steward of your own history! Please refer to my Disclaimer & Copyright Page.
If you’ve looked at the price of professional copy stands lately, you’ve likely experienced some “sticker shock.” While a dedicated stand is excellent, it’s essentially just a vertical pole on a flat base. You can replicate this with a trip to the local hardware store and a few items you already have in your junk drawer. In this tutorial, we’ll build a “Pipe & Flange” Copy Stand Rig that’s sturdier than a cheap tripod and takes up half the desk space.
Don’t Miss My Video Tutorial – Build A $65 Copy Stand For Camera Digitizing
The “Why” Behind This Build
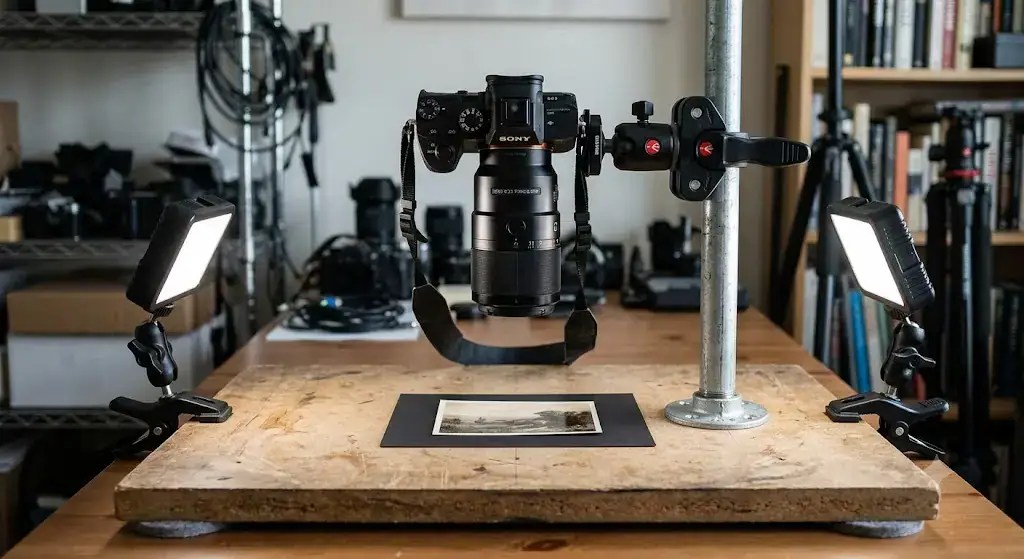
Most people try to use a tripod for digitizing, but tripods are designed to stand around objects, not over them. They are prone to “micro-shake” and are notoriously difficult to get perfectly level. This DIY rig provides a fixed, vertical axis, which significantly speeds up batch-scanning 500 family photos.

Image Above: Recommended Flange Type Make sure it is the right diameter for your chosen pole.
The Shopping List (Hardware Store Items)
A Reminder – “Measure Twice and Cut Once”
You can find these at any DIY store or local hardware shop:
- The Base: A 16″ x 20″ (or similar) piece of thick plywood or a heavy MDF shelf. (Weight = Stability).
- The Pillar: A 1-inch diameter galvanized steel pipe (24″ or 30″ tall, depending on your lens focal length).
- The Mount: A matching 1-inch floor flange, as above.
- The “Magic” Ingredient: A Manfrotto Super Clamp (or a generic ‘Crab Clamp’). This is the only “specialty” photo item you need. Note: If your clamp does not come with a standard camera ball-head, then you will also need one.
- Small Screws & Felt Pads: To attach the flange and protect your table.

Step-by-Step Assembly
This is your only opportunity to ensure everything is tight, perfectly level, and the post is precisely centered.
1. Prepare the Base
Screw the floor flange into the center-back of your plywood, ensuring it is tight.
- Pro Tip: Apply several felt pads to the bottom of the wood. This will allow you to slide the entire assembly across your desk without scratching it.
2. Install the Pillar
Thread your steel pipe into the flange. Use a wrench to tighten it “hand-tight plus a quarter turn.” If the pipe has any grease on it, wipe it down with degreaser or rubbing alcohol. Grease is common on plumbing parts, and cleaning it will prevent it from ruining your photos.
3. Attach the Camera Arm
Clamp your Super Clamp onto the pipe.
- Attach a standard Tripod Ball Head to the clamp’s stud.
- Mount your camera to the ball head, facing straight down.
The “Secret” to Success: Precision Leveling

A DIY rig is only as good as its alignment. If your camera is tilted by even 1°, your photos will be blurry on one side.
The Mirror Trick:
- Place a small, flat mirror on the base directly under the lens.
- Look through the camera’s viewfinder (or Live View).
- Adjust the ball head until the reflection of your lens center is perfectly centered in your frame.
- Once aligned, you are “perfectly parallel” and ready to scan.
Cost Comparison: DIY vs. Retail
| Item | Retail Copy Stand | DIY “Pipe & Flange” |
| Stability | Moderate (Aluminum) | High (Steel/Wood) |
| Height | Fixed | Customizable |
| Price | $280 – $550 | ~$65 |
Was This Post Helpful?
Building this free educational archive is a labor of love! If this post helped you today, please leave a like below to let me know you found it useful. Your support helps keep this site 100% free and ad-free for the archiving community.

Other Miscellaneous Internal Posts of General Interest
- High-Res Camera Mode [Pixel-Shift] Comparison: Sony vs. Lumix vs. OM System
- Migrating to Linux from Windows: An Engineer’s Perspective
- A Camera-Digitizing And Archiving Introduction For Novices
- The Lasting Legacy of Your New Digital Archive: Mission Accomplished!
- Camera-Digitizing Is The Best Solution
- Six Critical Color Correction Hacks for a Vintage Film Look
Confused by any technical jargon in this guide? Check out my [Full Jargon-Free Glossary] to get clear, simple definitions of all the archiving terms used here.
[Home]
External Links.
1. The Federal Agencies Digital Guidelines Initiative (FADGI)
- What it is: This is the premier standard used by US federal agencies (like the Library of Congress and the National Archives) to evaluate digitization quality.
- FADGI guidelines specifically outline the mechanics of copy stand photography, emphasizing the importance of keeping a camera perfectly perpendicular to a flat surface and angling dual lights at 45 degrees to eliminate shadows.
- While this post presents a budget-friendly DIY build, it perfectly mimics the geometric setup required by professional FADGI Digitization Guidelines used by cultural heritage libraries to ensure accurate, high-fidelity archival captures.”
2. The British Library’s Endangered Archives Programme (EAP) / Remote Capture Guide
- What it is: A comprehensive open-access field guide published via Open Book Publishers that teaches archivist teams how to digitize vulnerable collections around the world using portable setups.
- Why it fits my post: This guide features a dedicated chapter on using modern DSLR/mirrorless cameras, copy stands, and remote shutter releases in the field, bridging the gap between professional archival work and practical, hands-on setups.
- For a deeper look into professional workflows, camera settings, and document handling on a copy stand, the British Library’s open-access Remote Capture Guide is an incredible textbook for any DIY archivist.”
I welcome comments and questions