A warm welcome to the workbench for all existing members and the many new subscribers who joined us recently. Whether you found Camera-Digitize-Archive while building a copy stand, organizing digital master files, or dialing in film inversions, I am glad you are here.
While the primary library features deep, long-form technical guides, I am starting these shorter field notes to share quick tips, workspace updates, and quick answers to community questions between major releases.
What’s on the Horizon
Two vintage photographs showcasing an ambrotype and a tintype from the mid-1800s
Here is a quick look at what I am currently testing and drafting for the site:
Cased Images & Historical Media: Practical setups for capturing highly reflective Daguerreotypes, Ambrotypes, and glass plates without losing surface detail.
Open-Source Archival Pipelines: Further deep dives into Linux-based workflows, color profile management, and non-destructive file handling.
Quick Hardware Tweaks: Micro-adjustments for copy stand alignment and lighting geometry to save time during long capture sessions.
I would love to tailor upcoming notes to what you are actively working on. What media format or capture challenge is currently sitting on your workbench? Drop a line in the comments below—it is great to have you along for the journey!
These fundamental guides break down the core process of camera digitizing step-by-step.
Using AI Photo Restoration: AI should complement your high-resolution scan, not replace it.
AI image restoration has evolved far beyond cartoonish, heavy-handed filters. Modern machine-learning models can now recover detail from heavily degraded prints, negatives, and cased images.
However, the core philosophy of archival restoration remains unchanged: AI should complement your high-resolution scan, not replace it. The goal is true preservation—retaining genuine film grain and physical characteristics while removing age-related defects.
I have so far been reluctant to cover AI restoration in my comprehensive tutorials because I have always cherished the sanctity of vintage original images. However, I now accept that there has been somewhat of a revolution in modern AI restoration tools.
Continue with Care: Archiving is a manual process. Before starting, make sure your workspace is stable, your gear is secured, and your original files are backed up. Never make changes to your master file. You are the steward of your own history! Please also refer to my Disclaimer & Copyright Page
I. Prerequisites
A high-quality digital camera capture saved in a 16-bit uncompressed format (such as RAW or TIFF).
Photo editing software that supports non-destructive layers and masks.
II. Step 1: Preparing Your Source Scan
Before launching any artificial intelligence software, your primary focus must be capturing and conditioning the best possible source data. AI models do not create detail out of thin air; they rely on edge contrast, local luminance values, and clean tonal transitions to make accurate mathematical inferences. Passing a low-resolution, heavily compressed JPEG into a neural network severely limits what the software can recover and often leads to unnatural artifacts.
+-----------------------------------------------------------------------+| THE OPTICAL SIGNAL PIPELINE |+-----------------------------------------------------------------------+| [ Original Vintage Media ] || | || v || [ High-Fidelity Camera Scan ] ---> 16-Bit Uncompressed RAW/TIFF File || | || v || [ Global Tone Normalization ] || (Exposure, WB, Highlight Recovery) || | || v || [ Master AI Working Copy ] |+-----------------------------------------------------------------------+
Essential Pre-AI Preparation Steps
Work with High Bit-Depth Masters: Always digitize your original prints, negatives, or glass plates into an uncompressed 16-bit format (such as camera RAW or 16-bit TIFF). High bit-depth files preserve critical shadow detail and smooth highlight gradients that AI algorithms need to accurately distinguish real photographic detail from surface fading.
Execute Global Tonal Adjustments First: Perform your baseline exposure, contrast, and white balance corrections in your non-destructive editor before applying AI passes. If an original print suffers from a heavy yellow cast or severe silver mirroring, correct the color temperature and lift compressed shadows first. AI models perform significantly better when operating on a balanced, neutral histogram.
Establish a Non-Destructive Canvas: Never run AI processing directly on your archival camera capture. Duplicate your prepped 16-bit file to create a dedicated working copy, keeping your original master scan safely archived in its untouched state.
III. Step 2: Fixing Physical Damage (Inpainting & Scratch Removal)
Physical vintage media rarely survives decades without acquiring scratches, dust specks, emulsion tears, or cracked gelatin surfaces. Before attempting to sharpen features or upscale resolution, you must address these physical surface defects. Modern AI-assisted inpainting toolsets excel at identifying broken pixel patterns and filling those gaps seamlessly by sampling surrounding texture.
Isolate Defect Removal: Treat physical damage repair as an isolated, manual step. Avoid using automated, full-image “auto-scratch removal” filters across your entire photo. Broad global filters frequently misinterpret fine hair strands, background foliage, or sharp clothing seams as scratches, blunting authentic image detail.
Leverage Localized AI Inpainting: Use targeted AI retouching tools (such as localized patch models or content-aware fill engines) to remove specific cracks and dust spots. Select only the immediate boundary of the damage so the algorithm synthesizes replacement pixels using the exact local film grain structure.
Sequence Your Edits Correctly: Always complete your physical scratch and dust cleanup before sending the image through AI facial recovery or upscaling models. If you leave a severe crack running across a face, the facial prior model may mistake that line for an organic facial contour, permanently baking the distortion into the reconstructed features.
IV. Step 3: Targeted Detail Recovery & Facial Enhancement
One of the most remarkable breakthroughs in modern AI image processing is the development of facial prior models, such as CodeFormer and GFPGAN. Traditional sharpening filters simply increase edge contrast, which often exaggerates existing noise or JPEG compression artifacts. Facial prior networks work differently: they recognize human anatomical features—eyes, teeth, skin texture, and hair patterns—and compare degraded pixels against vast libraries of high-resolution facial data to infer missing details.
+-----------------------------------------------------------------------+| THE COMPOSITING WORKFLOW |+-----------------------------------------------------------------------+| [ Original Master Scan ] ------> Base Layer (Authentic Grain & Form) || | || [ AI Processed Pass ] ---------> Top Layer (Sharpened Details) || | || [ Opacity ] || (30% to 50%) || | || v || [ Balanced Final Composite ] |+-----------------------------------------------------------------------+
While these tools perform near-miracles on out-of-focus or severely degraded portraits, they come with a significant archival risk: over-fabrication. If pushed too hard, a neural network will replace the unique likeness of your ancestor with a generalized, synthetic face that looks unnaturally “plastic” or smooth.
The Selective Blending Technique
To maintain strict historical fidelity, never accept a facial restoration pass at full strength. Instead, follow a non-destructive layer-blending workflow:
Generate the AI Pass: Run your prepped, high-resolution scan through your chosen facial enhancement tool.
Import as a Secondary Layer: Bring the AI-processed output back into your editing workspace as a separate layer directly above your original scan.
Apply a Layer Mask: Mask out the background, clothing, and hair, isolating the AI adjustments strictly to the facial features (eyes, nose, and mouth).
Reduce Layer Opacity: Lower the opacity of the AI layer to between 30% and 50%.
By blending the AI layer with your original scan, you introduce just enough restored clarity to define softer features while allowing the authentic photographic underlying data and natural skin texture of the original capture to shine through.
V. Step 4: AI Upscaling and Grain Management
Standard digital upscaling uses mathematical interpolation (like Bicubic or Lanczos) to create new pixels by averaging the color values of neighboring pixels. This approach invariably results in soft, blurry edges when scaling up smaller vintage prints or cropped 35mm frames.
Modern AI upscalers utilize deep convolutional neural networks and diffusion models to predict fine structure, generating clean edges and sharp details that traditional algorithms cannot achieve.
+-----------------------------------------------------------------------+| INTERPOLATION VS. AI UPSCALING |+-----------------------------------------------------------------------+| Traditional Interpolation: [Pixel A] ---> (Averages) ---> [Pixel B] || Result: Blurry, soft edge transitions || || AI Model Upscaling: [Pixel A] ---> (Neural Net) -> [Pixel B] || Result: Reconstructed structural detail |+-----------------------------------------------------------------------+
The Grain Conservation Challenge
The primary obstacle when applying AI upscaling to film photography is handling silver halide grain. Denoising algorithms frequently misinterpret random film grain as unwanted digital noise, smoothing it out into a muddy, painted texture. Film grain is not a defect—it is the structural matrix that carries the original image information.
Best Practices for Preserving Film Texture
Disable Aggressive Denoise Filters: Prior to upscaling, turn off or minimize any built-in AI noise reduction toggles. Allow the model to upscale the existing texture alongside the structural data.
Use Architecture-Specific Models: Select upscaling models explicitly trained on natural photographic imagery rather than digital art, anime, or compressed web graphics. Models tuned for photo reproduction handle subtle tonal transitions far more accurately.
Reintroduce Uniform Micro-Grain: If an AI model leaves certain smooth areas (like skies or out-of-focus backgrounds) looking overly scrubbed, add a subtle, uniform fine-grain overlay across the composite. This unifies the newly synthesized AI details with the authentic areas of the original capture, delivering a cohesive, natural photograph.
VI. Step 5: Colorization & Final Tonal Balance
Applying color to a vintage monochrome capture or restoring severely faded dyes in an early color print requires a delicate balance between automated prediction and manual refinement. Neural colorization models analyze contextual elements—such as skin tones, skies, trees, and recognizable clothing items—to infer and render plausible color channels across a grayscale image.-------------------------------------------------------------------+
| BALANCED COLORIZATION PIPELINE |+-----------------------------------------------------------------------+an ] || | || v || [ Neural AI Colorization Pass ] --------> Base Color Layer || | || v || [ Manual Hue & Saturation Tuning ] ------> Refined Tonal Palette || | || v || [ Final Matched Composite ] +-----------------------------------------------------------------------+
Navigating Neural Limitations
While AI colorization algorithms can provide a rapid baseline, they operate purely on historical probabilities, not historical facts. AI cannot know the exact shade of an ancestor’s wool coat, military uniform, or eye color. Furthermore, neural models frequently leave unnatural color bleeding around high-contrast edges or introduce blotchy, muted patches in complex background areas.
Refining the Colorization Workflow
Establish a Clean Base: Always complete physical repair and tonal balancing before running a colorization pass. Neutralizing unwanted color casts in the original paper base ensures the AI interprets contrast and shadow density accurately.
Treat AI Output as a Base Layer: Bring the AI-colorized render into your editing suite as a dedicated layer set to Color blend mode over your restored monochrome master. This preserves the precise tonal values and sharpness of your original scan while applying only the hue and saturation channels from the AI pass.
Execute Manual HSL Adjustments: Use local Hue, Saturation, and Luminance (HSL) adjustments to correct color accuracy. Soften overly vibrant skin tones, equalize uneven background washes, and adjust historic details—such as military regalia or period attire—to ensure authentic representation.
VII. Recommended Software Toolkit
In line with my my Recommendation Philosophy, my goal is to help you achieve professional-grade results on a realistic budget thus open-source choices are listed first.
Low-opacity facial feature reconstruction on heavily degraded portraits.
Adobe Photoshop / Lightroom Classic
Mainstream Commercial
Industry-standard layer masking, Generative Fill, and Neural Restoration filters.
Topaz Photo AI
Mainstream Commercial
Offline AI upscaling, face recovery models, and noise/grain management.
DxO PureRAW
Mainstream Commercial
DeepPRIME demosaicing and optical lens correction straight off camera scans.
VIII. Key Takeaways
Source Quality Dictates Results: AI algorithms cannot invent authentic optical information out of thin air. A high-resolution, uncompressed 16-bit scan provides the essential dynamic range and structural data needed for clean processing.
Always Blend AI Layers: Avoid relying on all-in-one automated fixes at 100% opacity. Blend AI-processed passes with your master scan using layer masks and reduced opacity (typically 30% to 50%) to retain genuine character and facial identity.
Protect Authentic Film Grain: Silver halide grain carries the physical structure of an analog photograph. Use targeted localized inpainting and carefully tuned upscaling models to avoid smudging natural texture into smooth digital artifacts.
Keep Color Restrained: Treat neural colorization as a starting point. Refine color layers manually to prevent unnatural color bleeding and maintain historical accuracy.
IX. Conclusion
Modern artificial intelligence tools offer unprecedented capabilities for breathing new life into damaged, faded, or out-of-focus vintage photographs. However, the true art of archival restoration lies in restraint. By pairing powerful machine-learning algorithms with non-destructive, layer-based editing techniques, you can lift decades of wear and tear without stripping away the authentic optical qualities that give historical photographs their soul.
Was This Post Helpful?
Building this free educational archive is a labor of love! If this post helped you solve your problem today, please leave a like below to let me know you enjoyed it. Your support helps keep this site 100% free and ad-free for the archiving community.
Loading…
Other posts in this new series – The Hardware & Optical Precision Loop.
Title / Reference:Pik-Fix: Restoring and Colorizing Old Photos (Xu et al., 2023)
Why it’s authoritative: Published at the IEEE/CVF Winter Conference on Applications of Computer Vision (WACV), this paper presents a state-of-the-art end-to-end deep learning framework designed specifically for complex photo degradation (cracks, fading, noise) combined with colorization.
Source: Library of Congress — Federal Agencies Digital Guidelines Initiative (FADGI) & PREMIS
Title:Digital Preservation at the Library of Congress
Why it’s authoritative: The Library of Congress sets the global standard for digitization quality, preservation metadata (PREMIS), and format sustainability for historical visual media. .
Title:Digital Preservation and the Open Archival Information System (OAIS) Framework
Why it’s authoritative: IEEE defines the engineering and data integrity practices (such as ISO 14721 OAIS) required to keep digitized assets intact over long periods without bit rot or file format decay.
How to Generate and Verify File Checksums (MD5 / SHA-256)
In protecting your archive against bit rot when digitizing film or preserving legacy photographic archives, creating high-resolution archival master files is only the first step. Over time, digital media faces a silent threat: bit rot (data degradation caused by storage media wear, cosmic rays, or subtle read/write errors).
Without proactive tracking, a corruption event might go unnoticed until you open a TIFF file years later only to find half the image replaced by gray bars or distorted pixels. Thankfully, I have noty yet experienced this issue.
Generating and periodically verifying checksums gives your archive a digital fingerprint. If a single bit in a 100 MB file flips, the calculated checksum changes completely, warning you immediately so you can restore the damaged file from a clean backup.
What Is a Checksum? (MD5 vs. SHA-256)
A checksum (or cryptographic hash) processes every byte in a file through a mathematical algorithm to output a unique string of characters.
MD5 (Message Digest 5): Faster to compute across massive image libraries, generating a 32-character hexadecimal string. While no longer recommended for cryptographic security due to collision vulnerabilities, it remains widely used for simple storage error detection.
SHA-256 (Secure Hash Algorithm 256-bit): The modern gold standard for data integrity. It generates a 64-character hash and offers robust protection against corruption and collision risks.
How to Generate and Verify Checksums
1.Generate Checksums on macOS (Terminal):Native command line setup.
Open Terminal and navigate to your archive folder. To generate a manifest of SHA-256 hashes for all TIFF images in a directory:
Bash
cd /Volumes/ArchiveDrive/2026_Film_Scans/
shasum -a 256 *.tif > checksums.sha256
This creates a plain text file named checksums.sha256 containing every file name alongside its unique hash.
2.Generate Checksums on Windows (PowerShell):Native Windows utility.
Open PowerShell and navigate to your target folder:
If the terminal returns OK for every file, your archive remains byte-for-byte identical to the day it was hashed. Any FAILED status signals bit decay, alerting you to swap the affected file with a healthy redundant backup.
Integrating Checksums into Batch Conversion & Open-Source Negative Inversion Workflows
When processing raw camera scans of film negatives, checksum verification fits naturally into every stage of the pipeline:
Export & Hash Archival Masters: Export your final inverted images as 16-bit uncompressed TIFF files. Generate a master checksums.sha256 file in the destination folder prior to syncing the directory to long-term cold storage or cloud mirrors.
Schedule Periodic Audits: Run a automated audit script every 6 to 12 months. Verifying hashes periodically ensures bit rot is caught and corrected long before you ever open the file for editing or publishing.
Was This Post Helpful?
Building this free educational archive is a labor of love! If this post helped you solve your problem today, please leave a like below to let me know you enjoyed it. Your support helps keep this site 100% free and ad-free for the archiving community.
Other posts in this new series – The Hardware & Optical Precision Loop.
Here are two authoritative resources covering digital preservation, bit rot, and file fixity strategies for legacy collections:
Digital Preservation Coalition (DPC) HandbookThe DPC provides comprehensive technical standards on bit preservation, checksum generation, and media decay risks. It covers hardware monitoring, fixity checks, and strategies to protect long-term digital media against silent data corruption.
Library of Congress – Personal Digital ArchivingThe Library of Congress details practical guidelines for preserving high-resolution digital master files, photos, and family history collections over decades. It covers file format selection, storage redundancy, and long-term digital maintenance practices.
Self-Hosted Portals, Private Web Galleries, and Digital Picture Frames
Sharing your archive with non-technical family presents some hurdles and challenges. Building a pristine digital archive—complete with RAW masters, 3-2-1 backups, and rich IPTC metadata—is a monumental achievement. However, your archive only achieves its true purpose when family members can actually enjoy, search, and connect with the history you have preserved.
For non-technical relatives, navigating deep folder trees on a hard drive, opening uncompressed TIFF files, or reading raw EXIF data can feel overwhelming. If the hurdle to view the collection is too high, your hard work risks sitting invisible on a server.
This guide explores practical, user-friendly digital delivery methods that bridge the gap between technical preservation and everyday family enjoyment. I will cover Self-Hosted Portals, Private Web Galleries, and Digital Picture Frames
💡 Looking for key camera digitizing tutorials?
If you work with—or want to work with—reflective physical media or specialty formats, explore my links to dedicated camera digitizing guides below:
Never give non-technical family members direct write access to your primary preservation backup. Always stream or share lightweight Access Copies (optimized JPEGs with embedded metadata) through a clean presentation interface.
2. Option A: Self-Hosted Media Portals (Self-Reliance & Privacy)
If you prefer to maintain total control over your data without uploading thousands of family photos to commercial third-party cloud services, self-hosted web platforms offer the perfect middle ground.
Privacy: Your family media remains stored safely on your own hardware.
Facial Recognition & Search: Modern self-hosted platforms allow non-technical family members to search by person, date, or location using your embedded IPTC tags.
User Access Controls: Create guest accounts with read-only permissions so relatives can browse without accidentally deleting or renaming original files.
3. Option B: Private Cloud Web Galleries (Zero Setup for Relatives)
For distant relatives who simply want a web link they can open on a tablet or phone without logging into a home network, private cloud galleries offer maximum convenience. I have made full use of this method to share family photos with relatives thousands of miles away.
Best Approaches
Password-Protected Cloud Folders: Platforms like Proton Drive, Nextcloud, or encrypted cloud storage allow you to share read-only gallery links with custom passwords.
Static Web Galleries: Using open-source static site generators (such as Sigal or jGallery), you can convert a folder of exported JPEGs into a lightweight, static HTML website that can be hosted for free or low cost on personal web space.
Curated Family Albums: Avoid dumping 10,000 unsorted images at once. Create thematic “Highlight Reels” (e.g., The Smith Family 1950–1960, Grandpa’s WWII Letters, or Vintage Summer Vacations).
4. Option C: Digital Picture Frames (Passive Ambient History)
One of the most effective ways to bring historical photos back into daily life—especially for older relatives who do not use computers or smartphones—is through connected digital picture frames.
Wi-Fi-Enabled Frames: Modern smart frames allow you to remotely manage and push curated historical photo playlists directly to a frame sitting in a relative’s living room.
Ambient Discovery: Seeing a restored photo of their childhood home or a grandparent fade onto the screen sparks spontaneous storytelling and memory sharing during family visits.
Optimization Tip: Export images specifically resized to match the screen resolution of the frame (typically 1920 by 1080 or 2048 by 1536) to keep file transfer sizes small and loading instant.
Full searchability, metadata browsing, high-res downloads
Distant Family & Cousins
Private Cloud Web Gallery Link
Fast, mobile-friendly, no app installation required
Elderly Relatives / Non-Tech Family
Wi-Fi Digital Picture Frame
Zero technical interaction required; passive daily enjoyment
Digital Delivery Checklist
[ ] Protect Master Files: Confirm that family sharing platforms point to exported JPEGs, not master RAW/TIFF files.
[ ] Curate First: Organize photos into manageable, story-driven albums before sharing links.
[ ] Preserve Metadata: Ensure your export settings retain embedded IPTC captions, dates, and keywords so details display automatically in web viewers.
[ ] Provide Clear Instructions: Include a short note or user guide explaining how relatives can search or request full-resolution copies.
Was This Post Helpful?
Building this free educational archive is a labor of love! If this post helped you solve your problem today, please leave a like below to let me know you enjoyed it. Your support helps keep this site 100% free and ad-free for the archiving community.
Loading…
Other posts in this new series – The Hardware & Optical Precision Loop.
Here are three authoritative and relevant external resources that provide technical documentation, privacy guidelines, and best practices for self-hosting and distributing digital media to non-technical audiences:
When you digitize family history, you act as both a technical technician and an archival steward. While scanning old photo albums usually brings joy, digitizing private letters, personal diaries, medical records, or legal documents can uncover sensitive information that was never intended for a public audience or even a broad family group.
Uncovering unexpected adoption papers, mental health struggles, financial hardships, or painful interpersonal conflicts creates a delicate challenge: how do you preserve historical truth without causing unnecessary harm or distress to living relatives?
This guide explores the ethics of family archiving, practical privacy tiers, and safe redaction workflows for digitizing sensitive personal records.
1. The Archival Ethic: Preservation vs. Publication
In professional archiving, conservators draw a clear line between preservation (safekeeping the complete historical record) and publication (granting broad access to view the record).
As a general rule in archival ethics, the right to privacy belongs to living individuals.
Living Relatives: Information regarding living individuals—including medical history, financial records, government identification numbers, or sensitive personal correspondence—should always require explicit consent before sharing.
Deceased Ancestors: While legal privacy rights generally end at death, ethical considerations regarding dignity and family harmony remain. Ask yourself whether publishing a painful detail serves a genuine historical purpose or simply creates unnecessary family conflict.
2. Establishing Access Tiers for Your Digital Archive
Rather than taking an “all-or-nothing” approach to your digital collection, organize your family archive into three distinct access tiers.
Tier 1: Public / Broad Family Access
Content: Family portraits, public records, historical land deeds, news clippings, and non-sensitive correspondence.
Distribution: Shared via cloud galleries, private family websites, or USB drives distributed at family reunions.
Tier 2: Restricted Family Access
Content: Personal diaries, candid letters discussing family friction, adoption records, or documents containing sensitive personal opinions.
Distribution: Restricted to immediate adult family members or specific designated researchers using password-protected cloud folders.
Tier 3: Sealed / Vault Access
Content: Highly sensitive medical records, modern financial documents, or private legal papers involving living relatives.
Distribution: Encrypted preservation backups accessible only by you (and designated successors via your Digital Archive Letter of Instruction). These items remain sealed until a predetermined future date (e.g., 50 years after creation or after the death of named individuals).
3. Safe Redaction Workflows for Digital Documents
When preparing documents for Tier 1 or Tier 2 sharing, you may need to redact (black out) sensitive personal data such as Social Security numbers, home addresses, or medical diagnoses.
[ Original Digital Capture ] ---> [ Non-Destructive Layer Mask ] ---> [ Export Flattened JPEG ]
(Full raw text intact) (Blacks out sensitive text) (Permanently burned-in)
The Dangerous Redaction Pitfall
Never use a standard black drawing tool inside a basic PDF viewer or image editor and save it over the original file. In many standard PDF tools, drawing a black box over text simply overlays a visual shape—anyone can select, copy, and paste the hidden text underneath it.
Step-by-Step Non-Destructive Redaction Method
Preserve the Master Uncut: Always keep your original, high-resolution unredacted RAW/TIFF master file in your Tier 3 vault archive.
Create an Access Working Copy: Export a duplicate JPEG or TIFF copy specifically intended for redaction.
Burn In the Redaction: In your image editor (such as GIMP, Darktable, or Photoshop), draw solid black boxes over the sensitive text, then flatten the image layers into a single-layer JPEG or PNG file. Flattening permanently destroys the underlying pixel data beneath the black box in that specific file, ensuring the redacted information cannot be recovered from the access copy.
Update Metadata: Ensure that IPTC metadata or OCR text tags attached to the access copy do not contain the hidden text you just blacked out visually.
4. How to Handle Unexpected Historical Discoveries
If your camera-digitizing setup reveals a startling family secret—such as an unrecorded marriage, hidden adoption, or severe legal trouble—follow these diplomatic steps:
Pause Before Sharing: Do not immediately email or upload newly digitized discoveries. Give yourself time to analyze the context of the document.
Consult Closest Kin First: If the discovery directly impacts a living relative (such as a parent or sibling), speak with them privately before sharing the document with the broader family tree.
Document Historical Context: When including sensitive historical items, write an accompanying text note explaining the historical context objectively, rather than leaving room for gossip or misinterpretation.
Ethical Archiving Checklist
[ ] Separate Preservation from Access: Keep complete, unredacted original scans sealed in your master backup while sharing modified copies.
[ ] Protect Living Relatives: Obtain consent before sharing medical, financial, or personal details regarding living family members.
[ ] Flatten Redacted Exports: Confirm that blacked-out text on shared copies is fully flattened so hidden pixel data or OCR text cannot be extracted.
[ ] Establish Access Tiers: Group your files into Public, Restricted, and Vault folders based on sensitivity.
Was This Post Helpful?
Building this free educational archive is a labor of love! If this post helped you solve your problem today, please leave a like below to let me know you enjoyed it. Your support helps keep this site 100% free and ad-free for the archiving community.
Loading…
A collection of vintage photographs and handwritten letters on a wooden table, ready for digitization and archival preservation.
Other posts in this new series – The Hardware & Optical Precision Loop.
Here are three authoritative and relevant external resources that provide guidelines on ethics, privacy, and sensitive record handling in archival administration:
When camera-digitizing film, converting raw captures into balanced positives is the most critical post-processing step. While subscription plugins dominate commercial workflows, open-source editors provide industrial-grade tools without recurring costs or vendor lock-in.
For Linux users and open-source enthusiasts, Darktable features one of the most sophisticated film inversion tools available: Negadoctor. Built on the physics of Kodak’s Cineon printing system, it provides exceptional control over film-base subtraction, density curves, and color balance.
This step-by-step guide walks you through setting up an open-sourceDarktable pipeline and mastering the Negadoctor module.
Based on my recommendation policy – to help you achieve professional-grade results on a realistic budget.
1. Why Choose Open-Source Film Inversion?
Commercial film inversion tools often operate as “black boxes.” They apply automated preset curves that hide the underlying color math. While fast, this approach limits your ability to recover tricky shadow details or adjust non-standard film stocks.
Non-Proprietary Archiving: Your edit instructions are stored in lightweight, human-readable sidecar files (.xmp). You retain total ownership of your metadata and processing pipeline indefinitely.
Physics-Based Tone Curves:Darktable’s scene-referred workflow treats the raw capture as linear light data, preventing crushed blacks or clipped highlights during conversion.
Cross-Platform Parity:Darktable runs natively across Linux, macOS, and Windows, allowing you to move your archival workspace freely between operating systems.
2. Pre-Inversion Prep in Darktable
Before enabling the Negadoctor module, you must prepare your raw image frame to ensure accurate light measurements.
Set the white balance module to camera neutral or passthrough.
Negadoctor is specifically engineered to handle the film base color offset internally.
Step 2: Disable Default Tone Curves
Ensure that Darktable’s automatic filmic rgb or sigmoid modules are disabled for film inversion shots. You want the raw image feeding into Negadoctor to remain strictly linear.
Step 3: Crop to the Active Image Frame
Use the crop module to frame the active image area. While you will need a small strip of unexposed film edge for calibration in the next step, cropping out room ambient light or copy stand borders prevents exposure calculation errors.
3. Step-by-Step Guide to the Negadoctor Module
Open the color tab in Darktable’s darkroom view and activate negadoctor. The module is divided into three logical tabs that mirror traditional darkroom printing: Film Properties, Correction, and Print Paper.
[ Raw Negative Capture ]
||
\/
1. [ Film Properties ] --> Subtracts orange film base & sets D-Min / D-Max
||
\/
2. [ Correction ] --> Fixes color casts across shadows, midtones & highlights
Tab 1: Film Properties (Establishing the Film Base)
This tab neutralizes the orange mask (film base) of color negative film and establishes the dynamic range limits of the emulsion.
Color of the Film Stock:
Click the color picker eye-dropper next to “color of the film stock.”
Draw a box over a clean section of unexposed film rebate (the clear orange film edge or space between frames).
Negadoctor will automatically calculate and subtract the exact RGB values of your film base.
D-Min (Minimum Density):
Use the eye-dropper to sample the darkest part of the negative (which corresponds to the brightest highlight in the final picture, such as the sky).
D-Max (Maximum Density):
Use the eye-dropper to sample the clearest, lightest part of the negative emulsion (which corresponds to deep shadows in the final picture).
Tab 2: Correction (Balancing Color Casts)
If your inverted positive displays a color cast in the shadows or highlights, the Correction tab allows you to adjust color balance without distorting overall exposure.
Casts in Shadows: Use the shadows color bias slider to eliminate lingering color shifts in dark regions (for example, removing a green cast from dark jacket fabric).
Casts in Highlights: Use the highlights color bias slider to ensure bright clouds or white paper retain natural neutral tones.
Tab 3: Print Paper (Tone Curves & Contrast)
The final tab simulates exposing the inverted image onto virtual photographic printing paper.
Paper Black / White Points: Adjust the slider to set your absolute black point and white point, ensuring your histogram spans the full dynamic range without clipping.
Paper Gamma (Print Contrast): Increase or decrease paper gamma to control overall midtone contrast. Lower values preserve subtle shadow detail; higher values give the image modern punch and saturation.
4. Saving Presets and Batch Processing
Once you dial in the Negadoctor settings for a specific film roll (e.g., Kodak Portra 400 or Fujifilm Superia), you do not need to repeat the manual calibration for every frame on that roll.
Save a Roll Preset: Click the module preset menu in Negadoctor and select create preset. Name it after your film stock and lighting setup (e.g., Kodak_Gold_200_DichroicLight).
Batch Copy & Paste: In Darktable’s lighttable view, select the calibrated frame, copy its history stack, select the remaining frames from the same roll, and paste the history stack.
Fine-Tune Exposure Only: Because the film base color remains constant across the entire roll, you only need to make minor tweaks to individual frame exposures.
Recommended Open-Source Film Inversion Workflow Checklist
Phase 1: Pre-Capture & Inversion Baseline
[ ] Unexposed Film Base Calibration: Capture a frame of the unexposed film border/orange base. Use this frame to establish a custom white balance to neutralize the orange mask prior to processing.
[ ] Exposure to the Right (ETTR): Set the exposure using the camera’s histogram off the bare backlight to maximize dynamic range without clipping highlights.
[ ] Emulsion Alignment Check: Ensure the film was captured emulsion-side up. Apply a horizontal flip in Darktable during import to correct orientation.
Phase 2: Darktable & Negadoctor Processing
[ ] Initial Framing: Import RAW master files into Darktable and crop to the edge of the image, keeping a small slice of the unexposed orange border visible for sampling.
[ ] Film Properties (Orange Mask Subtraction): Enable Darktable’s Negadoctor module. Use the eye-dropper tool under the Film Properties tab on the unexposed film base sample to automatically remove the film’s orange mask.
[ ] D-Min & D-Max Calibration:
Adjust D-min (minimum density) to set the absolute black point from the film base.
Adjust D-max (maximum density) to set the highlights and capture full dynamic range without blowing out highlight details.
[ ] Print Properties (Tonal & Contrast Mapping):
Adjust Paper Black and Paper Grade (contrast) to simulate darkroom optical printing paper.
Fine-tune Print Exposure to balance midtones and skin tones naturally.
[ ] Color Cast Elimination: Use the color balance adjustments within Negadoctor to neutralize any remaining color shifts across the shadows, midtones, and highlights.
Phase 3: Final Crop, Export & Archival Metadata
[ ] Final Crop: Perform a non-destructive final crop to remove the film borders.
[ ] Archival Master Export: Save the converted positive image as a 16-bit uncompressed TIFF for archival masters or high-quality WebP/JPEG for sharing and web display.
[ ] Metadata Embedding: Apply IPTC metadata fields (Title, Description/Transcription, Keywords, and Archive Codes) to ensure long-term searchability.
Was This Post Helpful?
Building this free educational archive is a labor of love! If this post helped you solve your problem today, please leave a like below to let me know you enjoyed it. Your support helps keep this site 100% free and ad-free for the archiving community.
Loading…
Other posts in this new series – The Hardware & Optical Precision Loop.
Safeguarding your digital master files is a vital act of preservation.
Safeguarding your digital master files is a vital act of preservation. Capturing a high-resolution digitizer file is only half the archival process. Once light hits your camera sensor and the shutter closes, the longevity of that digital master depends entirely on the file format you choose for storage.
While camera manufacturers encourage saving files in their native, proprietary RAW formats, relying on these closed standards poses serious risks to long-term accessibility, color accuracy, and data integrity.
Converting camera-native RAW files into Adobe Digital Negative (DNG) creates a standardized, future-proof master file designed for decadal preservation. Below is an overview of why proprietary RAW formats fall short for archival workflows, how DNG solves these structural vulnerabilities, and the key configurations required to protect your digital archive.
The Operational Risks of Proprietary RAW Formats
Camera manufacturers write sensor data using proprietary formats such as Sony .ARW, Nikon .NEF, or Panasonic .RW2. While these formats function well during immediate post-processing, relying on them for multi-decade digital preservation introduces three critical vulnerabilities:
Software Deprecation: RAW processing software routinely drops support for legacy camera models over extended periods. If a manufacturer closes or stops updating its software Development Kits (SDKs), future operating systems may no longer render your RAW files correctly.
Proprietary Metadata Lock-in: Proprietary tags and white balance calculations depend on closed SDKs. If you rely on manufacturer-specific sidecar files or proprietary metadata tags, color rendering can drift when opened in non-native software.
Bit-Rot Vulnerability: Proprietary RAW files rarely contain standardized, accessible checksums. Without embedded validation data, silent bit rot (gradual media corruption) can damage pixel data undetected until you attempt to open the file years later.
Converting proprietary capture files to an open specification like Adobe Digital Negative (DNG) resolves these issues by wrapping your original sensor data in a publicly accessible, standardized structure.
Technical Comparison: Proprietary RAW vs. Archival DNG
Feature / Metric
Proprietary RAW (.ARW, .NEF, .RW2)
Open Archival DNG (.DNG)
Specification Standard
Closed / Proprietary
Open Public Specification (ISO standard candidate)
Key Technical Considerations for Master DNG Creation
When building a dedicated archival workflow around DNG files, several specific technical choices ensure maximum fidelity and compatibility:
1. DNG Conversion Preserves Native Sensor Pixels
A common misconception is that converting to DNG “alters” or re-demosaics the RAW data. When converted correctly using lossless settings, the DNG wrapper contains the exact un-demosaiced sensor data recorded at capture. No pixel data, dynamic range, or bit depth is sacrificed during conversion.
2. Embedded Camera Profiles (.dcp) vs. External Sidecars
I have personally learned that when digitizing vintage prints, slides, and negatives, exact color matching is paramount. Proprietary RAW workflows often rely on separate .xmp or color profile sidecar files that can easily become unlinked during file transfers. DNG allows custom camera profiles—such as those created with an X-Rite ColorChecker or Calibrite target—to be embedded directly into the file’s header.
3. Automated Integrity Verification
DNG files automatically calculate and embed an MD5 checksum of the raw image data upon creation. Archival management software and custom command-line scripts can read this embedded value during routine storage audits to verify that not a single bit of image data has degraded over time.
Best Practices for Archival Workflow Implementation
To safeguard your digital master files against software deprecation, metadata separation, and data loss, adhere to these four core guidelines:
Convert to DNG Upon Ingestion: Convert proprietary camera RAW files to losslessly compressed DNG format during the initial import process. Retain original linear image data without altering sensor pixel values or applying lossy compression.
Embed Color Targets and Profiles: Always capture a calibrated color target under your camera-digitizing light setup. Embed the resulting custom DNG Camera Profile (.dcp) directly within the master DNG file metadata.
Decide on Original RAW Storage: If required by specific institutional guidelines, the DNG converter offers an option to embed the original proprietary RAW file directly inside the DNG. For most independent archives, saving the lossless DNG alone is sufficient and saves approximately 30–50% in storage overhead compared to keeping dual copies.
Verify Integrity Periodically: Utilize DNG’s internal checksums during routine backup validation routines to detect bit rot across local drives and Network Attached Storage (NAS) before corruption causes unrecoverable data loss.
Was This Post Helpful?
Building this free educational archive is a labor of love! If this post helped you solve your problem today, please leave a like below to let me know you enjoyed it. Your support helps keep this site 100% free and ad-free for the archiving community.
Loading…
Other posts in this new series – The Hardware & Optical Precision Loop.
Why it’s relevant: This is the primary institutional authority on digital preservation. The Library of Congress evaluates DNG as an open, publicly documented specification (extending TIFF/EP) and identifies it as a preferred, non-proprietary format for safeguarding unrendered sensor data over decades.
Best used for: Providing institutional backing for why open standards reduce format obsolescence risks compared to closed, vendor-specific RAW files (like .NEF, .CR3, or .ARW).
Why it’s relevant: Developed by the American Society of Media Photographers (ASMP) with funding from the Library of Congress, dpBestflow is the definitive digital architecture framework for photographers. It breaks down the practical trade-offs between camera-native RAW and converted DNGs, including metadata safety, sidecar file elimination, and long-term file verification (checksums).
Best used for: Referencing real-world archival workflows, metadata integrity, and why converting to a standardized master file protects digital assets from orphaned software support.
Digitizing fragile physical media requires balancing maximum image capture quality against the physical limitations of historical materials.
Digitizing fragile physical media requires balancing maximum image capture quality against the physical limitations of historical materials. When working with bound scrapbooks, wide fold-outs, or permanently sealed framed images, standard flatbed scanning often risks torn paper or cracked bindings. I can assure you that for this type of media a mirrorless digital camera and macro lens is the only solution that allows you to professionally capture these complex physical artifacts safely.
1. Scrapbooks & High-Relief Bound Volumes
Scrapbooks present two main challenges: deep gutters that create dark shadow valleys and uneven surfaces caused by glued-in artifacts (coins, ribbons, thick cardstock).
Avoid Flatbed Presses: Pressing a thick, non-flat scrapbook flat against scanner glass puts severe stress on the spine and can pop attached elements off the page.
Use a 90° or 120° Book Cradle: Support the covers of the scrapbook at a comfortable angle using dense foam wedges or a book cradle. This prevents the spine from breaking under its own weight.
Cross-Polarized Lighting: Position two continuous lights at 45 degree angles relative to the page. Place cross-polarizing films over your lights and a circular polarizer on your camera lens to strip away glare caused by glossy photos, plastic sleeves, or adhesive tape.
Focus Stacking for High Relief: Because scrapbooks have varying depths across a single page, shoot at an aperture of f/8 to f/11. If objects like thick badges or pop-ups still fall out of focus, capture 3–4 bracketed focus shots and stack them in post-processing. Many mirrorless cameras can now do this for you in-camera (Panasonic Lumix).
2. Panoramic & Multi-Panel Fold-Out Media
Map inserts, family trees, and fold-out photo panoramas often exceed the field of view of a standard fixed overhead setup and tend to curl along fold lines.
Non-Destructive Flattening: Never press hard on aged paper folds. Use polished, clear acrylic weights (or snake weights wrapped in acid-free tissue) placed strictly on the blank margins to hold edges down.
Stitching Image Sections: Rather than moving the camera back and losing resolution, keep the camera height fixed and capture the fold-out in overlapping segments (30% overlap per shot). Stitch the images using software like Adobe Lightroom, Hugin, or PTGui.
Managing Shadow at the Fold: Direct light straight at a crease creates dark line shadows. Angle your key light parallel to the fold line rather than perpendicular to it to wash light through the valley of the crease.
3. Framed Photos Behind Glass (Without Unframing)
The Issue: Delicate, sealed, or glued heritage frames cannot always be opened safely without destroying the backing, paper dust seal, or historical labels.
When you must digitize a photo while it remains behind original glass, your primary enemy is reflection—from the room, the camera rig, and even your own clothing.
Kill Ambient Light: Work in a completely dark room. Any ambient ceiling light or window light will manifest as a wash of reflection on the frame glass.
Wear Dark Clothing: Stand behind a black screen or wear a dark matte long-sleeve shirt so your body does not reflect off the glass.
Set Off-Axis 45 degree Lighting: Position twin lights at 45 degree angles to the frame. At this angle, direct reflection bounces away from the camera lens rather than straight back into it.
Attach a circular polarizer (CPL) to your camera lens.
Rotate the lens filter until reflections off the glass completely disappear. This exposes the texture of the photo beneath without a hazy veil over the glass surface.
Align Sensor Parallel to Glass: Ensure the camera sensor is perfectly parallel to the glass plane to avoid keystone distortion and corner softness. Use a small mirror placed flat on the glass; when you see the camera’s lens center reflected precisely in the middle of your viewfinder frame, alignment is exact.
Practical Reference Guide
Artifact Type
Primary Risk
Lighting Angle
Essential Tool
Thick Scrapbook
Spine rupture & shadow valley
45 degree cross-polarized
Book cradle / foam wedges
Large Fold-Out
Crease tears & uneven focus
Parallel to crease
Acrylic weights & stitch software
Sealed Framed Image
Surface reflection & glare
45 degree strict off-axis
Lens CPL filter + lighting sheets
More details relevant to this subject can be found in my two related posts
Building this free educational archive is a labor of love! If this post helped you solve your problem today, please leave a like below to let me know you enjoyed it. Your support helps keep this site 100% free and ad-free for the archiving community.
Loading…
Other posts in this new series – The Hardware & Optical Precision Loop.
Maintained by the US National Archives and Records Administration (NARA), this guide provides authoritative preservation and digitizing standards for complex three-dimensional items. It details safe overhead camera positioning, face-up capture to protect fragile bindings, and proper handling techniques for items with folded or multi-layered inserts.
A comprehensive technical overview from a professional archival digitization institution. It covers practical studio workflows for handling complex layout challenges, including masking multi-page fold-outs to reduce glare, capture sequencing for tipped-in items, and book-cradle padding strategies for thick or uneven media.
Digitizing 3D History & Complex Formats: Stereoviews, View-Master Reels, and Multi-Layered Ephemera
Digitizing vintage media often goes beyond single flat prints or standard film strips. Formats designed for 3D viewing—such as stereoview cards and View-Master reels—along with multi-layered physical objects like photo albums and fold-out maps, present unique capture challenges.
This guide details lighting protocols, mounting techniques, and optical settings for digitizing stereoscopic media and complex ephemera safely and accurately.
💡 Looking for a different format?
If you are working with reflective physical media or specialty formats, explore my dedicated guides below:
Part 1: Capturing Stereoview Cards and View-Master Reels
Stereoscopic media relies on two slightly offset images side by side to create depth. To capture these items faithfully, you must maintain uniform lighting, precise alignment, and proper trans-illumination or surface illumination.
1. 19th and 20th-Century Stereoview Cards (Reflective Media)
Stereoviews (Holmes stereo cards, curved mounts, tissue stereoviews) often feature curved cardstock designed to fit vintage viewers.
Managing Curved Cardstock: Never force curved stereo cards completely flat under glass, as this can crack the cardboard backing or emulsion. Use padded edge clamps or gently weighted archival strips along the outer margins only.
Lighting Setup: Position dual diffuse LED lights at 45-degree angles to ensure even illumination across both left and right images. For tissue stereoviews (translucent prints designed for dual viewing), combine front reflective light with subtle rear trans-illumination.
Digital Capture Strategy: Capture both left and right images in a single high-resolution frame to preserve the original card mount and publisher details, or frame each side individually at 1:1 magnification for full digital stereo alignment.
2. View-Master Film Reels (Transmissive Media)
View-Master reels contain seven pairs of tiny Kodachrome film chips (approximately 11.5 x 10.5 mm each) mounted in a circular paper disc.
Backlighting Requirements: Use a high-CRI (95+) LED light panel underneath the reel to ensure true color rendering.
Masking Flare: Cut a custom black matte card to cover all unused reel windows, exposing only the active stereo pair or individual film chip during capture. Light leaking through adjacent windows degrades contrast and creates stray reflections in the lens.
Optics & Aperture: Because the individual film chips are extremely small, high magnification is required. Use a dedicated macro lens at 1:1 magnification or higher. Set your aperture to f/5.6 or f/8 to maximize center-to-edge sharpness while avoiding diffraction.
Part 2: Handling Scrapbooks, Ephemera, and Oversized Fold-Outs
Scrapbooks, photo albums with attached items (ribbons, clippings, dried flowers), and multi-page fold-out maps present variable depth across a single surface. Standard flatbed scanners or heavy glass plates will crush delicate items or fail to maintain focus across uneven planes.
Scrapbooks, photo albums with attached items (ribbons, clippings, dried flowers), and multi-page fold-out maps all present variable depth across a single surface. Standard flatbed scanners or heavy glass plates will crush delicate items or fail to maintain focus across uneven planes. I have found that capturing these types of media with a mirrorless camera and macro lens is the best—if not only—solution.
In generations past it was common to embelish photo albums with multi-layer ribbons, flower petals etc.
Managing Multi-Layer Albums
1. Managing Varying Plane Heights and Depth of Field
When photographing objects with multi-layered surfaces, strict flat-field macro rules must adapt to account for depth variation.
Aperture Adjustment: While standard flat scanning relies on f/5.6 or f/8, multi-layered ephemera requires stopping down to f/11 to expand the depth of field. This keeps both the base page and elevated elements (such as glued photos or ribbons) in sharp focus without introducing severe diffraction artifacts.
Focus Placement: Set your critical focus point on the mid-plane of the object’s height profile rather than the bottom paper page.
2. Gentle Stabilization Without Glass Pressure
Book Cradles & Foam Blocks: Use acid-free foam wedges or an adjustable book cradle to support the album spine at a 90-to-120-degree angle. Never force a historic binding flat at 180 degrees.
Archival Polyethylene Straps: Hold stubborn pages open using clear, inert polyethylene straps anchored around the support board, keeping pressure off delicate hinges.
Raking Light for Texture: To showcase the physical construction and depth of scrapbooks, offset one light source slightly lower (around 30 to 35 degrees) to produce subtle shadows around raised edges, photo corners, and ephemera.
3. Capturing Oversized Fold-Out Maps and Inserts
Multi-page fold-outs attached inside books often exceed the coverage area of a single camera frame or exceed copy stand height limits.
Sectional Grid Capture: Digitze oversized fold-outs in overlapping sections (grids) with 20% to 30% overlap between shots. Maintain fixed exposure, white balance, and lens settings across all frames.
Stitching Alignment: Combine the grid sections using automated panorama/photomerge tools, making sure to select a flat/rectilinear projection setting to prevent perspective warping.
Was This Post Helpful?
Building this free educational archive is a labor of love! If this post helped you solve your problem today, please leave a like below to let me know you enjoyed it. Your support helps keep this site 100% free and ad-free for the archiving community.
Loading…
Other posts in this new series – The Hardware & Optical Precision Loop.
To support the techniques discussed in the previous section, the following links provide resources from leading archival institutions, preservation guidelines, and specialized equipment providers. They offer practical advice, technical standards, and institutional best practices for handling non-flat, fragile, and varied-depth items.
Institutional Guidelines and Standards
These resources define the high-level standards used by memory institutions like the Library of Congress and the National Archives to ensure preservation-quality digitization of complex materials.
Federal Agency Digital Guidelines Initiative (FADGI): This is the paramount US standard for still-image digitization of cultural heritage. While technical, it establishes the quality metrics (the “star” ratings) that professional-grade overhead scanners strive to meet. It defines how sharp focus must be maintained across a depth plane.
The Library of Congress – Preservation Guidelines for Digitizing Library Materials: A crucial resource detailing handling precautions. While it covers various scanning methods, it provides specific guidance on when to use book cradles, the risks of flattening brittle papers, and general preservation principles for items with weak joints or restricted openings.
National Archives and Records Administration (NARA) Technical Guidelines for Digitizing Archival Materials: NARA provides comprehensive guidelines for creating digital surrogates of archival records. While focused on 2D, the guidelines address the complexities of bound materials and oversize items, emphasizing stabilization during capture.
Northeast Document Conservation Center (NEDCC) – Preservation Leaflets: NEDCC is a leading preservation lab. Their leaflets offer very practical advice on digitizing fragile items, providing context on why non-contact methods are often the only safe option for unique artifacts.
The companies that build the hardware and software for high-end archival capture often publish case studies and technical papers explaining how their technology handles varied depth and delicate items.
Digital Transitions (DT) Heritage: This is a prominent provider of overhead planetary scanners and digitization stands. Their resource library is invaluable for understanding the mechanics of capture—explaining how laser-guided focus, specialized lighting, and book cradles prevent damage to scrapbooks and maps.
Townsweb Archiving – “How to Digitise Large Format Maps, Plans and more”: This blog post offers practical, operational advice specifically focused on large, awkward, or multi-page fold-out materials, discussing large format book rests and scanner beds that provide necessary support.
Flatness Calibration & Depth-of-Field Precision: Achieving Razor-Sharp Camera Scans
When camera-digitizing flat media—whether photo prints, delicate documents, or film negatives—achieving uniform edge-to-edge sharpness is one of the most challenging hurdles. At macro working distances, the depth of field (DoF) is remarkably thin, often measuring only a fraction of a millimeter. Achieving razor-sharp camera scans requires careful and precise capture processes.
If your camera sensor is even slightly tilted or your media isn’t perfectly flat, parts of your scan will inevitably fall out of focus. This guide covers the physical calibration tools, optical principles, and depth-of-field calculations needed to achieve razor-sharp focus across every pixel.
1. The Geometry of Misalignment: Why Sensor Plane Tilt Destroys Sharpness
When shooting standard subjects at distance, a minor tilt in your camera position goes unnoticed because the depth of field absorbs small variations in distance. At macro magnifications (1:1 or 1:2 ratios), depth of field shrinks dramatically.
  [ Tilted Camera Sensor ]      /   <- Out of focus at top edge
                               /
                              /
                             /
  [ Flat Media Surface   ]  --------------------  <- In focus only where plane intersects
The Focal Plane Fallacy
Many assume that stopping down to f/11 or f/16 will cover up sensor-plane alignment errors. However:
Curvature of Field: Most lenses naturally exhibit field curvature, meaning the plane of sharpest focus is slightly bowl-shaped rather than flat.
Diffraction Tax: Stopping down too far causes light waves to bend around the lens iris, introducing overall image softness (diffraction) that destroys micro-detail like film grain or paper texture.
2. Step-by-Step Alignment & Calibration Methods
Camera and scanner setup for digitizing archival photographs and documents.
To eliminate tilt, your camera sensor plane and the copy board (or film stage) must be parallel along both the X-axis (pitch) and Y-axis (roll).
Method A: The Mirror Technique (Zero-Cost Precision)
The mirror alignment method uses basic reflection optics to achieve precise parallel alignment.
Setup: Place a flat, high-quality mirror directly on your copy bed or film stage, centered beneath the lens.
Manual Focus: Focus manually on the front element of your lens visible in the mirror reflection.
Adjustment: Adjust your copy stand head or leveling base until the center of the lens reflection is centered on the center crosshairs of your display grid.
Verification: Zoom in to 100% on live view. When the lens reflection is centered and both the top and bottom rim of the lens filter ring enter focus simultaneously, your sensor is parallel to the stage.
Method B: Digital Laser Alignment (High Repeatability)
If you frequently assemble and break down your digitizing rig, a dedicated laser alignment tool offers fast, repeatable accuracy.
Place the laser emitter on your copy board.
The laser projects a beam up to a target plate attached to your camera lens cap.
Adjust your copy arm until the returning laser beam reflects back into its origin point.
3. Depth-of-Field Precision at Macro Scale
To calculate your exact depth of field when camera-digitizing, standard DoF tables do not apply because they do not factor in macro magnification (m).
The total depth of field (DoF) at macro distances is determined by four key variables:
Lens Aperture (N): The f-stop setting (such as f/5.6 or f/8).
Circle of Confusion (c): Sensor-specific detail tolerance (approx. 0.015 mm for Micro Four Thirds, 0.020 mm for APS-C, 0.030 mm for Full Frame).
Magnification Ratio (m): The scale of reproduction (e.g., 0.5 for a 1:2 copy of a 6×7 negative, or 1.0 for 1:1 35mm film capture).
Sweet Spot: Offers safety margin for slightly warped prints.
f/16
1.0 (1:1 35mm)
Approx. 1.36 mm
Avoid: Diffraction noticeably softens fine film grain.
4. Physical Flattening Techniques
Even with perfect alignment, curved or warped media will breach your depth-of-field envelope. Use these safe physical techniques to maintain flat media:
                  [ Top Glass/ANR Layer ]
-----------------------------------------------------------
     [ Warped Media ] -> ~~~~~~~~~~~~~~~~~~~~~~~  (Flattened)
-----------------------------------------------------------
                  [ Base / Light Pad    ]
Anti-Newton Ring (ANR) Glass: For curled photo prints or unmounted film negatives, place a sheet of ANR glass on top. The etched texture prevents Newton’s rings while pressing the surface flat.
Border Mask Tension: For film strips, use spring-loaded or magnetic film carriers that grip the non-image borders to stretch the film flat without touching the image area.
Weight Calibration: When digitizing thick documents or album pages, use archival weighted snakes or acrylic blocks along the margins to keep pages parallel to the copy bed.
Archival snakes are flexible, tubular weights filled with glass beads or stainless steel shot and covered in unbleached cotton. They are used by conservators to gently hold down curled media without scratching the surface or transferring acidic chemicals).
Practical Checklist for Flatness and DoF Precision
[ ] Check Alignment: Perform the mirror test before every digitizing session.
[ ] Select Aperture: Set your lens to its optical sweet spot (typically f/5.6 to f/8).
[ ] Inspect Live View at 100%: Check all four corners of your image frame in Live View to confirm uniform sharpness.
[ ] Flatten Safely: Use border tension or ANR glass on stubborn, curled media to keep variations within your calculated depth-of-field tolerance.
Was This Post Helpful?
Building this free educational archive is a labor of love! If this post helped you solve your problem today, please leave a like below to let me know you enjoyed it. Your support helps keep this site 100% free and ad-free for the archiving community.
Loading…
Other posts in this new series – The Hardware & Optical Precision Loop.
Here are three authoritative and relevant external resources that provide technical guidelines, optical calculations, and practical methods for camera alignment and depth-of-field precision:
Why it’s relevant: An accessible, highly stable reference explaining how close working distances shrink depth-of-field tolerances down to fractions of a millimeter during macro capture.
Why it’s relevant: The official FADGI portal hosting technical standards for spatial resolution, sensor-to-subject planarity, and field flatness required for professional cultural heritage digitization.
Physical and Optical Precision dictates that any light from your backlight that bypasses the outer edge of the film frame enters the camera lens.
When scanning transparent media—such as 35mm negatives, medium format film, or mounted slides—any light from your backlight that bypasses the outer edge of the film frame enters the camera lens directly. This unwanted illumination is known as non-image light seriously impacts your physical and optical precision. I have used the Essential Film Holder extensively in my work and I found out very early on that it really needed black masking around its’ sides.
Veiling Flare: Unmasked light surrounding the film bounces between the glass elements inside your camera lens. This creates a haze that reduces contrast and washes out shadow details.
Color Casts in Shadows: Diffused backlight bounce distorts color accuracy during negative inversion, particularly in dense areas of the film.
Edge Halos: Unmasked slide mounts or film sprockets create bright halos along the borders of your digitized frame.
How to Mask Your Setup
Use Matte Black Materials: Craft an aperture mask using dense black cardstock (400 GSM or higher) or thin black foam board. Avoid glossy materials, which can reflect light back onto the underside of the film. For something like the Essential Film holder mask the light that leaks around the sides of the holder.
Cut Precise Apertures: Especially for flat lighting panels (which are often not optimal), measure the exact active image area of your film format (for example, 24mm x 36mm for standard 35mm film) and cut a clean window with a utility knife and metal ruler.
Block the Backlight: Place the mask directly over your light source, around the film holder or flat light panel, so that the only light reaching the lens passes through the image frame itself. This is especially important if you are forced to use simple strip negative holders laid on a flat light panel.
Add a Lens Baffle: On a copy stand, ambient room light can bounce off the top surface of the film into your lens. Using a deep, matte-black lens hood or a DIY cardboard tube between the lens hood and film carrier creates a sealed optical path.
2. Sensor-to-Subject Alignment & Lens Sweet Spot
When shooting flat media at close distances, even a fraction of a degree of tilt between your camera sensor and the film or print causes uneven sharpness across the frame. Because depth of field at macro distances is measured in millimeters, physical parallelism is essential.
Place a flat, high-quality mirror directly on your copy stand baseboard or film stage.
Look through your camera’s electronic viewfinder or live-view screen with grid lines enabled.
Adjust your camera head until the center of your lens reflection aligns perfectly with the center crosshairs on your screen.
When the reflection of the lens aperture is centered in the frame, your sensor plane is parallel to the subject plane.
Choosing the Optical Sweet Spot
Depth of field and lens sharpness follow a distinct curve when shooting flat subjects with a macro lens.
Sharpness vs. Aperture (Macro Lens)
High ^ / \
| / \ <-- Sweet Spot (f/5.6 - f/8)
| / \
| / \ (Diffraction Blur at f/16+)
Low +---------------------->
f/2.8 f/8 f/16 f/22
Wide Open (f/2.8 – f/4): Macro lenses show subtle corner softness and field curvature wide open. Depth of field is too shallow to absorb minor paper buckles or film curls.
The Sweet Spot (f/5.6 – f/8): This range offers optimal center-to-edge sharpness and provides enough depth of field to keep the entire frame sharp without introducing optical diffraction.
Stopped Down (f/11 – f/22): While stopping down increases depth of field, optical diffraction sets in, softening fine details and film grain across the entire frame.
3. Managing Newton’s Rings: ANR Glass vs. Border Suspension
Newton’s rings are rainbow-like concentric interference patterns that occur when two smooth transparent surfaces—such as a glossy print or smooth film base—touch glass with a microscopic air gap between them.
       [ Top Glass Surface ]
~~~~~~~~~~~~~~~~~~~~~~~~~~~~~~~~~  <-- Microscopic Air Gap
       [ Smooth Film Base  ]       <-- Produces Interference Rings
Curled prints, glass plates, unmounted film strips
Flattens stubborn media completely; etched surface scatters light to prevent rings.
Requires careful cleaning; matte texture must sit outside the focal plane.
Border Masking / Suspension
Flat film strips, mounted slides
Eliminates glass from the optical path entirely; zero added reflections or glass surfaces to clean.
Will not physically flatten severely curled or warped media.
Emulsion-Side Contact
Single-glass setups
The textured emulsion side of film rarely forms Newton’s rings against standard glass.
Requires flipping or mirror-inverting the image in post-processing.
Pre-Flight Checklist for Precision Scanning
Before starting a digitizing session, run through this quick checklist:
Clear Dust: Clean your light pad, film holders, and lenses with an air blower.
Mask Excess Light: Cover all exposed areas of your light pad around the carrier with matte black cardstock.
Verify Alignment: Perform a quick mirror check to confirm your sensor is parallel to the copy bed.
Set Lens Aperture: Set your aperture to your lens’s sweet spot (typically f/5.6 or f/8).
Inspect Live View: Zoom in to 100% on live view to check for glare, soft corners, or Newton’s rings before capturing your final image.
Was This Post Helpful?
Building this free educational archive is a labor of love! If this post helped you solve your problem today, please leave a like below to let me know you enjoyed it. Your support helps keep this site 100% free and ad-free for the archiving community.
Loading…
A collection of vintage photographs and handwritten letters on a wooden table, ready for digitization and archival preservation.
Other posts in this new series – The Hardware & Optical Precision Loop.
Here are three authoritative and relevant external resources that provide practical guidelines, optical science, and industry standards on masking stray light and preventing flare in film digitizing setups:
FilmLab Desktop is a standalone application (available for macOS, Windows, and Linux) designed specifically for camera-based film digitizing (DSLR or mirrorless camera scanning). Rather than functioning as a Lightroom plugin or relying on complex tone-curve inversion tricks. FilmLab operates as an independent post-processing tool that converts camera RAW image files of film negatives directly into positive images.
Imatest: Stray Light (Flare) Documentation & PhysicsWhy it’s relevant: For readers who want the deep optical science behind the phenomenon. Imatest provides industry-standard technical documentation on how non-image light creates “extended source veiling glare” across image sensors and why masking is required to isolate true frame contrast.
FilmLab Desktop is a standalone application (available for macOS, Windows, and Linux) designed specifically for camera-based film digitizing (DSLR or mirrorless camera scanning). Rather than functioning as a Lightroom plugin or relying on complex tone-curve inversion tricks,
FilmLab operates as an independent post-processing tool that converts camera RAW image files of film negatives directly into positive images. If you have followed all of my guidance on how to achieve optimum results when camera digitizing film, FilmLab Desktop will have no issues playing its part in turning them into archival masterpieces.
I have routinely used FilmLab since its inception, both in Windows and Linux, and now I wouldn’t be without it. It aligns perfectly with my policies, stated at the end of my home page, about suitability for all potential users’ budgets.
Core Features & Capabilities
A professional photo editing interface showing color negative processing adjustments for digitizing vintage photographs.
Standalone RAW Processing Engine: FilmLab ingests native RAW files directly from most major camera manufacturers (Sony, Canon, Nikon, Panasonic, Fujifilm) without requiring Lightroom, Photoshop, or intermediate conversion utilities.
Darkroom-Inspired Color Processing: Instead of standard RGB sliders, FilmLab uses color science modeled after optical printing in a darkroom. Adjustments use color-subtractive filter sliders (Yellow, Magenta, Cyan) along with Exposure, Contrast, and Brightness controls.
Input & Light Source Calibration: Recent updates allow users to select sensor profiles and backlight light-source profiles (e.g., standard LED light pads, high-CRI light sources like Negative Supply pads) to compensate for specific light-panel color spikes before conversion.
Format Flexibility: Works seamlessly with 35mm, medium format (120/220), and large format negatives, as well as color negative film, black-and-white negatives, and color slide (transparency) film.
Export Options: Converted positives can be exported as 8-bit JPEGs for quick sharing or as 8-bit/16-bit uncompressed TIFFs for further editing in external image editors.
How FilmLab Desktop Performs in Practice
Based on my recommendation policy – to help you achieve professional-grade results on a realistic budget.
1. Speed and Simplicity
The primary strength of FilmLab Desktop is its low barrier to entry and rapid workflow. Where traditional camera-scanning workflows often require converting images frame-by-frame inside Adobe Lightroom using paid plugins like Negative Lab Pro (NLP) or manually setting up complex, inverted tone curves, FilmLab detects the film frame and renders an accurate color positive almost instantaneously upon loading.
2. Color Accuracy & Base Fog Handling
For standard, well-exposed color negative films (e.g., Kodak Portra, Fuji Pro 400H, Gold 200), FilmLab delivers pleasing skin tones and balanced contrast out of the box. Its algorithms automatically analyze the orange film base mask and neutralize it smoothly. However, heavily expired film, film with dense base fog, or specialty stocks (such as LomoChrome Purple) can occasionally confuse the automatic conversion engine, requiring manual tweak of the filter sliders.
3. File Handling & Archival Output
Exporting to 16-bit TIFF retains significant dynamic range from the original camera RAW file, providing ample headroom for further local adjustments (like spot dust removal or dodging and burning) in programs like GIMP, Photoshop, or Darktable.
Pros & Cons Summary
Advantages
Limitations
No Adobe Lock-in: Runs standalone on macOS, Windows, and Linux without requiring a Lightroom subscription.
Limited Retouching: Lacks localized editing tools (no dust spotter, gradient masks, or local brush adjustments).
Intuitive UI: Minimalist interface with analog darkroom-style CMY color sliders.
Less Granular Control: Power users seeking deep control over individual color channels or custom HSL curves may find it less flexible than Lightroom + NLP.
Fast Ingestion: Directly processes camera RAW files in batch.
Batch Automation Limits: Frame auto-cropping across large batches of slightly misaligned film strips can require manual fine-tuning.
Final Verdict
FilmLab Desktop fills a crucial niche in the analog digitizing ecosystem. It is an ideal fit for photographers who use camera-scanning setups and want a straightforward, non-subscription standalone app to convert film negatives without taking on the complexity or cost of an Adobe software suite.
While extreme archivist setups or heavily damaged/expired film may still benefit from specialized editing suites or dedicated plugins, FilmLab Desktop remains one of the fastest, most accessible ways to get authentic analog colors out of camera-captured negatives.
Was This Post Helpful?
Building this free educational archive is a labor of love! If this post helped you solve your problem today, please leave a like below to let me know you enjoyed it. Your support helps keep this site 100% free and ad-free for the archiving community.
Loading…
A collection of vintage photographs and handwritten letters on a wooden table, ready for digitization and archival preservation.
Here are two external resources that evaluate FilmLab Desktop directly alongside other film conversion options and competitors in the camera-scanning space:
Focus: Compares standalone applications like FilmLab Desktop and SmartConvert directly against plugin solutions like Negative Lab Pro. It breaks down color accuracy, ease of use, workflow speed, and overall value for photographers looking to convert film without relying on an Adobe subscription.
Focus:Offers a detailed comparative breakdown across major standalone film conversion software (including FilmLab Desktop, SmartConvert, and LightBox) as well as non-standalone alternatives (Negative Lab Pro and Capture One).It evaluates key criteria including pricing models, cross-platform compatibility, batch processing, and non-destructive RAW editing.
An image from 1902 appears, showing the exact doorstep where your great-grandmother stood.
Imagine clicking a pin on a digital map of Liverpool, Coventry, or a small rural parish in Ireland. An image from 1902 appears, revealing a map of your ancestors’ journeys and places.
Imagine the power this gives you in mapping your ancestors’ journeys. Click a pin on a digital map of Liverpool, Coventry, or a small rural parish in Ireland, and an image from 1902 appears, showing the exact doorstep where your great-grandmother stood.
When we digitize family photos, we preserve moments in time. However, without knowing where those images were taken, they become isolated points in history. Modern smartphone photos automatically include GPS coordinates, but vintage film scans and historical prints lack this data. Here, I will guide you through the process of rectifying this.
By adding precise latitude and longitudemetadata to your digitized files, you can turn a static photo album into an interactive visual record of your family’s migrations. Here’s how to connect historical research with image metadata.
1. Finding the Coordinates: A Genealogist’s Investigation
Before tagging an image, determine its original location. Ancestral locations often have changed names, altered street layouts, or disappeared entirely due to urban development.
Key Tools for Finding Historical Locations
Historical Census Records and Parish Registers: Census records often include street names and house numbers, while parish registers for baptisms, marriages, or burials provide details about exact churches or churchyards.
Side-by-Side Historical Mapping: Platforms such as the National Library of Scotland (NLS) Map Images offer tools for comparing 19th-century Ordnance Survey maps with modern satellite imagery. This enables users to identify the locations of lost streets or demolished buildings.
Google Maps / OpenStreetMap: After identifying the modern counterpart or remaining street corner, right-click the exact spot in Google Maps to copy the precise decimal latitude and longitude (e.g., 52.4068, -1.5197).
A representation of geotagging vintage images.
2. The Result: Interactive Family Atlases
Once your archived collection contains GPS data, the benefits extend beyond organizing files:
Future-Proofing Context: In the future, your descendants won’t have to guess where a photograph was taken; the coordinates will be embedded in the digital archive file.
Geographic Filtering: Tools like digiKam or darktable offer a “Map View” to display your entire photo archive plotted across the world.
Mapping Migration Routes: You can visually trace your family’s journey—watching pins move from a small churchyard in rural Ireland to the boarding docks of Liverpool and eventually to an industrial, terraced street in Coventry.
About these vital applications:
1. digdigiKam
What It Is
digiKam is a free, open-source, full-featured digital asset management (DAM) and photo editing application. Available on Windows, macOS, and Linux, it serves as a self-hosted alternative to software like Adobe Lightroom Classic or ACDSee.
Key Features & Strengths:
Large-Scale Organization: Easily handles libraries containing hundreds of thousands of photos organized across local drives, external hard drives, or network-attached storage (NAS).
Deep Metadata & Tagging System: Offers hierarchical tagging, color labels, star ratings, and customizable search criteria based on EXIF, IPTC, and XMP metadata.
Built-in Image Editor & Batch Queue: Includes non-destructive editing tools, RAW file decoding (via LibRaw), lens correction, facial recognition tagging, and a powerful batch queue manager for processing hundreds of images at once.
Open Database Architecture: Uses SQLite or MySQL databases to store metadata, ensuring your file structure remains clean and accessible without proprietary lock-in.
Best Used For:
Photographers, archivists, and home users who want a rich graphical interface (GUI) to view, organize, tag, edit, and curate large collections of digitized photos or camera files.
2. ExifTool
What It Is:
Created by Phil Harvey, ExifTool is a free, open-source command-line application and Perl library designed for reading, writing, and editing metadata across more than 400 file formats, including images, video, audio, and documents.
Key Features & Strengths:
Unmatched Metadata Access: Unlike standard desktop applications that only read basic tags, ExifTool provides raw access to nearly every metadata tag imaginable. This includes EXIF, IPTC, XMP, GPS coordinates, ICC profiles, and proprietary camera maker notes.
Automation & Scripting: Running from the terminal/command prompt, ExifTool simplifies scripting, automation, and bulk batch operations across thousands of files simultaneously.
File Management & Renaming: It can automatically rename or move files into folder hierarchies based on embedded metadata—for example, sorting photos by year/month/day derived from their original creation dates.
Data Export:ExifTool can extract and export metadata directly into clean JSON, CSV, or XML files for archiving or database imports.
Best Used For:
Power users, developers, and archivists who require precise batch metadata modification, command-line automation, or back-end engine capabilities. (Notably, tools like digiKam rely on ExifTool behind the scenes.)
Gaining insight and knowledge from parents, and especially grandparents.
Grandparents advising archivist about people and places in digitized vintage family photos.
When you hold an old family photograph, you hold a physical record of a moment in time—but without context, it’s just silver and paper. While digitizing (capturing sharp, color-accurate digital copies) preserves the image, it is the living memory of your family that preserves the story.
As I have stated in several of my posts, gaining the insight and knowledge of parents, and especially grandparents, is the single most critical step in turnkey archive preservation. Here is why their input is completely irreplaceable:
1. Unlocking the “Invisible” Metadata
Digital asset management systems rely on metadata—names, dates, locations, and relationships. While software can index files, it cannot look at a black-and-white group portrait from 1954 and tell you:
Who is in the frame: A grandparent can identify third cousins, forgotten neighbors, or childhood friends who would otherwise remain anonymous forever.
The “Where” and “When”: A vague backdrop of trees becomes “the back garden of the house in Coventry before the extension was built in ’62.”
Key Milestones: They can link a seemingly ordinary casual photo to a specific life event—a farewell party before emigration, a christening, or a celebration after a tough hardship.
Next Steps & Recommended Reading
Adding location data is just one part of creating a complete digital archive. If you’re setting up your archival software or working with location-based tagging, check out these related internal guides:
Building this free educational archive is a labor of love! If this post helped you solve a problem today, please leave a like below to show your appreciation. Your support helps keep this site 100% free and ad-free for the archiving community!
Loading…
A collection of vintage photographs and handwritten letters on a wooden table, ready for digitization and archival preservation.
These are internal posts that are ancillary to the actual digitizing process but still important.
Why it’s authoritative: The NLS holds one of the largest digitised historic map collections in the world. Their split-screen viewer allows researchers to align 19th- and 20th-century Ordnance Survey maps directly alongside modern satellite photography, making it the gold standard tool for locating redeveloped streets or vanished landmarks in the UK and beyond.
Why it’s authoritative: As the official manual for digiKam, this guide details the exact mechanics of reading, writing, and editing EXIF/IPTC/XMP geolocation blocks. It’s an ideal reference link for readers who want deep-dive technical specifics on managing coordinates within open-source archival software.
Why it’s authoritative: Maintained by Phil Harvey, ExifTool is the universal standard for image metadata manipulation used across digital preservation and IT industries. This documentation explains how GPS tag structures work and how to execute precise coordinate injections.
Media Types That Can Be Digitized using a Digital Camera and Macro Lens.
Media Group
Media Type
Physical Format Details
Primary Capture Priority
Recommended Equipment
Source
Film
35mm Negative / Slide
Standard 35mm strips, rolls, or mounted slides; includes Kodachrome and high-density transparencies.
High Priority Original
Mirrorless/DSLR camera (20MP+), 1:1 Macro Lens (60mm-105mm), Copy Stand, CRI 95+ LED Light Source, Film Carrier (Valoi, Essential Film Holder, or Nikon ES-2), Tethering Cable.
[1-47]
Film
120 Film
Medium format roll film (6×4.5, 6×6, 6×7, 6×9); prone to curling; includes 120/220 sizes.
High Priority Original
High-resolution Mirrorless/DSLR (Pixel-Shift recommended), 1:1 Macro Lens, Copy Stand, CRI 95+ Light Table, Medium Format Film Carrier, Tethered Workstation.
[1-10, 13-18, 20-23, 25-40, 42-49]
Film
126 Film
Instamatic square format cartridge film; often found as color slides or negatives.
High Priority Original
Mirrorless/DSLR camera, 1:1 Macro Lens, Copy Stand, CRI 95+ LED Light Panel, Specific 126 Film Mask/Carrier, Tethering Software.
Large format sheet film; may have glass plate or cellulose base.
High Priority Original
High-resolution Camera (Pixel-Shift/Multi-shot), 1:1 Macro Lens, Precision Backlighting/Light Table, Large Format Film Holder, Copy Stand with Horizontal Arm.
[1-7, 9, 10, 13-18, 20-23, 25-44, 46, 47, 50, 51]
Artwork
Daguerreotypes / Tintypes
Early metal-based photographic processes; silver-plated copper (Daguerreotypes) or iron plates (Tintypes); highly reflective.
High Priority Original
Mirrorless/DSLR with Macro Lens, Copy Stand, Cross-Polarization (Polarizing Filters + Sheets), Black Shroud/Baffles to control reflections, High-CRI LED lighting.
Bound collections of prints; may include fragile pages, adhesive, annotations, and curated context.
Secondary Source
Mirrorless/DSLR camera, Copy Stand or Tripod, Diffused LED Lighting (45-degree angle), Weights or Transparent Acrylic Sheets for flattening, Remote Shutter.
The Voices on the Reverse: Unlocking the Hidden History on the Back of Family Photos
On the front of the silver-gelatin print, an air-raid warden stands resolutely in a dark wool uniform, a white ‘W’ painted on his steel helmet. He looks calm, almost stoic. But when we carefully flip the fragile paper over, the hidden history of this family photo is revealed. The true story whispers to us from the reverse side, written in frantic, thick pencil—perhaps rushed during a quiet moment between sirens:
“Post 14, Greyfriars Green. A noisy night, but we all pulled through. 14th November 1940”.
The Back of many Photos is a “Time Capsule”
In all family photo collections, the front of a vintage photo was often meant for public display—in an album or on a mantelpiece. The back, however, served as a “private diary” that, over time, was often forgotten.
In fact, the back contains the direct thoughts, handwriting style, ink choices, and real-time reactions of our ancestors. It is a physical thumbprint of their existence. For many of us, this brief (or at times not-so-brief) writing connects us to our ancestors as much as the image on the front. That is why a professional digital archive must record both sides of the print.
Why a Digital Camera and Precision Macro Lens Are Essential
When people use flatbed scanners or other slow methods, they either skip scanning the back entirely or end up with two separate files (e.g., Scan001.jpg and Scan002.jpg) lost in a sea of digital folders. Over time, these files become separated, and their connection is broken forever.
By utilizing a modern, precision digital camera and macro lens, the frustrating limitations of the flatbed scanner are left behind forever. The hazy secrets of the past can now be expertly extracted, seamlessly locking together the visual front, visual back, and searchable metadata into a single, holistic digital archive.
Using a professional camera to digitize old family photos for preservation and archiving.
The Double-Sided Camera-Digitization Workflow
1.Establish a ‘Flip’ Rhythm:Keep your pairs organized.
To avoid mixing up which back belongs to which front, digitize them in a strict, unvarying sequence. Capture the front first, then immediately flip the print horizontally and capture the back. Your camera’s memory card will naturally pair them as consecutive file numbers (e.g., _0045.RAW and _0046.RAW).
2.Batch-Crop and Align:In Photoshop, Darktable, or DigiKam.
Import your RAW files. Crop the front and back to their respective edges. If the back contains faint pencil marks, use a simple tone curve or local contrast adjustment in Photoshop or Darktable to make the faded handwriting crisp and legible.
Using IPTC metadata is a magic ‘act of translation’: Over decades, pencil graphite smudges, ink fades, and paper decays. By transcribing that faded penciled message into the IPTC Description field, you are effectively carving those words into digital stone.
IPTC Description/Caption Field: [Transcription of handwritten pencil note on reverse]: “Post 14, Greyfriars Green. A noisy night, but we all pulled through. 14th November 1940.” Photo shows Air Raid Warden (identified as Great-Uncle Arthur) in ARP uniform, Coventry.
These “scribbles” on the back are clues for deeper historical detective work.
I am a photographer, a digitizer, and an archivist, but I am not a professional genealogist. Therefore, I have included three external links at the bottom of this page to help you gather more guidance on the “detective work” discussed in the following bullet points:
A faded developer’s stamp (e.g., “John Playford, Photographic Chemist, Coventry”) can help date a photo.
A military postmark or a censor’s stamp tells you where a soldier was stationed when they mailed the picture home.
Digitizing these markings allows the reader to zoom in on stamps and signatures that are barely visible to the naked eye under normal room lighting.
To build a professional and sustainable archiving workflow, start with these essential guides, carefully sequenced in order of importance.
Confused by any technical jargon in this guide? Check out my [Full 55-Term Jargon-Free Glossary] to get clear, simple definitions of all the archiving terms used here.
Was This Guide Helpful?
Building this free educational archive is a labor of love! If this technical breakdown helped you solve a problem today, please leave a like below to let me know you found it useful. Your support helps keep this site 100% free and ad-free for the archiving community!
Camera and scanner setup for digitizing archival photographs and documents.
Mistakes That Ruin Your Archival Quality (And Fixes)
You’ve finally decided to rescue your family’s vintage negatives, slides, or old prints from the back of the closet. Even better, you’ve chosen camera digitizing over a slow, clunky flatbed scanner. It’s a brilliant move—using a modern mirrorless or DSLR camera with a macro lens offers incredible speed, gorgeous dynamic range, and professional-grade resolution.
But there is the catch.
Unlike an enclosed flatbed scanner, a camera-based digitizing rig is an open-air system made of multiple moving parts: a copy stand or tripod, a light source, a lens, and a film holder. Because the system is completely open, the line between a flawless, archival-quality digital preservation and a muddy, blurry mess comes down to a matter of millimeters and basic physics.
It is incredibly frustrating to spend a weekend capturing hundreds of family heirlooms, only to realize later at your computer that every single image suffers from soft corners, weird color casts, or washed-out contrast.
The good news? The most catastrophic mistakes made by home archivists have nothing to do with how expensive your camera is. Instead, they are simple setup errors that can be completely eliminated with a few clever, zero-cost adjustments.
In this guide, we will break down the top pitfalls in camera digitizing, look at exactly how they ruin your digital images, and give you simple, foolproof solutions to ensure your digital archive is tack-sharp and color-perfect on the very first try.
Why Focus on These Pitfalls? (A Quick Note for My Readers)
When you digitize family history, you aren’t just taking a picture; you are creating a digital master file that needs to last for generations. Neglecting the fine details of your setup doesn’t just lower image quality—it means you might have to redo the entire project down the road. Let’s look at how to get it right the first time.
Camera digitizing (using a DSLR or mirrorless camera to scan film negatives, slides, or prints) offers incredible speed and dynamic range compared to old flatbed scanners. However, as previously discussed, it relies on a multi-part physical setup rather than an enclosed box. This makes it incredibly easy for small configuration errors to ruin an entire batch of archives.
The Pitfalls and Solutions
We will now discuss the five most common issues, followed by their solutions. While this post frequently refers to film negatives, all information applies equally to photographic prints.
A home workstation captures and digitizes old family photographs using a camera and laptop
1. The Parallel Alignment Pitfall
The single most common mistake for home archivists is assuming their camera is perfectly parallel to the film stage just because it “looks straight.”
The Mistake: Not using a mirror or a dedicated bubble level to align the sensor plane with the film holder or baseboard.
The Quality Impact:Keystoning and uneven planes of focus. Because a macro lens has an incredibly thin depth of field, if the camera is tilted even by one degree, one side of the digital image will be tack-sharp while the opposite corner or edge will be noticeably blurry.
Statistic: In film digitizing forums, dynamic troubleshooting threads reveal that roughly 70% of “Why is my macro lens soft on the edges?” complaints are actually solved by fixing alignment, not by buying a better lens.
2. Ambient Light Leakage and Flare
Many beginners set up their digitizing rigs directly on their office desks, often under standard room lighting or near a bright window.
The Mistake: Failing to mask out excess light from the light box or leaving overhead room lights on during exposure.
The Quality Impact: Severe contrast degradation and muddy shadows. Stray light striking the front elements of the lens or leaking around the edges of the film holder creates a hazy veil across the image. When digitizing color negatives, this ambient light introduces undesirable color casts that are nearly impossible to correct in post-processing.
The Fix: Block Stray Light at the Source. Stray light is the enemy of sharp, high-contrast scans. Always turn off all room lighting and use a matte black cardboard mask around your film holder to block extra light from the light panel. To control light even more, use a deep lens hood—I thread a matte black 30mm extension tube onto my polarizing filter to ensure only direct light from the film reaches the sensor. Finally, move in as close as your macro lens allows to fill the frame completely.
3. Relying on Autofocus Between Frames
Film stocks warp, bend, and sit at slightly different physical heights within a carrier, especially older, curled negatives.
The Mistake: Leaving the camera on continuous or single autofocus (AF), allowing it to refocus for every frame in a strip.
The Quality Impact: Inconsistent focus. Autofocus systems often struggle with low-contrast areas of a negative, grain structure, or dust, frequently locking focus slightly ahead of or behind the emulsion layer.
The Fix: Use manual focus (or lock AF once) by utilizing the camera’s live-view magnification on a highly detailed part of the film (such as text on a sign or prominent film grain). Then, keep it locked for the entire batch.
Home archivists frequently assume that to achieve a completely sharp negative, they should close the lens down as far as possible.
The Mistake: Shooting at extreme apertures like f/16 or f/22 to maximize depth of field.
The Impact on Quality:Diffraction blur. Optical physics dictates that passing light through a tiny aperture causes light waves to bend and interfere with each other, resulting in a soft, muddy image across the entire frame.
Key Data: Most high-quality macro lenses achieve peak sharpness (their “sweet spot”) between f/5.6 and f/8. Shooting at f/22 can reduce the effective resolution of a 24-megapixel sensor, making the image appear as if it were taken with a soft 10-megapixel sensor due to diffraction.
5. Neglecting the Color Rendering Index (CRI) of the light source,
People often try to save money by using a cheap iPad screen, a standard video light panel, or a budget lightbox meant for tracing drawings.
The Quality Impact:Dead, unrecoverable color tones. Cheap LEDs emit a choppy light spectrum with massive gaps in the red or cyan channels. When digitizing color film, these missing wavelengths mean certain colors simply aren’t recorded accurately by the camera sensor, resulting in permanently skewed skin tones or muddy skies.
Stat/Standard: True archival digitizing requires a light source rated at 95+ CRI (or using a specialized metric like TLCI 98+) to guarantee that the full color spectrum of the original film is accurately captured.
The following Camera-Digitizing Step-By-Step Breakdowns provide detailed instructions for archival success.
Diagram of a professional artwork digitizing setup highlighting key features for optimal preservation and quality control.
Here is a step-by-step breakdown of the Mirror Alignment Trick.
What You Need:
A small, completely flat mirror (a compact makeup mirror or a small craft mirror works perfectly).
Your film holder or light panel set up exactly where you intend to digitize.
Step-by-Step Implementation Guide
Step 1: Place the Mirror on the Stage
Lay the mirror completely flat on your baseboard, film holder, or light box, centered directly under your camera lens.
Step 2: Turn on Live View & Open the Aperture
Turn on your camera’s Live View screen. Open your lens aperture to its widest setting (e.g., f/2.8) to minimize the depth of field, which makes focusing highly sensitive and precise.
Step 3: Peer Into the Reflection
On your camera screen, you will see a reflection of your own camera lens looking back at you.
If the camera is misaligned: The lens reflection will be off-center on your screen. You might see more of the left side of the lens barrel, or the reflection will sit towards one of the grid corners.
If the camera is perfectly parallel: The lens reflection will be dead center in the middle of your screen. You will be looking directly down the barrel of the reflected lens.
Step 4: Fine-Tune the Adjustment
Slowly adjust your copy stand head or tripod mount until the reflection of your lens’s front element is perfectly concentric in the middle of your frame. If your camera has a digital grid overlay option on the screen, turn it on to help center the reflection exactly on the crosshairs.
Step 5: Lock It and Focus
Once the reflection is centered, lock your tripod head down tightly.
Now, use manual focus to focus directly on the surface reflection of the lens’s front ring text.
Here is a step-by-step breakdown of the “Masking Blackout” for Maximum Image Contrast
Many home archivist wonder why their digital transfers look hazy, desaturated, or “muddy” compared to professional scans. The culprit isn’t a bad camera or a cheap lens—it’s stray light pollution.
When a large film lightbox sits under a camera, a huge amount of light escapes around the edges of the small slide or negative frame. This excess light spills directly upward, bouncing around inside the camera lens elements, causing veiling flare and instantly killing your dynamic range.
What You Need:
A sheet of thick, matte black cardstock or cardboard (avoid glossy materials, which reflect light).
A utility knife or precision craft knife.
A pencil and a ruler.
Step-by-Step Implementation Guide
Step 1: Measure Your Film Holder
Place your film carrier or negative strip on the lightbox. Measure the exact dimensions of the active image area you want to digitize (for example, a standard 35 mm frame is roughly 36 mm × 24 mm).
Step 2: Cut the Aperture Window
Take your black cardstock and cut out a rectangle that is large enough to completely cover your entire light panel. In the dead center of this cardstock, carefully use your craft knife to cut a window that matches the dimensions of your film frame or film holder opening.
Step 3: Layer the Setup
Place the black cardstock mask directly on top of your light panel, (to cover the whole light panel) then position your film holder over the cut window. If your film holder has any light spilling from the sides, mask that off as well.
The Result: The only light emitting from your entire setup should be the light passing directly through the film emulsion itself. All surrounding white light from the panel is completely blocked out.
Step 4: Kill the Ambient Room Lights
Before you begin digitizing the batch, turn off all overhead room lights and close any nearby window blinds. Your digitizing room should be completely dark, save for the light panel under your camera.
Step 5: Add a Lens Hood (The Final Shield)
As mentioned previously, always attach the lens hood to your macro lens. Even in a dark room, light passing through the negative can glance off the front edge of the lens filter ring. A hood ensures that only light traveling straight down the optical axis reaches the sensor.
    [ Camera Sensor ]
          |   |
      ============  <-- Lens Hood blocks stray side angles
         \     /
          \   /
      ============= <-- Black Cardstock Mask blocks all edge light
      ### [Film] ### <-- Only light passes through the negative
      ======================================================
                     [ Light Box Panel ]
The QualitMy Impact: Before vs. After
What happens to the digital file when you implement this fix:
Before the Mask: The raw image’s histogram will appear compressed, with elevated black points due to stray white light contaminating the shadows. This leaves the image looking washed out. Color negative conversion software (such as FilmLab Desktop, Negative Lab Pro, or Darktable’s invert modules) will struggle, often producing unusual green or magenta color casts in the shadows.
After the Mask: The shadows become rich, deep, and clean. The histogram naturally expands across the full dynamic range. Because the camera sensor is reading only the data from the film, color correction algorithms work flawlessly on the first try.
Professional lab scanners are designed as completely enclosed, pitch-black boxes for a reason. By using a black cardstock mask and turning off the room lights, you effectively transform your open-air copy stand into a controlled, professional-grade scanning environment for pennies.
Here is a step-by-step breakdown of The “Focus-and-Lock” Method: Solving Autofocus Drift
When you examine a strip of vintage negatives, they appear flat to the naked eye. However, under the microscopic scrutiny of a macro lens, film reveals itself as a rolling landscape of waves and curls.
The Problem: If your camera’s autofocus (AF) remains active while scanning a batch, it will re-evaluate focus for every single frame. Since film lacks the sharp contrast edges of modern digital subjects, the AF system often struggles with large areas like sky, smooth skin tones, or stray dust particles on the emulsion. This can lead to the camera locking focus slightly ahead of or behind the actual film grain, resulting in inconsistent sharpness throughout your archive.
The Goal: Lock the camera’s focus precisely onto the physical emulsion layer of the film and maintain it there, completely eliminating the camera’s guesswork.
Step-by-Step Implementation Guide
Step 1: Switch to Manual Focus Mode
Once your camera is securely mounted and aligned, switch your lens or camera body from Autofocus (AF) to Manual Focus (MF).
Step 2: Utilize Live-View Magnification
Activate your camera’s Live View screen and use the digital zoom/magnification button to zoom in to the maximum level (typically 5x or 10x) on a highly detailed section of the film.
What to look for: Seek out sharp text, distinct object edges, or the fine, salt-and-pepper texture of the film grain itself. If the grain structure is clearly visible, you are perfectly focused on the emulsion layer.
Step 3: Use Focus Peaking (Optional)
If your mirrorless camera features Focus Peaking (a function that highlights sharp edges with a bright color such as red or yellow), enable it. Adjust the focus ring until the grain or sharp edges illuminate intensely across the screen.
Step 4: Gaffer Tape the Lens Ring (The Pro Trick)
Once you have achieved perfect focus, do not assume the lens ring will stay in place. Macro lens focus rings can be remarkably loose, and even the micro-vibrations from the camera shutter can cause the focus to drift during an hour-long session. Take a small piece of painter’s tape or gaffer tape and secure the focus ring directly to the lens barrel to prevent accidental movement.
Here is the breakdown for the Suboptimal Aperture (f/22 Trap)
This is a vital concept because it directly dispels a massive myth that many beginner and intermediate photographers bring into the archiving process.
Debunking the f/22 Myth: Finding Your Lens’s “Sweet Spot”
When digitizing flat media like film, slides, or old photographic prints, it seems logical to turn your camera lens’s aperture ring all the way down to f/16 or f/22. After all, in landscape or macro photography, a smaller aperture provides a deeper depth of field, keeping everything sharp, right?
Unfortunately, when it comes to capturing fine details like film grain, this approach introduces a hidden optical trap: diffraction blur.
The Science Made Simple
When light waves travel through a tiny aperture opening (like f/22), they don’t just pass straight through. Instead, the light waves bend around the sharp edges of the aperture blades and interfere with each other. This bending causes the light rays to spread out and overlap on your camera sensor, turning pristine, microscopic detail into a soft, pixelated mush.
The Fine-Line Balance: Sharpness vs. Flatness
Digitizing film is essentially a game of balancing two optical forces:
Lens Sharpness (Aperture Sweet Spot): Every macro lens has an optimal aperture setting where aberrations are minimized and resolution is maximized. For most high-quality lenses, this sweet spot sits right between f/5.6 and f/8.
Film Flatness (Depth of Field): If your film is slightly curled, you do need somedepth of field to keep the entire frame in focus. Moving to f/11 provides a tiny safety buffer for physical variations without completely destroying resolution.
The Sharpness Spectrum
f/2.8 to f/4: The lens is wide open. It may suffer from minor corner softness, vignetting, or a depth of field so paper-thin that any microscopic film curl goes completely out of focus.
f/5.6 to f/8:The Goldilocks Zone. Maximum sharpness, zero diffraction, and crisp rendering of individual film grains.
f/16 to f/22:The Danger Zone. While the entire film strip will technically be in the plane of focus, the entire image will suffer from global softness caused by diffraction. A 24-megapixelcamera sensor will effectively render detail like an old 10-megapixel camera.
Step-by-Step Calibration Guide
To help you find the perfect aperture for your specific camera and lens combination, I give you this simple test procedure:
Step 1: Secure an Ultra-Sharp Frame
Choose a high-contrast negative or slide that you know has excellent detail (such as a photo with fine text, crisp architecture, or distinct, sharp film grain). Set up your alignment and masking perfectly.
Step 2: Shoot a Bracketed Sequence
Switch your camera to Aperture Priority (A) mode or Manual (M) mode. Keep your ISO low (ideally ISO 100) and take identical photos of the exact same frame at:
f/4
f/5.6
f/8
f/11
f/16
Step 3: Inspect at 100% Zoom
Import the images into your editing software (like Photoshop, GIMP, or Darktable) and zoom in to 100% on two specific spots: the absolute center of the frame and one of the far corners. Look closely at the sharpness of the organic film grain structure.
Step 4: Pick the Winner
In almost every case, you will notice the grain structure looks incredibly crisp at f/5.6 or f/8, slightly softer at f/11, and visibly blurred or “smudged” at f/16. Pick the sharpest aperture setting that still keeps all four corners in focus, and lock that setting in for your entire archive project.
💡 Pro-Tip
If you find that your corners are soft at f/8, do not try to solve it by stopping down to f/16. That is treating the symptom, not the underlying problem. Soft corners at f/8 almost always mean your camera isn’t perfectly parallel to the film. Go back to the Mirror Alignment Trick to square up your sensor and keep your lens operating at its peak optical performance.
Here is a step-by-step breakdown of the Pure Spectrum Test: Fixing Cheap Lightboxes
Here is a step-by-step breakdown for resolving the Stray Light and Contrast issue. This quick, zero-cost DIY solution significantly improves image quality.
The quality of your digital archive is directly limited by the quality of the light used. Many home archivists use inexpensive LED tracing pads or tablets, operating under the assumption that “white light is white light.”
The Problem: Standard consumer LEDs achieve a “white” appearance by combining blue light with a yellow phosphor coating. This process creates a substantial deficiency in the red and cyan portions of the light spectrum. When your camera sensor attempts to record color film illuminated by this incomplete spectrum, it results in permanent gaps in your color data. Skin tones appear sickly gray-green, and skies look muddy. No amount of editing in Photoshop or Darktable can correct colors that were never captured in the first place.
The Goal: Ensure you are using a high-CRI (Color Rendering Index) light source that emits a full, continuous spectrum of light wavelengths.
Step-by-Step Calibration and Verification Guide
Step 1: Check the Specs (The 95+ Rule)
Before purchasing or using a light panel, examine the manufacturer’s technical specifications. Specifically, look for a CRI rating of 95 or higher (98+ is ideal) or a TLC index of 98+.
Step 2: The “Blank Frame” White Balance Baseline
To confirm your light source is interacting correctly with your camera, photograph the bare light source (without any film in the holder).
Import this RAW file into your editing software and use the eyedropper tool to set a custom white balance on the white panel.
Check the RGB values. If the light source is high-quality, the resulting color temperature adjustment should appear neutral, and the histogram will display an even, balanced distribution across the Red, Green, and Blue channels.
Step 3: Run a Color Conversion Check
If you are digitizing color negatives with software like FilmLab Desktop, Negative Lab Pro, or darktable’s negadoctor, perform a test run on a familiar family photograph featuring distinct colors (e.g., a red car or a bright blue sky).
Low-CRI failure: You will observe that as you correct the sky color, skin tones aggressively shift to an unnatural orange or green. The colors will seem “uncoupled” and conflict with each other.
High-CRI success: The software will instantly compute a beautiful balance where colors render naturally from the outset, requiring only minor exposure adjustments.
The Final “Pre-Flight” Setup Checklist
Here is a quick, 5-point cChecklist to run through every single time you sit down to digitize a new batch of film:
[ ] Mirror Parallel Check: Is the lens reflection centered on the LCD grid?
[ ] The Blackout Mask: Is all light escaping around the film holder blocked by cardstock?
[ ] The Golden Aperture: Is the lens set between f/5.6 and f/8 (not f/22)?
[ ] Focus Locked: Is the lens switched to MF and taped down on the grain structure?
[ ] Room Blackout: Are the overhead room lights off and window blinds closed?
Now you have a complete, bulletproof blueprint to build a studio-grade digitizing setup at home!
Was This Post Helpful?
Building this free educational archive is a labor of love! If this post helped you solve your problem today, please leave a like below to let me know you enjoyed it. Your support helps keep this site 100% free and ad-free for the archiving community.
Loading…
To build a professional and sustainable archiving workflow, start with these essential guides, carefully sequenced in order of importance.
Confused by any technical jargon in this guide? Check out my [Full 55-Term Jargon-Free Glossary] for clear, simple definitions of all the archiving terms used here.
Here are some excellent, authoritative external resources covering camera-digitizing setup and the mirror alignment technique.
Deep-Dives on Alignment & Physics
Negative Lab Pro’s Official Scanning Guide: A highly respected industry standard guide for camera scanning. It details exact best practices for physical alignment (including the mirror trick), masking stray flare, and choosing light sources with high Color Rendering Index (CRI) ratings.
Tone Photographic – Intro to Camera Scanning: A very clean, practical workflow tutorial that explains how to integrate grid overlays and the mirror alignment trick into a standard digital capture routine.
A young woman, camera digitizing novice and genealogy enthusiast trying to learn about archiving and file structure
If you are a novice, this Guide to Digital Archiving Jargon is all you need.
If you are opening my advanced digitization tutorials and finding terms like RAW, ISO, or Metadata a bit overwhelming, don’t worry! You do not need a degree in photography to digitize your family history. You just need this Guide to Digital Archiving Jargon.
“Preserving your family’s story doesn’t require an engineering degree—just a clear roadmap!”
1. RAW vs. JPEG (The Kitchen Analogy)
When you press the shutter button, your camera captures a massive amount of data. How it saves that data matters:
JPEG is a “Pre-Baked Cake”: A JPEG is a finished photo file. The camera takes the image data, bakes in the contrast and color, compresses it to make the file size small, and throws away the extra “ingredients.” It’s great for texting a photo but bad for archiving. If the photo is too dark or has a heavy yellow color tint, it is very hard to fix later because the extra data is gone.
RAW is the “Box of Raw Ingredients”: A RAW file saves everything the camera sensor saw without changing or compressing it. The file size is huge, but because nothing is “baked in” yet, you have complete control in your editing software to flawlessly fix a dark shadow or correct a bad color tint years down the road without ruining the picture.
Archival Rule: Always capture your historical media in RAW format. It preserves the most historical data.
2. What on Earth is ISO? (The Microphone Analogy)
You will see my guides constantly telling you to lock your camera at ISO 100.
Think of ISO as the volume knob on a microphone. If you are trying to record someone whispering in a quiet room, you have to crank the volume knob all the way up. The problem? You hear a loud, fuzzy hiss in the background.
High ISO (e.g., ISO 6400): Artificially amplifies the sensor’s sensitivity so you can shoot in the dark, but it introduces digital “hiss”—which looks like ugly, grainy colorful pixels (called digital noise) over your precious photo.
Low ISO (ISO 100): This is the camera’s quietest, cleanest setting. Because my tutorials teach you to use powerful LED studio lights and a sturdy tripod, your camera doesn’t have to “whisper.” Keeping it at ISO 100 guarantees crisp, grain-free, museum-quality images.
What exactly is a vintage digital archive?
Imagine taking all your family’s old photo albums, shoeboxes filled with printed pictures, and slides sitting in the attic, and converting them into high-quality digital files on your computer.
A vintage, digital family photo archive isn’t just a collection of random image files sitting on a hard drive—it’s a carefully organized digital library. Its goal is to ensure your historical family memories are safely preserved for decades, easy to search, and never lost due to changing computer technology.
Think of It Like a Library Call Number
When you digitize an old family photograph, the original physical item—the print, negative, or slide—doesn’t disappear. It goes back into a protective storage container (like a print album, acid-free box, binder, or slide album).
A location-based naming convention links the digital picture on your computer directly to the physical container on your shelf.
If you ever need to find the physical 1950s negative to re-scan it or show a relative, you won’t have to hunt through twenty dusty shoeboxes. The folder/file name on your screen tells you the exact album, box, binder, or pocket it lives in.
A Vital Key Point!
The computer folder name (‘KFA-AG01-Album-01’) must exactly match the adhesive paper label (‘KFA-AG01-Album-01’) on its corresponding media container.
You may then ask, “How do I find the image of ‘Grandma Ginny sitting on the pier at the Beach’?”
The answer is – You will have saved that description in the IPTC metadatadescription field of the image (i.e., “Grandma Ginny sitting on the pier at the Beach”), which will stay with the saved and backed-up image forever!
The file will be named according to its sequence in the digital capture process, i.e., KFA-AG01-Album-01-Image01.
Ready to Begin?
Now that you know the basic vocabulary, you are officially ready to build your blueprint. To design your own roadmap, head straight to the master tutorial: [Camera Scanning – Archive Structure and Priorities]. Alternatively, you can always head back to the [Home page] to explore the full index of my free guides and tutorials.
As always, every tutorial on this site is completely free, ad-free, and privacy-focused—no tracking, no sign-ups, just open learning.
Once your folder blueprint is ready and you understand your camera’s basic language, select the specific media type you want to digitize today.
Why it’s essential: This is the absolute gold standard and the most trusted, comprehensive living dictionary for professional archivists and conservators worldwide. It provides clear, precise, and peer-reviewed definitions for complex terms like metadata, provenance, ingest, and digital preservation.
Why it’s perfect for my readers:Cambridge in Colour is widely considered the gold standard for visual learning in digital photography. Rather than just offering static text definitions, it uses clear visual diagrams and interactive tools to explain core concepts like dynamic range, sensor sizes, bit depth, exposure, and color spaces.
3. The Comprehensive Glossary Choice: Digital Photography School – Essential Photographic TermsWhy it’s perfect for my readers:Digital Photography School (dPS) is one of the longest-running, most trusted beginner photography tutorial sites on the web. Their comprehensive terminology guide breaks down camera modes, lens types, lighting concepts, and camera settings into plain, jargon-free English.
You did it: your new digital archive! After mastering the preparation and essential knowledge outlined in my guides, you have successfully completed the process.
Your hard work has culminated in your new digital archive—a secure, accessible, and meaningful collection of your most cherished memories.
Permanent Preservation: Your physical artifacts have been moved into a stable, digital format, safeguarding them for future generations.
Rapid Retrieval: Powerful IPTC metadata is now embedded into every image. This provides you and your family with the unparalleled advantage of rapidly searching and instantly finding any specific memory across the entire archive.
Effortless Sharing: Your digital collection is now instantly shareable with family members, regardless of their location.
Your grandkids will truly know these stories.
The True Impact
This newfound ability goes beyond simple convenience—it creates a deeper connection:
A Bridge to the Past: Your digital archive serves as an immediate and engaging link to your family’s history, allowing stories and experiences to be easily revisited and celebrated.
Fostering Connections: By making these memories so accessible, you foster deeper family connections, making shared moments a seamless part of daily life.
Embrace the convenience and lasting value of your digital archive. You have built a truly enduring legacy.
⏩ If this is not really about you – Why not visit my home page and make it com true!
Was This Post Helpful?
Building this free educational archive is a labor of love! If this technical breakdown helped you solve your problem today, please leave a like below to let me know you found it useful. Your support helps keep this site 100% free and ad-free for the archiving community.
Loading…
Here you will discover other informative and interesting internal posts.
The Library of Congress: Preserving Your Personal Digital MemoriesWhy it’s essential: This beginner-friendly institutional hub breaks down exactly how to organize, duplicate, and sustain a long-term personal digital archive. It provides simple, jargon-free guides for handling different media types (photos, documents, and videos).
Using a mirrorless digital camera and a powerful 1:1 macro lens is the best way to digitize film, slides, and prints.
The mirrorless camera and 1:1 macro lens method guarantees supreme quality for digitizing your treasured moments, including prints in albums. This is why camera digitizing is the best solution for effortlessly archiving and sharing your images across multiple platforms.
I can state with confidence that this method is superior to any other, especially for digitizing film. It provides an unmatched degree of clarity, enabling a more genuine preservation of precious vintage images and artwork. Additionally, the ability to digitally edit and enhance images opens up a plethora of creative opportunities. Compared to other methods, the entire process is quicker and more enjoyable.
Effortlessly Share on Multiple Platforms
Embracing digital technology allows you to preserve your treasured memories for enjoyment and appreciation, guaranteeing effortless sharing across multiple platforms while saving you time.
Camera digitizing captures the fine details of original artwork and enables color and contrast adjustments to improve its overall appearance. This allows photographers and artists to create excellent reproductions that preserve the spirit of their work and make it available to a wider audience. Everything in the process is in your control.
For very large prints or artworks, camera digitizing is the only real solution.
When it comes to digitizing very large prints, framed prints, or artworks, a mirrorless camera is often considered the best or only practical solution for several key reasons:
Superior Resolution
Advanced Sensor Technology
Extensive Lens Variety
EVF – Real-Time Print View
Pixel-Shift/Multi-Shot Technology
While high-quality DSLRs can certainly be used for this purpose, a modern mirrorless system offers distinct advantages. These advantages streamline the workflow and result in more precise final output. For large-scale art digitization, the combination of high-resolution sensors with advanced lenses is crucial for enhancing quality. The practical benefits of the mirrorless design further contribute to its superiority, often making it the only practical solution.
When using a camera for this procedure, one can use polarizing filters to reduce light flare.This improvement guarantees that the finished product will appeal to viewers by further enhancing the image’s clarity and vibrancy. Modern technology connects traditional craftsmanship with modern accessibility. It enables artists to express their ideas in once unimaginable ways.
Was This Post Helpful?
Building this free educational archive is a labor of love! If this post helped you solve your problem today, please leave a like below to let me know you found it useful. Your support helps keep this site 100% free and ad-free for the archiving community!
Loading…
Here you will discover other informative and interesting internal posts.
A conservator carefully restores a vintage 1917 newspaper with specialized tools
Rescue Missions: Safely Removing Rust and Tape to Restore Your History
Before you can digitize a document or film sleeve, you often have to safely remove rust and tape. Rusted staples, brittle paperclips, and yellowed Scotch tape—never meant to last 50 years—are now actively destroying the substrate.
Disclaimer: The following steps represent a risk of further damage to your treasured artifacts. If you are not comfortable handling these delicate tasks, please consult a professional conservator or photo archive service.
How to Safely Extract Fasteners and Tape
1. The Toolkit
Avoid using fingernails or standard “jaw-type” office staple removers, as these can tear paper. Instead, gather the following:
2. Removing Rusted Fasteners
Rust bonds to paper fibers, so pulling directly will damage the document.
Step 1: Place the document on a hard, clean surface.
Step 2: On the backside, use a micro-spatula to very slowly pry up the staple’s “legs.” Do not slide the spatula under the staple head yet.
Step 3: Once the legs are vertical, flip the paper over and gently lift the staple head.
Step 4: If the staple resists, apply a tiny drop of high-grade Isopropyl Alcohol (99%) with a swab to lubricate the rust-to-paper bond.
3. Addressing “Magic Tape”
Old tape typically presents in two ways: as a “dry chip” or a “sticky bleed.”
The Dry Chip: If the tape is brittle and brown, do not peel it. Instead, use a micro-spatula to gently “flick” the edges. Often, the adhesive has already failed, requiring only a mechanical nudge.
The Sticky Bleed: If the adhesive is gooey and soaking into the paper, stop. This situation requires chemical solvents like heptane, which should only be used in a well-ventilated area. If you are not comfortable with chemicals, it is best to digitize the document “as is” with the tape attached.
If the removal process begins to thin the paper (you see fibers lifting), stop immediately. A rusted staple is an eyesore, but a hole in a document represents a permanent loss of information.
Next Steps for Your Collection
Once the fasteners are out, don’t put them back! If you must keep documents grouped, use plastic paperclips or stainless steel staples. However, the best archival practice is to keep documents in individual acid-free folders.
Some of the actions mentioned in this post can damage your precious meda if handled incorrectly. If you are not confident, please seek professional advice. Please see myDisclaimer & Copyrightpage.
Was this guide helpful?
Building this free educational archive is a labor of love! If this technical breakdown helped you solve a problem today, please leave a like below to let me know you found it helpful. Your support helps keep this site 100% free and ad-free for the archiving community!
Loading…
Phase3Posts: These are posts that are ancillary to the actual digitizing process but still important.
“Leaflet 4.6: Removal of Fasteners from Paper” The NEDCC is a leading authority on paper and media conservation. This leaflet provides specific, step-by-step instructions on how to use a micro-spatula to lift rusted staple “legs” without scarring the substrate. It also explains the chemical interactions between metal oxides and organic fibers, which is essential for understanding why certain fasteners require more care than others.
2. National Archives and Records Administration (NARA)
“Preservation Self-Help: Removing Staples and Other Fasteners” NARA provides a practical framework for handling large-scale collections. Their guidance is particularly useful for establishing a “triage” system—helping you decide which fasteners are safe to remove at home and which have reached a level of decay (such as “bleeding” adhesives or deeply embedded rust) that requires the intervention of a professional conservator.
For the specific issue of “Magic Tape” or pressure-sensitive adhesives mentioned in your post draft, the NEDCC also maintains Leaflet 4.8: Removal of Pressure-Sensitive Tape. This is the definitive guide for identifying whether a tape is in the “rubbery,” “leaching,” or “brittle” phase and how to address each state safely.
A Fujifilm X-T4 camera sits beside a smartphone on a rustic wooden table.
Camera-Scanning vs. Smartphone Capture: Why a Mirrorless Camera and Macro Lens Is the Premium Choice for Archiving
The camera/macro lens always wins! If you are contemplating digitizing your family albums, prints, negatives, and slides, the process should be straightforward, enjoyable, and—above all—precise. While many reach for the device in their pocket, there is a reason professional archivists use a dedicated setup: a modern digital camera (preferably mirrorless), a 1:1 macro lens, and a sturdy copy stand.
Camera-Scanning vs. Smartphone Capture: Why Smartphones Are Less Suitable
Smartphones are perfect for “social sharing” or quick cataloging, but they face significant physical hurdles when it comes to high-quality reprography (photographing a photo).
Sensor Size and Digital Noise: To maintain a slim profile, smartphones use tiny sensors with microscopic pixels. These are susceptible to “digital noise,” which can obscure the subtle textures and fine grain of vintage paper. In contrast, the sensor in a DSLR or mirrorless camera is often 5 to 10 times larger, allowing it to capture significantly more light (photons) for a cleaner, sharper image.
The AI Factor: Phones often use aggressive AI to “guess” details. While great for a selfie, this software can inadvertently smooth out or alter the authentic texture of a 1940s film print. A dedicated camera captures high-fidelity data without artificial interference.
The Optical Path: Eliminating Distortion
The primary distinction between these two methods lies in the physics of their lenses.
Most smartphone lenses are wide-angled, designed for landscapes or groups. When used for close-ups, this results in barrel distortion or “keystoning,” where the straight edges of your original print appear curved or misaligned.
A dedicated macro lens (typically 50mm to 105mm) allows you to position the camera further from the subject. This ensures every millimeter of your photograph is captured with uniform, edge-to-edge sharpness and zero perspective distortion—essential for true archival preservation.
Stability and Precision: The Copy Stand Advantage
Precision is nearly impossible to achieve with a handheld device. Using a camera mounted on a sturdy copy stand provides two critical benefits:
Eliminating Movement: It protects the image from even the slightest vibration, ensuring maximum sharpness.
Perfect Alignment: It keeps the camera sensor perfectly parallel to the photo, a task that is incredibly difficult to do by hand.
Understanding the “Signal-to-Noise Ratio” (SNR)
In the context of digitizing, SNR is a measure of clarity.
High SNR: Indicates a clean, sharp image with rich detail.
Low SNR: Results in “grainy” or “snowy” images, especially in a photograph’s shadow areas.
By relying on pure optical resolution and high dynamic range rather than software upscaling, a dedicated rig captures the authentic data contained within your original analog prints.
Camera digitizing a vintage print with professional equipment for high-quality archiving.
Conquering the Enemy: Light Glare
Finally, a dedicated setup allows you to combat “light glare”—the bane of glossy photos. Using a macro lens gives you the ability to use polarizing filters and a lens hood on your lens, and polarizing sheets over your lights. This “cross-polarization” setup can virtually eliminate reflections, allowing the true colors and details of the photo to shine through.
Prove to yourself that the mirrorless camera and macro lens combination is king.
These fundamental guides break down the core process of camera digitizing step-by-step.
A precision camera can be “tethered” directly to your computer or laptop via a USB cable. This allows you to manage the entire capture process on a large, high-resolution monitor, rather than squinting at a tiny camera viewfinder. This connection provides total control over your settings, filing, post-editing, and backups within one seamless environment.
A Real-Time Archival Workflow
To illustrate this efficiency, here is how I process a roll of film in a single, continuous session:
Organize: I create a new, dedicated folder structure immediately upon capture.
Standardize: Images are saved directly into my permanent archive according to my established naming conventions.
Optimize: I can edit and enhance the images on a full-sized screen for maximum precision.
Secure: My first backup happens automatically, as I have configured the system to save a copy directly to my Network Attached Storage (NAS) device.
Watch My New Video – Camera-Scanning vs. Smartphone Capture
Is your smartphone “good enough” for your family history? In this video, we dive into the technical and practical differences between quick mobile scans and a professional-grade camera scanning rig. We explore why the physics of light, sensor size, and optical paths matter when your goal is true archival preservation rather than just a social media share. The Right Tool for the Task: Camera-Scanning vs. Smartphone Capture
Building this free educational archive is a labor of love. If this post helped you solve a problem today, please leave a like below to let me know you enjoyed it. Your support helps keep this site 100% free and ad-free for the archiving community!
Loading…
These are internal posts that are ancillary to the actual digitizing process but still important.
Why it’s relevant: This is the primary authority for US government archives. It specifically details the “Star Ratings” for camera-based capture systems and provides the mathematical benchmarks for archival-grade digitization.
Why it’s relevant: NARA provides extensive documentation on using high-resolution cameras for “still image reformatting.” They emphasize the need for “true optical resolution,” which supports the recommendation of DCS over smartphone apps.
Why it’s relevant: DT Heritage is a leader in professional museum-grade camera scanning. Their resources provide a deep technical dive into why “Instant Capture” (DCS) is superior for speed, safety, and image quality compared to any other method.
This step-by-step guide ensures your family’s memories are camera-captured with superior quality and context.
How To Digitize Old Photo Albums: Camera scanning or preferably mirrorless camera-digitizing is the superior method for preserving and documenting fragile vintage photo albums. This step-by-step guide ensures your family’s memories are captured with superior quality and context.
Continue with Care!
Archiving is a manual process. Before starting, ensure your workspace is stable and use the correct tools. Some actions suggested here can easily cause damage to precious originals. You are the steward of your own history! Please refer to my Disclaimer & CopyrightPage.
Camera digitizing vintage family photo albums at home first requires calibrating your mirrorless digital camera’s color processing to the precise light source used for digitization. By photographing a neutral reference target (such as an 18% gray card) placed directly on the copy stand’s base, the camera calculates and locks in a perfect neutral baseline. This crucial step ensures absolute color accuracy across your entire scanning session and minimizes color-cast correction during post-processing.
To ensure consistency across an entire album, preset the settings listed below into a camera custom setting (C1, C2, C3, etc.). Then, set your camera to that custom program mode before you start capturing.
Please note: Much of the process for digitizing photo albums is the same as for digitizing prints. Therefore, please also refer to my post, The Ultimate Guide to Digitizing Vintage Prints, which provides more information on holding down and flattening loose prints, among other things. The remainder of this post, however, will provide vital information specifically relevant to digitizing and archiving albums.
For the highest resolution, use the high-definition pixel-shift mode available on mirrorless cameras such as Panasonic Lumix, Sony, Olympus, and and some Pentax models. This feature typically needs to be configured in advance and then activated in the camera settings just before you begin capturing.
Camera digitizing the entire album, including all pages (front and back), creates a “master map” that preserves the original curation context of the photos. This ensures you know exactly where each photo belongs if it’s removed. Aim for the highest possible resolution during this stage, as it serves as a safety net for subsequent close-up captures. Additionally, be vigilant for “hidden” history: if you remove prints from the album, capture an image of any writing found on the back.
Initial Album Capture: Before capturing individual prints or removing them:
Document the front cover.
Document the inside front cover.
Document the rear cover.
Document the inside rear cover.
Document every full page of the album.
This attention to detail creates a comprehensive visual guide for later context. Do this in the highest possible resolution!
Folder Structure: Utilize identifiers for FFP (Front-Facing Pages) and RFP (Rear-Facing Pages). Example: [Prefix]-[Group]-[Album]-FFP01-IMG01.TIFF
Rigid Hardware Rig: Need a stable vertical platform that accommodates heavy album bindings? Review my DIY setup: Build a $65 Pipe Flange Copy Stand Rig.
III. Three Options for Camera Digitizing Album Prints
Choice 1: Prints Remain on Page (Recommended for Fragile Albums)
An example of weighing down the side of the album you are not capturing whilst you photograph the adjacent page.
The prints remain secure, minimizing handling risk.
Setup: Position the album on a copy stand. Use a stack of books to level the non-captured side, ensuring the target page is flat. Employ a two-light setup at 45° angles.
Place small A5 sheets of foam board under the side currently being captured to ensure it is level and on the same plane as the camera on the copy stand.
Flattening: Use small, clean, transparent acrylic sheets to hold down curled prints.
Gutter Shadow: For photos spanning the center crease, capture the left and right sides separately and stitch them together in post-processing.
Choice 2: Camera Capturing Entire Album Pages (Recommended for Speed)
This is the fastest option, though it offers the lowest detail.
Technique: Consistently frame the entire page.
Use the ‘stack of books method’ described above.
Post-Processing: Use High-Definition Mode if available. You will need to individually crop and straighten each print later using software.
Choice 3: Remove Prints from Pages (For Highest Quality)
This method allows for documenting rear captions but carries a high physical risk to the prints.
Pro-Tip for Removal: If prints are stuck to “magnetic” pages (i.e., glued), use unflavored dental floss in a gentle “sawing” motion to cut through the brittle glue without tearing paper fibers. Do not lift the paper yourself; allow the dental floss to do the work. A hairdryer on a low/cool setting for 10 seconds can help soften stubborn adhesive.
Capture: Position each print to fill the sensor and capture each one individually. Immediately photograph the reverse side if it contains notes. Refer to my post The Ultimate Guide to Digitizing Vintage Prints for the full story on individual paper print capture.
Labeling: Mark the back of the print with its original location (e.g., FFP-01) using a soft graphite pencil.
For prints that are difficult to flatten, use transparent, archival-quality acrylic sheets. These sheets must be spotlessly clean and dust-free. They provide physical protection and keep the print flat without adhesives. When using acrylic or any other shiny overlay, it is strongly recommended that you use polarized light. (Refer to my post for more information.) Polarizing Sheets & Lens Filters For Camera-Digitizing
A step-by-step illustration of the camera digitization process, from project folder to finished digital archive, emphasizing professional image scanning.
Please don’t overlookthe archive label
The example below shows an archive label attached to an album, with the corresponding folder structure on the archive computer to its left.
Remember to photograph the archive label for every album:
Include an image of the label in the album’s specific archive folder.
Adhere the physical label to the inside back cover of the album.
Digital archive management with scanning and cataloging of old photographs and documents.
Building this free educational archive is a labor of love! If this post helped you solve your problem today, please leave a Like below to let me know you found it useful. Your support helps keep this site 100% free and ad-free for the archiving community.
Loading…
Explore More Photo Digitization Guides on This Site
In this block you will find other professional media digitizing guides.
Confused by any technical jargon in this guide? Check out my [Full 55-Term Jargon-Free Glossary] to get clear, simple definitions of all the archiving terms used here.
1. Library of Congress: Preservation Guidelines for Digitizing
This is the “gold standard” for archival handling. It provides critical safety instructions that reinforce advice on fragile materials, specifically regarding why you should never apply pressure to brittle spines or use glass/Plexiglas to flatten photos if the media is flaking.
Key Focus: Material safety, workspace cleanliness, and handling brittle paper.
3. The National Archives (UK): Digitisation Standards
This article explains the technical “why” behind using TIFF formats and ZIP (lossless) compression, and it sets professional benchmarks for resolution (PPI) that match museum-quality goals.
Key Focus: File formats (TIFF vs. JPEG2000), checksums for corruption detection, and naming conventions.
Preserving the Past: A Guide to Archival Digitization
In this guide to archival digitization, you will learn eight critical steps—often overlooked in photo digitizing tutorials—that will elevate you to the status of a complete archivist!
Continue with Care! Archiving is a manual process. Before starting, make sure your workspace is stable and you are using the correct tools. Some actions suggested here can easily damage precious originals. You are the steward of your own history! Please refer to my Disclaimer & Copyright Page
1. Rescuing Memories: Archival Extraction for ‘Magnetic’ Albums
To safely extract photos from 1970s and 80s “magnetic” self-adhesive albums, the following tools are recommended:
Dental Floss: Gently “saw” through the adhesive behind a photo to lift it without tearing. Do not force or pull the paper.
Micro-spatulas: Use these thin, professional archival tools to carefully pry the photo away from the damaging adhesive.
Many professionals describe these albums as a “crisis” for family archives because their materials are often acidic and damaging to original prints over time. Safely removing photos from these albums is a key part of the physical stabilization process in the pre-capture phase of digitization.
2. The Point of Diminishing Returns for 8×10 Prints
For 8×10 prints, the point of diminishing returns is reached at approximately 24 megapixels. This resolution is often more than sufficient for a print of that size.
In digitization, the concept of diminishing returns refers to the point where a higher-resolution sensor begins to capture the physical characteristics of the medium—such as paper texture or film grain—rather than additional image detail.
3.What is the minimum resolution for 110-format negatives?
For a 110-format subminiature negative, a 24-megapixel (MP) camera is the bare minimum.
This is due to the small size of the 110-format original. While a 24MP sensor is often more than enough for a large 8×10 print, the much smaller surface area of 110-format film requires higher pixel density to capture the necessary detail. This is crucial before reaching the “point of diminishing returns,” the stage where the sensor begins capturing film grain rather than additional image information.
4.What is the Point of Diminishing Returns for 35mm Film?
While there isn’t a specific megapixel count provided by professionals for 35mm film, benchmarks for other formats can help frame the resolution requirements:
8×10 Prints: A 24MP camera is often more than enough to capture the necessary detail.
110-format Subminiature Negatives: Due to the small size of these originals, a 24MP camera is considered the bare minimum.
For 35mm negatives, the objective is to identify the precise point where increased resolution no longer provides additional image information but merely oversamples the film’s grain.
5. Essential Tools for Tethered Digitization
While an exhaustive list of hardware for a tethered digitization setup, including specific cables or copy stands, is challenging to define, several key pieces of equipment and tools are essential for a professional-standard tethered archival workflow:
Camera and Sensor: A camera is required to capture the images. A 24MP camera is often sufficient for 8×10 prints and serves as the bare minimum for 110-format subminiature negatives to avoid oversampling the film grain.
Monitor Calibration Hardware: To ensure FADGI compliance and Delta E accuracy, hardware calibration devices such as the Calibrite Display Pro or Datacolor Spyder are recommended.
Conversion and Workflow Software:Tethered shooting is part of a linear workflow that requires software for capturing and converting images. Popular tools include:
Micro-spatulas for the safe removal of adhesive or fasteners
Tethered shooting is widely described as a professional standard. Various methods exist to physically connect the camera to the computer (such as TetherPro cables or similar) and to hold the camera and lighting in place (such as copy stands or strobe lights). You may want to independently verify the specific cable requirements for your camera model and computer interface.
6. How should I calibrate my monitor for FADGI compliance?
To calibrate your monTo ensure FADGI compliance and Delta E accuracy for your monitor, you must address your hardware, software environment, and physical workspace. An uncalibrated monitor is often the “weakest link” in a professional archival workflow.
I recommend the following steps:
Perform Hardware Calibration: Use a dedicated calibration device, such as the Calibrite Display Pro or Datacolor Spyder, to create an accurate color profile for your screen.
Set a Neutral Workspace: Use a “Neutral Grey” desktop background on your computer to prevent visual bias during the editing process.
Control Ambient Lighting: Ensure your editing environment has controlled ambient lighting, specifically targeting D50 or D65 standards when performing final color edits.
Following these protocols allows you to move beyond creating merely “pleasing” images to achieving the “neutral” archival captures required for professional standards.
Monitor Calibration Hardware: To ensure FADGI compliance and Delta E accuracy, hardware calibration devices such as the Calibrite Display Pro or Datacolor Spyder are recommended.
7.What are D50 and D65 ambient lighting standards?
Professionals identify D50 and D65 as controlled ambient lighting standards that are important to maintain when performing final colour edits to ensure monitor calibration and FADGI compliance.
Most professionals define these standards as essential for a professional archival environment, they do not provide specific technical definitions for them.
In the fields of photography, printing, and colour science (which you may want to independently verify), these terms refer to standard illuminants that represent different types of daylight:
D50: This represents a color temperature of 5000K, which mimics warm, direct sunlight. It is the industry standard for the printing and graphic arts industries because it is how white paper is typically viewed.
D65: This represents a color temperature of approximately 6500K, which mimics slightly cooler, overcast midday light. It is the standard color temperature for most digital displays and internet content (sRGB).
Using these specific lighting standards in your workspace helps prevent your eyes from being deceived by “warm” or “cool” room lights, ensuring that the colors you see on your calibrated monitor are as accurate as possible.
8. How can I record oral histories to link with photos?
To record oral histories effectively, most professionals recommend recording a relative’s voice as they view newly digitized photos. This visual stimulus is a key technique for triggering specific memories and uncovering the “story” behind an image.
This process is part of a “Social Metadata” workflow aimed at identifying “mystery” people and preserving context before that knowledge is lost. You can implement this by:
Utilizing Digital Tools: Use private web galleries or features like Google Photos’ face grouping to share images with elderly relatives. This makes it easier for them to review the collection and provide identifications.
Capturing the Narrative: Focus on recording their descriptions and anecdotes as they view the photos to ensure the information is captured in their own words.
Linking Audio to Images: The ultimate goal is to link the resulting audio recording directly to the image file, creating a permanent connection between the visual record and the oral history.
Building this free educational archive is a labor of love. If this post helped you solve a problem today, please leave a like below to let me know you found it useful. Your support helps keep this site 100% free and ad-free for the archiving community!
Loading…
To build a professional and sustainable archiving workflow, start with these essential guides, carefully sequenced in order of importance.
Confused by any technical jargon in this guide? Check out my [Full Jargon-Free Glossary] to get clear, simple definitions of all the archiving terms used here.
For information regarding the technical and archival standards discussed in this tutorial, the following four websites are recognized as leading authorities in the field of digital preservation and photographic care.
1. FADGI (Federal Agencies Digital Guidelines Initiative)
This is the primary authority for the FADGI compliance and Delta E accuracy mentioned in your section on monitor calibration and imaging standards. Their technical guidelines provide the specific performance criteria for still image capture, including detailed benchmarks for resolution, color accuracy, and noise levels that professional archives use to evaluate “neutral” captures.
2. Library of Congress – Care, Handling, and Storage of Photographs
This resource is the industry standard for the physical stabilization and archival extraction processes described in your guide. It offers specific guidance on the dangers of “magnetic” albums and the proper use of tools like micro-spatulas and nitrile gloves. Their “Personal Digital Archiving” section also provides a framework for the preservation of digital files.
3. National Archives and Records Administration (NARA)
NARA provides the technical specifications for digitizing archival materials for permanent retention. This site is highly relevant to your discussions on the point of diminishing returns and minimum resolution for various formats (35mm, 110-format, and prints). It outlines the file format requirements (such as TIFF vs. JPEG2000) and the metadata standards required for professional-grade repositories.
To support the social metadata workflow and the recording of oral histories to link with photos, the OHA is the principal authority. Their “Principles and Best Practices” guide provides the ethical and technical framework for capturing high-quality interviews, ensuring that the “narrative” linked to the digital archive is preserved with professional integrity.
In a standard photo archive, the “Description” field is for captions. In an OCR archive, it becomes your transcription layer for OCR Documents
Tailoring IPTC metadata for OCR is an important step. When photos are digitized, metadata often focuses on the subjects pictured. However, when documents are digitized for Optical Character Recognition (OCR), the purpose of metadata shifts to data retrieval.
If you’re using camera digitization to build a searchable archive, your IPTC strategy must adapt. You’re no longer just tagging a “picture of paper”; you’re indexing a dataset.
1. OCR vs. Photo Metadata: The Key Differences
Diagram illustrating the workflow of OCR metadata extraction and IPTC field mapping for digital asset management.
In a standard photo archive, the “Description” field is for captions. In an OCR archive, it becomes your transcription layer.
The Transcription Field: Copy the raw text from your OCR engine directly into the IPTC Description or Alt-Text (Accessibility) field. Always begin with a confidence note, e.g., [OCR Confidence: 95%].
Semantic vs. Literal Keywords: Use the IPTC Keywords field to add “normalized” terms not present in the text. For an 1850s land deed, add keywords like “Probate” and “Genealogy.” Include the modern names of the county and state to ensure discoverability in contemporary searches.
The “Reliability” Flag: Use the IPTC Genre field to flag the document as “Type: Typed,” indicating high search reliability. Alternatively, use “Type: Manuscript,” which signifies that a manual review is required. This informs future users about the trustworthiness of automated search results.
2. The Archival XMP Sidecar Template
Advanced users working with RAW or TIFF files should use an XMP Sidecar file to manage their data. This small, XML-based text file resides alongside your image, ensuring your transcription remains with the file without modifying the original “master” image.
You can copy the template below into a blank text file and save it as [yourfilename].xmp to see how professional archives structure this data:
For automating metadata injection across hundreds of files, ExifTool is the industry standard. To embed a transcription from a text file into an image, use a command similar to this: exiftool “-Description<transcript.txt” image.jpg
Option C: digiKam (The Open-Source Suite)
digiKam is a free, professional-grade photo management suite that seamlessly handles XMP sidecar files.
Check “Write to XMP sidecar only” to safeguard your original RAW files. This option stores your OCR data in an easily readable external file.
Why This Matters
Embedding your OCR results now is crucial for future-proofing your archive. As AI-powered search tools become standard, these “tagged” documents will be instantly discoverable on your computer. This transforms your collection of “pictures of old paper” into a fully searchable, private library.
Was This Post Helpful?
Building this free educational archive is a labor of love! If this post helped you today, please leave a Like below to let me know you found it useful. Your support helps keep this site 100% free and ad-free for the archiving community.
Loading…
These posts are provided to guide you to an understanding of the use of optical character recognition in digitizing your documents and letters.
Confused by any technical jargon in this guide? Check out my [Full Jargon-Free Glossary] to get clear, simple definitions of all the archiving terms used here.
To help you deep-dive into advanced archival metadata workflows here are three highly relevant external links from the official standard-setters and digital preservation institutions:
The IPTC Photo Metadata Standard Official SpecificationWhy it’s essential: This is the absolute source of truth maintained by the International Press Telecommunications Council. It defines the exact boundaries of the IPTC Core and Extension schemas, demonstrating how embedded tags operate internationally across different digital asset management (DAM) frameworks and platforms.
The IPTC Photo Metadata User GuideWhy it’s essential: This practical guide breaks down the precise semantics, character limits, and behavioral traits of every single IPTC field. It is the perfect technical companion for showing advanced archivists how to route OCR transcriptions, custom search keywords, and granular administrative data into fields beyond the basic description or caption boxes.
The University of British Columbia Indigitization Archival GuidelinesWhy it’s essential: This exhaustive, museum-grade institutional toolkit focuses on the practical application of metadata templates for digitized cultural heritage materials, fragile text records, and historical negatives. It offers excellent, real-world instruction on building preservation workflows that map complex text metadata directly into software like Adobe Bridge and Photoshop without breaking file structures.
These links will give you the technical depth you need to understand how professional archivists stretch IPTC tools to handle massive, text-heavy historical documents!
Standard IPTC metadata focuses on a photo’s “Who, What, Where.” OCR-specific metadata acts as the link—the OCR-Metadata Bridge—between a raw image and a searchable database.
When it comes to OCR, the metadata strategy shifts from description to discovery. You aren’t just saying what the document is; you are making the text work for the user’s database and Digital Asset Management (DAM) system.
Standard IPTC metadata focuses on the “Who, What, Where” of a photo. OCR-specific metadata acts as the link between a raw image and a searchable database.
1. The “Alt-Text” and “Transcription” Fields
Standard IPTC lacks a dedicated “Full OCR Text” field, leading most users to utilize the IPTC Caption/Description field.
The OCR Difference: As of 2026, many archival systems now support the IPTC “Alt-Text (Accessibility)” or dedicated “Transcription” schema extensions.
Best Practice: If your OCR engine provides a “confidence score” (e.g., 98% accuracy), it is professional best practice to include this score at the very top of your Description field: [OCR Confidence: 98%] [Transcript follows]…
2. Semantic Keywords (The “Context” Layer)
OCR provides raw text, but metadata provides meaning.
The Problem: A document might mention “The Big Apple,” but a search for “New York City” will fail if the OCR is purely literal.
The Fix: Use the IPTC Keywords field to add “normalized” terms not present in the text. For an 1850s land deed, add keywords such as “Primary Source” and “Land Records,” and include the modern name of the county/state.
Illustration of normalizing historical metadata from 1832 shipping documents
3. Machine-Readable Language Tags
Modern OCR engines are multilingual, but their performance improves significantly when the language is specified.
The Metadata Solution: Utilize the IPTC “Language Identifier” field. Tagging a document as en-US (English) ensures the correct dictionary is applied, just as tagging it as de-DE (German) enhances accuracy. This practice also assists future AI tools in selecting the appropriate dictionary when reprocessing your archives.
4. Distinguishing “Handwritten” vs. “Typed” Documents
Effective filtering by document type is incredibly beneficial within your archive.
The Strategy: Implement a custom keyword or use the IPTC “Genre” field to categorize the capture type:Type: Typed (High OCR reliability)
Why It Matters: This categorization informs you (or future users) which documents can be reliably searched using keywords. It also highlights documents that may require a manual “human-in-the-loop” review.
5. Linking “Source” and “Originality”
When you OCR a document, you are creating a derivative data layer.
Best Practice: Ensure the IPTC “Source” field references the physical location of the original document (e.g., “Box 4, Smith Family Archive”). If the OCR was generated by a specific tool, include that information in the “Software”metadata field (e.g., GPT-4o or Tesseract). This practice is crucial for tracking provenance.
Quick Comparison: Standard Photo vs. OCR Document Metadata
Building this free educational archive is a labor of love. If this post helped you solve a problem today, please leave a like below to let me know you found it useful. Your support helps keep this site 100% free and ad-free for the archiving community!
Loading…
These posts are provided to guide you to an understanding of the use optical character recognition, in digitizing your documents and letters.
Confused by any technical jargon in this guide? Check out my [Full Jargon-Free Glossary] to get clear, simple definitions of all the archiving terms used here.
The Library of Congress: METS (Metadata Encoding and Transmission Standard) Official SiteWhy it’s essential: When dealing with digitized multi-page documents, diary collections, or letters, simple photo captions aren’t enough. The Library of Congress’s METS standard is the global authority on structural metadata. It shows advanced archivists exactly how to link digital master images directly to their corresponding raw OCR text files (like ALTO or plain text layouts), binding them together into a single, permanent archival package.
The IIIF (International Image Interoperability Framework) Presentation API SpecificationWhy it’s essential: IIIF is the bleeding-edge standard used by world-class museums and universities to display digitized texts. Their Presentation API specification shows how raw OCR transcriptions are layered directly over scanned images as “Web Annotations.” Linking to this teaches your readers how text hidden inside an image is structurally mapped to metadata fields, making the document interactive, fully searchable, and future-proof.
Camera digitizing for searchable archives differs from that of other documents.
In camera scanning, “DPI” is a relative term that changes based on the camera’s distance from the page. For successful OCR, disregard the 300 DPI rule and focus instead on the x-height.
By using camera digitizing for searchable archives, you move beyond simple images. Learn how to use Optical Character Recognition (OCR) to make your scanned documents, letters, and journals fully text-searchable.
OCR (Optical Character Recognition)is about signal-to-noise ratio.
1. The Resolution Myth: Pixels Per Character, Not DPI
When camera scanning, “DPI” is a relative term that changes based on your camera’s distance from the page. For successful OCR, disregard the 300 DPI rule and instead focus on the x-height.
The Rule of 20: For high-accuracy OCR, ensure the lowercase “x” in your document is at least 20 pixels tall.
The Math: Digitizing a standard 8.5×11 sheet with a 24MP camera yields approximately 400 “effective” DPI, which is sufficient for most fonts. However, for microfiche or tiny footnotes, you’ll need to move the camera closer and “tile” the image.
2. The Capture Setup: Avoiding Perspective Distortion
Standard OCR engines (such as Tesseract or ABBYY) struggle with perspective distortion. Even a slight camera angle will cause letters at the top of the page to appear smaller and those at the bottom to appear larger.
Best Practice: Use a bubble level on both your copy stand and your camera’s LCD.
The “Flat” Factor: Paper curl is the primary cause of OCR inaccuracy. Use a sheet of anti-reflective (AR) glass or an acrylic platen to keep the document perfectly flat.
3. Lighting: High Contrast, Zero Glare
While photo digitizing requires soft, diffused light, OCR thrives on uniformity and contrast.
The 45-Degree Rule: Place two lights at 45-degree angles to the document. This minimizes “hot spots” on glossy paper and prevents the camera’s shadow from appearing.
Color Mode: Capture in Color or Grayscale, even for black and white documents. Capturing in “Bitonal” (pure black and white) at the camera level removes anti-aliasing data, which modern AI OCR uses to interpret blurry characters.
4. Processing: The “OCR-Ready” Workflow
Pre-processing your image before feeding it into an OCR engine significantly improves results:
De-skewing: Use software (like RawTherapee or Lightroom) to ensure text lines are perfectly horizontal.
Thresholding: If the paper is yellowed or stained, use a “Levels” adjustment to make the background pure white and the text deep black.
Linear Profiles: As with my FADGI-Lite guide, avoid heavy “S-curves.” Ensure the text is sharp and the background is clean, but avoid “choking” the letters excessively, which can cause the holes in characters like “e” and “a” to disappear.
The 2026 Software Stack: AI vs. Traditional
Feature
Traditional OCR (e.g., Tesseract, ABBYY)
AI-Powered OCR (e.g., GPT-4o, AWS Textract)
Best For
Clean, printed books and typed letters.
Handwriting, degraded documents, or multi-column layouts.
Accuracy
High on standard fonts; low on “noisy” backgrounds.
Extremely high; uses context to “guess” missing words.
Privacy
Local (Runs on your PC).
Cloud-based (Requires uploading).
Structure
Often loses table formatting.
Excellent at “understanding” tables and headers.
Pro-Tip: The “Semantic” Validation Layer
In 2026, the best practice isn’t just “scanning”—it’s validating. If your OCR outputs a word like “Wedn_ay,” a modern AI layer can analyze the context and realize it should be “Wednesday.” When archiving, always keep the original image alongside the sidecar text file; this allows for later verification of errors.
In 2026, OCR software is more intelligent than ever. Yet, it still adheres to the “GIGO” rule: Garbage In, Garbage Out. Use this checklist to ensure every capture is optimized for utmost machine readability.
📥Phase 1: Physical Setup & Preparation
Before you even touch the shutter button, the physical geometry must be perfect.
Flatten the Field: Use a clean sheet of anti-reflective (AR) glass or a weighted acrylic platen. Curved text is the number one cause of “hallucinated” words in OCR.
Parallel Alignment: Use a bubble level on both the camera sensor and the copy stand. Even a 2° tilt (keystoning) affects character size, causing characters at the top of the page to differ in size from those at the bottom.
The “X-Height” Rule: Zoom in until the lowercase “x” in your document reaches 20 pixels tall on your LCD screen.
Background Contrast: Place the document on a neutral, non-distracting background (usually matte black or gray). This aids the software in auto-detecting document edges for cropping.
💡 Phase 2: Lighting & Focus (The “Signal”)
OCR requires “clean edges.” Soft, artistic shadows that enhance a photograph will confuse a text recognition engine.
45-Degree Dual Lighting: Position two lights at 45-degree angles to the page to eliminate glare and “hot spots.”
High-CRI Bulbs (95+): While FADGI is for color, high-CRI lighting provides sufficient spectral data for faint pencil marks and aids in distinguishing faded ink from the paper.
Aperture “Sweet Spot”: Set your lens to its sharpest aperture (typically f/5.6 or f/8). Avoid wide-open apertures (f/1.8), which can cause blurry corners, and f/22, which causes diffraction.
Manual Focus Check: Use “Focus Peaking” on your LCD or 10x magnification. Focus on the text itself, not the paper texture.
⚙️ Phase 3: Camera Settings (The “Raw Data”)
Capture in RAW: JPEGs introduce “compression artifacts” (small blocks of noise) around text, which OCR engines often mistake for punctuation like commas or periods.
Base ISO (100-400): Keep the ISO low to prevent “digital grain.” To a computer, a grain of digital noise looks exactly like a dot on an “i.”
Linear Response Profile: Ensure you are not using a “Vivid” or “High Contrast” picture style. A flat, linear image is preferred to preserve the “anti-aliasing” data of the font edges.
🖥️ Phase 4: Post-Processing (The “OCR-Ready” File)
Deskewing: Use a grid tool to ensure the lines of text are perfectly horizontal (0.0° tilt).
Binarization / Thresholding: For black-and-white documents, apply a Levels adjustment to push the background to white and the ink to black. Caution: Do not over-process, or you will “choke” thin letters (like “l” and “t”).
Denoising: Apply a light luminance noise reduction. This “smoothes” the background, making it easier for the OCR to focus on the “foreground” signal.
🧠 Phase 5: The “2026” Validation Layer
Export to PDF/A: Use the Archival PDF standard, which embeds the text layer directly within the file for long-term searchability.
The Semantic “Sanity Check”: Run the output through an AI layer (like GPT-4o or a local LLM). Ask it: “Does this text contain any obvious OCR errors based on the context of the document?”
Original + Sidecar: Always store the Original RAW/TIFF file alongside the Searchable PDF. If OCR technology improves in five years (and it will), you will want the clean original data to re-process.
Pro-Tip: If you’re digitizing a large volume of pages, do a “test run” of 5 pages. Run them through your OCR engine of choice before you scan the other 500. It’s much easier to fix a lighting glare now than to rescan an entire book later!
Was This Post Helpful?
Building this free educational archive is a labor of love! If this post helped you solve a problem today, please leave a Like below to let me know you found it useful. Your support helps keep this site 100% free and ad-free for the archiving community.
Loading…
These posts guide you to an understanding of optical character recognition in digitizing your documents and letters.
Here are two phenomenal, highly authoritative external links for this specific post:
The Federal Agencies Digital Guidelines Initiative (FADGI) Still Image GuidelinesWhy it’s essential: FADGI is the gold standard used by U.S. federal agencies, the National Archives, and the Library of Congress to evaluate digital image quality. Their strict 4-star ranking system explicitly lays out how parameters like spatial resolution, uniform illumination, color accuracy, and lens distortion directly impact downstream OCR success. Linking here proves to your readers that your camera-scanning metrics align with world-class archival benchmarks.
The National Archives (UK) Preservation Digitisation StandardsWhy it’s essential: This comprehensive guide provides exact technical formulas for OCR optimization. It explicitly outlines necessary PPI (pixels per inch) specifications for text records (minimum 300–400 PPI), mandates the use of 24-bit color spaces to retain legibility, and details why uncompressed or lossless file formats (like TIFF with ZIP or LZW compression) are non-negotiable for preventing the digital noise that triggers OCR character errors.
Professional museum standards, simplified. Understand the core principles of FADGI compliance to ensure your archive meets high-level technical benchmarks..
High-quality digital preservation doesn’t have to be complex. This guide simplifies rigorous technical requirements into actionable steps, enabling any home archivist to achieve color results that offer a degree of “FADGI Compliance for Amateurs.”
High-end archives, such as the Library of Congress, utilize the FADGI star-rating system, which ranges from 1 to 4 stars. This system ensures every pixel is a faithful reproduction of the original. While a 4-star setup can cost upwards of $50,000, you can still achieve “2-Star” (Professional Minimal) or even “3-Star” (High Quality) results at home. The key is to focus on the mathematics of color rather than the price of the gear.
1. The Core Philosophy: Accuracy over “Beauty”
The biggest hurdle for amateurs is moving away from the concept of “pleasing” color. Most scanners and cameras attempt to “improve” your photos with heightened saturation and contrast. FADGI, however, demands neutrality.
The Goal: Achieve a ΔE (Delta E) color error of less than 3.0.
The Reality: You’re on the right track if you cannot discern a difference between your screen and the physical photo, especially when viewed side-by-side under 5000K lighting.
2. The Essential “Budget” Toolkit
While a Phase One camera isn’t necessary, these three items are non-negotiable:
Tool
Pro Choice ($$$)
FADGI-Lite Choice ($)
Why it matters
Color Target
ISA Golden Thread ($1,000+)
X-Rite ColorChecker Passport (~$120)
Provides a “known truth” for your software to calibrate against.
Lets you apply custom ICC profiles and “Linear” curves.
Lighting
North Light Repro LEDs
High-CRI (95+) LED Bulbs
Cheap bulbs have “spectral gaps” that make certain colors impossible to capture accurately.
3. The 3-Step FADGI-Lite Workflow
Step A: Set Up the “Gray Base”
FADGI 3-star requires a very specific white balance.
Home Hack: Avoid “Auto White Balance.” Instead, place your color target in the frame and take a RAW photo. Then, use the “neutral gray” patch to set a custom white balance for the entire session. This ensures the a* and b* values (red-green and blue-yellow axes) remain as close to zero as possible.
Step B: Use a Linear Response Curve
Standard JPEGs apply an “S-Curve” to enhance images, which destroys FADGI compliance.
Home Hack: Always capture in RAW. When processing, use a Linear Profile. The image will initially appear flat and dull—this is desirable! It means you’ve preserved data in the shadows and highlights without the software making assumptions.
Step C: Target Validation (The “OpenDICE” Secret)
Professionals use expensive software to verify their star ratings.
Home Hack: Utilize the free OpenDICE software provided by the Library of Congress. You can feed it a scan of your ColorChecker, and it will precisely indicate the deviation of your colors. If your “Mean ΔE” is under 4.0, you have officially achieved a “Professional” baseline.
What does ΔE mean?
In simple terms, ΔE (Delta E) is a single number that indicates the difference between two colors. The “E” stands for Empfindung, the German word for sensation, making ΔE literally the “change in sensation.” In a digitizing workflow, ΔE measures the difference between your photo’s physical color and the digital color captured by your camera or scanner.
FADGI Summary
FADGI isn’t about how much you spend; it’s about how much you control. If you use a standard target and follow a linear workflow, a $500 DSLR can outperform a $5,000 scanner, especially if the scanner is running on ‘Auto’ settings.
Was This Post Helpful?
Building this free educational archive is a labor of love! If this post helped you today, please leave a Like below to let me know you found it useful. Your support helps keep this site 100% free and ad-free for the archiving community.
Loading…
To build a professional and sustainable archiving workflow, start with these essential guides, carefully sequenced in order of importance.
Confused by any technical jargon in this guide? Check out my [Full Jargon-Free Glossary] to get clear, simple definitions of all the archiving terms used here.
The links below are two definitive “home bases” for FADGI. One is the official interactive hub, and the other is the comprehensive technical “bible” for still imaging.
1. The Official FADGI Website (General Hub)
This is the main landing page maintained by the Library of Congress. It’s the best starting point. You can see the full scope of the initiative, which includes both Still Image and Audio-Visual working groups.
Why it’s authoritative: It is the primary source for all FADGI news, glossary terms, and project updates.
2. The Still Image Technical Guidelines (3rd Edition, 2023)
This is the specific document that defines the “Star Ratings” mentioned in this post. The 3rd Edition was published in May 2023. It is the most current version. The National Archives (NARA) uses it as the benchmark for digital preservation.
Why it’s authoritative: It provides the exact mathematical metrics (Delta E, noise, and sampling frequency) needed to meet professional standards.
“The ‘Technical Guidelines’ link is the gold standard used by federal agencies. Home users should check the ‘Table of Performance Goals’ on page 38. This will show how your DIY setup compares to the pros.”
A woman edits and organizes photos on a desktop computer in a cozy home office
AI Culling: How to Find the Top Ten
The good news? You don’t need a degree in data science or a paid subscription to use AI to do the heavy lifting.
Here is how to use free AI-powered tools to find your family’s “greatest hits.” The “culling” process involves selecting the best and discarding the rest. It is the most exhausting part of archiving. Here, I provide a solution in the form of AI-Culling: How to Find the Top Ten in a Sea of Photos
Continue with Care:Archiving is a manual process. Before starting, make sure your workspace is stable, your gear is secured, and your original files are backed up. You are the steward of your own history!
We’ve all been there: you finally finish digitizing a box of old slides or offload a decade of phone backups, only to realize you’re looking at thousands of nearly identical files. This “culling” process—selecting the best and discarding the rest—is the most exhausting part of archiving.
The good news? You don’t need a degree in data science or a paid subscription to use AI to do the heavy lifting. Here’s how to use free AI-powered tools to find your family’s “greatest hits.”
1. The “Visual Similarity” Strategy (Free & Offline)
Most family archives are cluttered with “bursts”—five photos of the same birthday cake or ten shots of the same landscape.
The Tool:DigiKam (Open Source/Free)
The AI Secret: DigiKam includes “Fuzzy Search” and “Find Duplicates” features. It uses computer vision to analyze the visual fingerprint of your photos.
How to Do It: Scan your folder, and DigiKam will group visually similar items. Instead of looking at 1,000 separate images, you only look at 100 “groups.” Pick the one with the best smile and remove (or archive) the rest.
2. Quality Scoring with Desktop AI
Why manually check for closed eyes or blurry faces when an algorithm can do it in seconds?
The Tools:Upscayl (Free/Open Source) or Google Photos (Free tier)
The AI Secret: While Upscayl is primarily for enlarging photos, its “Face Refinement” preview can quickly highlight the sharpest faces. Similarly, the “Utilities” tab in Google Photos often suggests “Best Photos” by identifying clear focus and distinct lighting.
The Logic: Set your folder to “Large Icons” and look for AI-highlighted “Suggested” edits. These are almost always the photos with the highest technical quality.
3. Smart Search: Finding the “Who” and “Where”
A digital interface visualizing interconnected personal memories and relationships
If you have 1,000 photos and want to find the 10 best of Grandma, don’t scroll—search.
The Tool:Windows Photos or Apple Photos
The AI Secret: Both operating systems now include local AI indexing. You can type “Dog,” “Wedding,” or a specific person’s name into the search bar.
The Workflow: First, search for “Smiling.” Then, add the search term “Outdoor.” The AI will filter your 1,000 photos down to 50, making it possible to pick the “Top 10” in minutes, not hours.
Archivist’s Note on Privacy: When using AI for family history, privacy is paramount. Many “free” online AI tools “train” their models using your uploaded images. To keep your family archive private, use local software. Options include DigiKam or native OS applications, which process AI on your own computer instead of in the cloud.
Summary: Your 15-Minute Culling Workflow
Group: Identify visual duplicates using DigiKam.
Filter: Search for specific keywords (names, objects, or emotions).
Pick: Select the sharpest image from each group and move it to a “Favorites” folder.
Was This Post Helpful?
Building this free educational archive is a labor of love. If this post helped you solve a problem today, please leave a Like below to let me know you found it useful. Your support helps keep this site 100% free and ad-free for the archiving community.
Loading…
These are internal posts, ancillary to the digitizing process, but still important.
Confused by any technical jargon in this guide? Check out my [Full Jargon-Free Glossary] to get clear, simple definitions of all the archiving terms used here.
The external links below focus on how machines rank “aesthetic” quality and identify the best images in a sequence—the core mechanics of finding the “top ten” in a sea of photos.
This is a cornerstone research paper from Google that describes a deep learning system trained to predict the aesthetic distribution of images. Unlike older models that simply classified images as “good” or “bad,” NIMA (Neural Image Assessment) scores photos based on a range of human preferences, essentially “looking” at an image to decide if it is technically sound and visually pleasing (Talebi & Milanfar, 2018). It is highly relevant for explaining how AI mimics human taste to surface top-tier photos.
This research addresses the exact problem of “finding the best” by training a network specifically to rank photos relative to one another (Kong et al., 2016). It explores how AI can be taught to recognize “meaningful photographic attributes”—such as the rule of thirds, depth of field, and color harmony—to create a fine-grained hierarchy of images. This is the logic behind “finding the top ten” rather than just filtering out the blurry ones.
3. Photo Rater: Photographs Auto-Selector with Deep Learning
This 2022 paper is particularly useful because it explicitly uses the photography term “culling” (Photo Rater: Photographs Auto-Selector with Deep Learning, 2022). It outlines a three-step approach for selecting top images: assessing general quality, detecting blur (from motion or focus), and evaluating composition. It provides a clear framework for how an automated system can handle the “tedious and time-consuming” task of manual selection.
In this tutorial, we’ll build a $65 Pipe & Flange Copy Stand Rig. It’s sturdier than a cheap tripod and takes up half the desk space.
Measuring a piece of plywood for the base of a DIY copy stand.
Stop overpaying for professional equipment: build a $65 Pipe & Flange Copy Stand Rig. Learn how to constrConstruct a rock-solid, precision-leveled copy stand for museum-quality camera scanning using affordable hardware store items.
Continue with Care:Archiving is a manual process. Before starting, make sure your workspace is stable, your gear is secured, and your original files are backed up. You are the steward of your own history! Please refer to my Disclaimer & Copyright Page.
If you’ve looked at the price of professional copy stands lately, you’ve likely experienced some “sticker shock.” While a dedicated stand is excellent, it’s essentially just a vertical pole on a flat base. You can replicate this with a trip to the local hardware store and a few items you already have in your junk drawer. In this tutorial, we’ll build a “Pipe & Flange” Copy Stand Rig that’s sturdier than a cheap tripod and takes up half the desk space.
A homemade rig holds a camera steady above an vintage print for digitizing.
Most people try to use a tripod for digitizing, but tripods are designed to stand around objects, not over them. They are prone to “micro-shake” and are notoriously difficult to get perfectly level. This DIY rig provides a fixed, vertical axis, which significantly speeds up batch-scanning 500 family photos.
Image Above:Recommended Flange Type Make sure it is the right diameter for your chosen pole.
The Shopping List (Hardware Store Items)
A Reminder – “Measure Twice and Cut Once”
You can find these at any DIY store or local hardware shop:
The Base: A 16″ x 20″ (or similar) piece of thick plywood or a heavy MDF shelf. (Weight = Stability).
The Pillar: A 1-inch diameter galvanized steel pipe (24″ or 30″ tall, depending on your lens focal length).
The Mount: A matching 1-inch floor flange, as above.
The “Magic” Ingredient: A Manfrotto Super Clamp (or a generic ‘Crab Clamp’). This is the only “specialty” photo item you need. Note: If your clamp does not come with a standard camera ball-head, then you will also need one.
Small Screws & Felt Pads: To attach the flange and protect your table.
Step-by-Step Assembly
This is your only opportunity to ensure everything is tight, perfectly level, and the post is precisely centered.
1. Prepare the Base
Screw the floor flange into the center-back of your plywood, ensuring it is tight.
Pro Tip: Apply several felt pads to the bottom of the wood. This will allow you to slide the entire assembly across your desk without scratching it.
2. Install the Pillar
Thread your steel pipe into the flange. Use a wrench to tighten it “hand-tight plus a quarter turn.” If the pipe has any grease on it, wipe it down with degreaser or rubbing alcohol. Grease is common on plumbing parts, and cleaning it will prevent it from ruining your photos.
3. Attach the Camera Arm
Clamp your Super Clamp onto the pipe.
Attach a standard Tripod Ball Head to the clamp’s stud.
Mount your camera to the ball head, facing straight down.
The “Secret” to Success: Precision Leveling
A sturdy Manfrotto clamp shown here securely attached to a black tubular arm.
A DIY rig is only as good as its alignment. If your camera is tilted by even 1°, your photos will be blurry on one side.
The Mirror Trick:
Place a small, flat mirror on the base directly under the lens.
Look through the camera’s viewfinder (or Live View).
Adjust the ball head until the reflection of your lens center is perfectly centered in your frame.
Once aligned, you are “perfectly parallel” and ready to scan.
Building this free educational archive is a labor of love! If this post helped you today, please leave a like below to let me know you found it useful. Your support helps keep this site 100% free and ad-free for the archiving community.
Loading…
Other Miscellaneous Internal Posts of General Interest
Confused by any technical jargon in this guide? Check out my [Full Jargon-Free Glossary] to get clear, simple definitions of all the archiving terms used here.
1. The Federal Agencies Digital Guidelines Initiative (FADGI)
What it is: This is the premier standard used by US federal agencies (like the Library of Congress and the National Archives) to evaluate digitization quality.
FADGI guidelines specifically outline the mechanics of copy stand photography, emphasizing the importance of keeping a camera perfectly perpendicular to a flat surface and angling dual lights at 45 degrees to eliminate shadows.
While this post presents a budget-friendly DIY build, it perfectly mimics the geometric setup required by professional FADGI Digitization Guidelinesused by cultural heritage libraries to ensure accurate, high-fidelity archival captures.”
2. The British Library’s Endangered Archives Programme (EAP) / Remote Capture Guide
What it is: A comprehensive open-access field guide published via Open Book Publishers that teaches archivist teams how to digitize vulnerable collections around the world using portable setups.
Why it fits my post: This guide features a dedicated chapter on using modern DSLR/mirrorless cameras, copy stands, and remote shutter releases in the field, bridging the gap between professional archival work and practical, hands-on setups.
For a deeper look into professional workflows, camera settings, and document handling on a copy stand, the British Library’s open-access Remote Capture Guide is an incredible textbook for any DIY archivist.”
High Density / warped & Unsearchable media. Stacks of old black-and-white photographs spread across a wooden desk near a window
Solving High-Density, Warped, and Unsearchable Media: The “Kodachrome” Issue, “Curled” or Brittle Media, and More!
Tackle the “difficult” media types. Learn expert solutions for digitizing warped photos, high-density negatives, and glass plate images that defy standard methods. Solving high-density, warped, and unsearchable media is just a matter of following the steps in this guide.s post.
The following instructions involve certain risks to the original. If you don’t feel confident performing them, please consult a professional. Please also refer to my Disclaimer & Copyright page on this website.
“Blocked” shadows frequently appear in dense-color slides, especially in types like Kodachrome or underexposed negatives. When these are digitized with a single exposure, the darker areas of the image often exhibit noise or grain because the camera sensor struggles to capture detail through the film’s densest parts.
Several colorful photo positives are spread out on a light table ready for inspection.
The solution is digital HDR scanning.
Take two or three pictures of the same frame with different shutter speeds: one “normal” and one or two “bright” (overexposed) to bring out details in the dark areas.
Use HDR software to combine them into a 32-bit file that shows the full range of the original film.
2. How to Handle “Curled” or Brittle Media
The Problem:Film and prints kept in rolls or dry attics will “cup” or “curl.” If the media isn’t perfectly flat, the edges will be blurry, and only the center will be in focus with your macro lens.
The Solution: “Relaxation” and “Sandwich Method.”
Relaxation: For very fragile media, place them in a “cold DIY humidity chamber” (a sealed bin with a damp sponge that never touches the media) for 24 hours to make the fibers more flexible.
The Sandwich: When capturing, use high-quality anti-Newton ring (ANR) glass or an acrylic sheet to gently press print media flat against the baseboard. For film, use a good-quality film holder to keep it flat against the light source. This ensures sharp edges all the way around without leaving “oil-slick” patterns on your scan.
You’ll find all the steps for making a “DIY HumidityChamber” at the end of this post.
3. Making History Searchable (OCR for Documents)
The Problem: A digital image of a letter from the 1920s is just that: an image. You cannot search for a name or date within it.
After scanning your documents, use OCR software like Adobe Acrobat, Google Lens, or specialized open-source tools to process them.
Tip: Save these as searchable PDFs. This embeds the text behind the image, allowing you to add IPTC descriptions and keywords. You can now search your “Digital Archive” for keywords just like you would a Word document.
Privacy Check: OCR’s “Hidden” Data
Converting a photo of a letter into a searchable PDF makes that information very easy to find.
Warning:If a letter contains private medical information or bank account numbers for a deceased relative, remember that once it’s OCR-indexed, anyone with access to your computer could find it with a simple search.
Action: Revisit our Data Sovereignty rule and ensure these “searchable” files are stored within the “Restricted” folder hierarchy discussed earlier.
How to Safely Flatten Brittle Media with a DIY Humidity Chamber
Photos and films stored in dry conditions for decades often become “locked” into a curled or rolled shape. Never attempt to flatten them forcefully. The emulsion (the image-bearing layer) is fragile and will crack, causing permanent damage.
Instead, you need to “relax” the fibers by introducing moisture in a controlled manner. You can create a professional-grade humidity chamber very inexpensively.
What You’ll Need
A large plastic bin with a tight-sealing lid.
A smaller plastic container (or a wire rack) to place inside the large bin, keeping the media dry.
Distilled water: Essential for preventing mold spores and mineral deposits.
A sponge or paper towels.
Step-by-Step Directions
The Setup
Place paper towels or a sponge in the bottom of the large bin and saturate them with distilled water. The goal is moist air, not standing water.
The Protective Barrier
Place your smaller container (or a wire cooling rack) on top of the wet towels in the large bin.
IMPORTANT: Ensure the media never touches the water or wet towels. You are only utilizing evaporated moisture.
The “Relaxing” Stage
Place your curled photos or film into the smaller box. Close the large lid tightly. Allow it to sit for four to twenty-four hours.
Check frequently: Thinner paper relaxes quickly, while heavy film takes longer. It’s ready when the media feels soft and “leathery” instead of “crunchy.”
4. The Pressing Step
Once you are ready, remove the media and place it between two sheets of acid-free blotting paper or clean white paper towels. Place something heavy and flat on top, such as a large book. Let it sit for another 24 to 48 hours to dry completely flat.
⚠️ Important Warnings The Mold Timer says you shouldn’t leave media in the chamber for more than 24 hours. Mold grows when there is humidity and no movement of air.
Stay Away from the “Sticky” Side: If the emulsion side of a photo feels “tacky” or sticky, remove it from the chamber immediately.
Tip:The best time to do your High-Res Camera Scan is when the document is flat and “limp” from the chamber. This will keep it from curling up again.
This is not for glass plates; it’s only for prints and films on paper.
The Paper Trail and Privacy
When you are relaxing old legal papers or letters, keep in mind that these often contain the most private data in your archive.
There are some risks to the original in the steps above! If you don’t feel sure about doing them, please talk to a professional.
If you are reviewing old legal documents or letters, remember that these often contain the most sensitive “Privacy” data in your archive.
Was This Post Helpful?
Building this free educational archive is a labor of love. If this post helped you solve a problem today, please leave a Like below to let me know you found it useful. Your support helps keep this site 100% free and ad-free for the archiving community.
Loading…
These are internal posts, ancillary to the digitizing process, but still important.
Confused by any technical jargon in this guide? Check out my [Full Jargon-Free Glossary] to get clear, simple definitions of all the archiving terms used here.
External Linksy blog addresses the exact intersection of difficult physics (warped media), high-density data preservation, and digital searchability (OCR/metadata), here are the most relevant, highly authoritative external links.
1. For “High-Density” & Optical Media Preservation
Since this section of my post covers handling dense physical media formats, microforms, or fading optical media, referencing federal preservation guidelines adds immense authority.
Anchor Text Choice: “Library of Congress Preservation Guidelines” or “institutional standards for media preservation”
Why use it: It provides readers with a baseline on how national institutions approach long-term storage and media care.
2. For “Warped” & Fragile Physical Media
The Northeast Document Conservation Center (NEDCC):
NEDCC Preservation Leaflets” or “professional flattening and repair leaflets”
The NEDCC offers highly detailed, free technical leaflets on treating damaged paper, photographs, and film backing materials safely before they hit the copy stand.
Why use it: When explaining how to map OCR-extracted text into structural metadata fields so the files become universally searchable, linking directly to the governing body of photo metadata standards is the most authoritative move possible.
Learn the vital steps to capturing overlarge, 3D, and glass media.
Standard prints are easy, but vintage archives often contain “problem children” that defy a standard copy-stand setup. Here is how to handle capturing glass—over large and 3D media—and the four most common challenges.
Continue with Care:Archiving is a manual process. Before starting, make sure your workspace is stable, your gear is secured, and your original files are backed up. You are the steward of your own history!
1. Lantern Slides and Glass Plate Negatives
The Problem: These are very fragile and create “double reflections.” Glass is heavy and can break when using regular film clips. It also reflects both the light source and the camera lens.
The Fix: Support: Use a special holder for the glass plate. You can also use a “riser” that holds the plate only by its edges.
Reflections: To hide the camera’s reflection in the glass, use a black “lens” donut. This donut is a piece of black foam board with a hole for the lens.
Focus: Always look at the emulsion side (the dull side), not the glass surface.
Photographic negatives are displayed on an illuminated lightbox for examination.
2. Big Things (Like Maps and Really Big Documents)
The Problem:“Loss of Resolution” and “Distortion of the Lens” means you lose the fine detail needed for text. This happens if you move the camera far enough away to fit a big map in the frame.
The Solution:The “Mosaic” Method involves taking pictures of the item in pieces (tiles) with a 30% overlap.
Stitching:To put them together, use “Photo Merge” in Lightroom, Gimp, or a separate stitching program. This makes a huge, very high-resolution file that lets you read even the smallest print on a map.
3. Stereoview Cards (Stereographs)
The Problem:These cards are often bent or warped. The two pictures on them have to be perfectly lined up for them to “work” visually.
The Fix:Lighting. Use lighting techniques called “cross-polarization” to eliminate glare on the curved surface.
The Digital Alignment:Take a picture of the entire card. In the digital image, first, crop the left and right images separately during post-processing. Then, use a template to ensure the horizon lines align perfectly for viewing.
The Problem:The human brain struggles to merge the two images if the left image is slightly higher than the right, or if one is tilted by even one degree. This is called vertical parallax, and it is the main reason your eyes hurt when viewing 3D content.
The Fix for the Template: Do not “eyeball” the crop. Use a digital template, typically in Photoshop or Affinity Photo. See the links below.
The Stereo Window:Align the pictures so that their “inner” edges form a clean frame. This creates the illusion of looking at a scene through a window, rather than just two flat pictures.
Slice:Divide the picture of the card into two separate files: one for the left side and one for the right side.
Level:Choose a clear horizontal landmark, such as a tabletop or a horizon line. Ensure it is at the same pixel height in both frames.
Further Details and Links
Finding the right visual guide is crucial for mastering stereograph alignment. Even a small vertical mismatch can cause eye strain for the viewer.
For Photoshop
A specific tutorial, complete with a downloadable template, is available:
The Template:The creator provides a link to a Photoshop template in the video description.
Key Lesson:It demonstrates how to place your left and right captures into the template, ensuring they are perfectly leveled and spaced for a stereoscope.
For GIMP
GIMP does not have a widely shared “stereoview-specific” template file. The process relies on using theAlignment ToolandGuidesto achieve the same effect.
The Technique:Use the “Centering with Guides” method mentioned at the 7:33 mark. Drag a horizontal guide across your canvas to act as your “horizon line.” Then, use the alignment tools to snap both your left and right image layers to that exact pixel height.
Quick Workflow TipWhen using these videos to set up your own template:
Repeat:Do the exact same for the right image. If both identical points touch that same line, you have eliminated the vertical parallax that causes headaches.
4. Mounted and Cased Media (Daguerreotypes and Ambrotypes)
The Challenge: These media act like mirrors, making it difficult to see the ancestor whenviewed directly.
The Fix:
The “Off-Axis” Technique:Tilt the camera or the media slightly (5–10 degrees) to eliminate the mirror effect. Alternatively, use a “light tent” to create a soft and even lighting environment.
Black Surround:Place black velvet around the camera to prevent stray light from reflecting off the plate’s surface.
Horizontal Guide:Always place a guideline across the middle.
Feature Matching:Select a distant, sharp point in the left image, such as a rock or a window corner. Move the layer until it aligns with the guide.
Note on Privacy for “Difficult” Media
Items such as maps or large certificates often contain specific addresses or legal information. When creating your archive structure, carefully review the metadata of “stitched” files. Some software may remove the IPTC data you have meticulously created during the mergingprocess.
🛑 The instructions above for Capturing Glass – Over Large and 3D Media, involve certain risks to the original. If you are not confident performing these steps, please consult a professional. Please also refer to myDisclaimer & Copyright page on this website.
Was This Post Helpful?
Building this free educational archive is a labor of love! If this post helped you solve your problem today, please leave a Like below to let me know you enjoyed it. Your support helps keep this site 100% free and ad-free for the archiving community!
Loading…
These are internal posts, ancillary to the digitizing process, but still important.
Confused by any technical jargon in this guide? Check out my [Full Jargon-Free Glossary] to get clear, simple definitions of all the archiving terms used here.
Here are two highly authoritative, expert-backed external links perfect for this post:
The Northeast Document Conservation Center (NEDCC): Preservation of Glass Plate NegativesWhy it’s essential: The NEDCC is a premier authority on physical artifact conservation. Their technical preservation briefs explicitly break down the historical chemistry, handling hazards, and physical properties of both collodion wet plates and gelatin dry plates. Linking to their framework provides your readers with professional instruction on utilizing specialized custom sink mats, mitigating chemical emulsion lifting, and handling cracked or broken glass without destroying the underlying silver image.
FADGI Guidelines for Digitizing Oversized and Three-Dimensional MaterialsWhy it’s essential: Maintained by the Federal Agencies Digital Guidelines Initiative, this serves as the global textbook for complex cultural heritage imaging. Under their physical handling and imaging rules, they detail specific, strict mandates for capturing oversized media and physical objects—explicitly forbidding the use of high-vacuum suction boards or heavy glass platens on fragile surfaces without a conservator’s approval, and detailing how to safely handle and composite multi-section files.
Two people exchanging documents among archival boxes labeled with historical data.
How to Build a Succession Plan for Your Digital Archive
Succession planning is the human side of digital preservation. It is the process of choosing a “Digital Heir” and preparing them to take up the torch—ensuring your years of hard work don’t end up as an inaccessible brick of silicon in a junk drawer.
In my previous post, I shared a Template for a Digital Archive Letter of Instruction. That document is your archive’s “Emergency Break Glass” kit. However, a letter is only effective if there is someone prepared to read it.
Here’s how to ensure your digital legacy survives to the next generation.
1. Identify Your Digital Successor
Not everyone in the family has the interest or technical skill to manage a digital archive. You need to identify one or two people who will act as the “Chief Curator.”
The Tech-Savvy Heir: Someone comfortable with SSDs, cloud storage, and file formats.
The Family Historian: Someone who understands the value of the stories behind the images.
The Ideal Candidate: Ideally, this is the same person. If not, pair them up: one keeps the hardware running; the other keeps the stories alive.
You likely already use the 3-2-1 backup rule (3 copies, 2 different media, 1 offsite). Your succession plan should apply this exact same logic to people and access:
3 People who know the archive exists.
2 Physical copies of your Letter of Instruction (e.g., one with your Will, one in your desk).
1 Digital Executor named in your legal documents.
3. Formalize It Legally
A detailed infographic illustrating the steps for digital legacy planning and archival succession.
In many jurisdictions, digital assets exist in a legal gray area. To protect your archive:
Update Your Will: Explicitly mention your “Digital Assets.” You can grant your executor the power to access, handle, distribute, or delete digital files.
The Memorandum of Wishes: A Will is a formal legal document, whereas a Memorandum of Wishes serves as a simpler way to state specific desires. For instance: “I want the ‘Smith Family Archive’ SSD to go to my niece, Sarah, as she is the designated family historian.”
4. Schedule an “Archival Handover”
Don’t let your death be the first time your successor sees your filing system. Once a year, hold a 15-minute “Archival Briefing”:
Show them where the Master Drive is kept.
Explain your folder naming convention (e.g., SFA-AG07-Roll-01).
Demonstrate how to log into your Password Manager.
The “Legacy Day” Update: As mentioned in the Letter of Instruction, use this day to verify that passwords haven’t changed and hardware is still spinning.
5. Curate for Clarity (The “Less is More” Strategy)
One reason heirs abandon digital archives is “Data Overwhelm.” If you leave behind 50,000 unorganized RAW files, they may delete everything out of frustration.
The “Gold” Folder: Create a specific folder named START_HERE_BEST_OF_COLLECTION.
Include a “Read Me” File: A simple text file in the root directory of your drive that explains what the archive is and why it matters.
6. The Financial Plan
Digital archives aren’t free to maintain. Cloud storage subscriptions (like Backblaze or Google One) expire if the credit card on file is canceled.
The “Archive Fund”: If your archive relies on paid cloud hosting, consider leaving a small dedicated amount in your estate to cover 5–10 years of storage fees, giving your successor time to transition the data.
Summary: Your Action Plan
Print your Letter of Instruction.
Appoint your Digital Successor today.
Talk to them about it!
Additional Legal & Privacy Templates You Can Use
Your digitizing work is a gift to the future, and a succession plan ensures that gift is actually opened. Below are two practical templates you can copy and adapt right now.
Copy and provide this to your estate solicitor or add it to your legal documents:
“I give to my Digital Successor, [Name of Successor], full power to access, manage, distribute, and/or delete my digital assets. This specifically includes my ‘Family Digital Archive’ stored on [Physical Hardware/Cloud Service].
I authorize my Executor and Digital Successor to bypass or reset any passwords and remove encryption if necessary to recover these files for the benefit of my heirs. This includes the authority to maintain cloud storage subscriptions using funds from my estate for a period of [e.g., 2 years] following my passing.”
2. The Archive Guide: Succession Privacy Statement
Include this as a text file named !!_PRIVACY_AND_SHARING_READ_ME.txt in the root folder of your master drive:
Archive Privacy & Usage Guidelines
To my Successors and Family Members: This archive contains our shared history. While I want these memories to be enjoyed, I ask that you respect the following privacy boundaries to protect the dignity of those pictured:
Public vs. Private: Please distinguish between “Public Interest” photos (ancestors from 50+ years ago) and “Private” photos (living family members).
Social Media: Before posting photos of living relatives to social media or public genealogy sites (like Ancestry or MyHeritage), please seek their explicit consent.
Sensitive Content: I have tagged certain folders as [PRIVATE] (e.g., medical records, personal journals, or sensitive letters). These are intended for family records only and should never be published or shared outside the immediate family line.
The Goal: This archive is meant to connect us, not to embarrass or expose anyone. Use your best judgment and err on the side of privacy.
Glossary: Confused by any technical jargon in this guide? Check out my [Full Jargon-Free Glossary] to get clear, simple definitions of all the archiving terms used here.
Was This Post Helpful?
Building this free educational archive is a labor of love. If this post helped you solve a problem today, please leave a Like below to let me know you found it useful. Your support helps keep this site 100% free and ad-free for the archiving community.
Loading…
External Links
These two high-quality external resources focus specifically on digital estate planning, establishing a “digital executor,” and handling the inheritance of intangible files:
[The Guardian’s Guide to Organising Your Digital Legacy]: Provides an excellent framework for creating a digital inventory and appointing a specialized “digital executor.” It addresses how platform-specific rules (like Apple’s Legacy Contacts or Google’s Inactive Account Manager) interact with personal file storage.
[Brabners Legal Insights: 3 Essential Steps to Protect Your Digital Assets]: Written by legal professionals, this guide covers the legalities of modern lifetime planning for digital property. It breaks down how to construct a secure digital asset inventory without exposing sensitive passwords and why picking a tech-capable executor is critical.
High-Res Camera Mode [Pixel-Shift] Comparison: Sony vs. Lumix vs. OM System
This high-resolution camera mode (pixel-shift) comparison represents a technical deep dive into how different mirrorless “HD” modes impact digitization quality.
The Fundamentals: Why it matters for Digitization
In this High-Resolution Camera Mode (Pixel-Shift) comparison, you will learn that High-Resolution (Pixel-Shift) modes don’t just add pixels; they eliminate the Bayer Pattern.
Interpolation: By moving the sensor by 0.5 or 1 pixel, each spot on your vintage photo is captured by red, green, and blue pixels. This process eliminates color moiré and aliasing on fine film grain.
Brand Comparison Table
Feature
Sony (a7R IV/V)
Lumix (S1R/S5 II)
OM System (OM-1)
Max Resolution
240MP (16 shots)
187MP (8 shots)
80MP (8 shots)
In-Camera Processing
No (Requires desktop software)
Yes (Produces high-res RAW/JPG)
Yes (Very fast)
Motion Correction
None (Any movement = “ghosting”)
Excellent (Mode 2 handles movement)
Good (Handheld High-Res mode)
Workflow Speed
Slow (Tether + Post-processing)
Fast (Ready to archive immediately)
Fast (Great for volume)
Technical Recommendation for Digitizers
For the “Purist” (Maximum Detail):Sony is the clear winner for maximum detail. Its 240MP files offer the most flexibility for cropping. However, it lacks in-camera stitching and motion compensation, necessitating a heavy-duty copy stand and a vibration-free environment.
For the “Efficient Archivist”: Lumix strikes the optimal balance. Its “Mode 2” motion compensation is industry-leading, intelligently ignoring minor imperfections like a slightly curling photo edge or a vibrating floor. This feature significantly reduces the need for reshoots.
For the “Mobile/Field Archivist”: The OM System (Olympus) is ideal. Its Handheld High-Res mode enables digitization in archives where tripods or copy stands are not permitted.
The “Resolution Limit” Warning
While a higher megapixel count provides greater detail, it is crucial that the lens meets the necessary specifications. To fully resolve 240MP or even 186MP, users must employ high-end macro lenses such as the Sony 90mm f/2.8 G or Sigma 105mm DG.
A Lumix camera next to a worn memory book on a wooden table
The primary DSLR manufacturer that embraced this is Pentax (Ricoh):
Pixel-shift, or high-definition mode, is predominantly found in modern mirrorless cameras. The other primary DSLR manufacturer that also embraced this technology is Pentax (Ricoh).
The Canon EOS R5 also features a high-definition, high-resolution mode, known as IBIS High Resolution, which was added via firmware update v1.81. This mode utilizes the in-body image stabilizer to move the sensor, capturing nine images to create a single, highly detailed 400MP JPEG image.Please let me know if I have missed any DSLR cameras that have this function.
Why [Pixel-Shift] is rarer in DSLRs
There are two main reasons why mirrorless cameras have “won” the pixel shift race:
IBIS Prevalence: Mirrorless cameras (especially from Sony, LUMIX, and OM System/Olympus) were designed around sensor-based stabilization from the ground up. Many DSLR models have relied heavily on lens only stabilization.
Electronic Shutters: Pixel Shift requires taking many photos in rapid succession (often 8 to 16 shots). In a DSLR, the mechanical mirror flipping up and down creates vibrations that can ruin the sub-pixel alignment. Mirrorless cameras use electronic shutters to stay perfectly still during the sequence.
Model
Feature Name
Primary Benefit
Pentax K-1 / K-1 II
Pixel Shift Resolution
Full-frame sensor shift for better color and detail.
Pentax K-3 II / K-3 III
Pixel Shift Resolution
APS-C sensor shift; the K-3 III is one of the most advanced DSLRs still in production.
image displaying the consequences of a your archive becoming a Ghost Archive problem. A man holding his head in frustration.
The digital archive letter of instruction will guide you through succession planning for your digital archives.
Goal: To ensure the “Ultimate Archive” doesn’t die on a forgotten hard drive or locked cloud account.
1. Introduction: The “Ghost Archive” Problem
The Problem: Why 90% of digital archives disappear (due to lost passwords, expired cloud subscriptions, and “bit rot”).
The Mission: To ensure that your work—thousands of hours of digitizing—survives to be seen by your great-grandchildren.
Definition: What a “Digital Successor” is and why every archivist needs one.
The Answer:
Digital succession, also known as digital inheritance, is the process of managing an individual’s digital assets—such as social media accounts, cryptocurrencies, online banking, photos, and intellectual property—and transferring them to beneficiaries after the person’s death or incapacitation. This process ensures that digital legacies are secured and legally handled, often requiring specific instructions within a will.
It would be a waste of your time if your family cannot access the archive after your death.
This website offers many tutorials to help you create your professional family digital archive. However, your efforts would be in vain if your family couldn’t access it after you’re gone. This post is the first step in a plan to ensure your family archive remains accessible.
It’s crucial to provide your loved ones with clear instructions on how to access and use the digital archive. This not only preserves your family’s memories but also empowers them to continue the tradition of recording their history.
This guide is a vital component of your plan, transforming your work from a mere “technical project” into a “living legacy.” Without adequate documentation, most digital archives are lost within five years of their creator’s death.
Here is a comprehensive outline for The Digital Legacy Blueprint: A Succession Plan for Your Family Archive.
Template:Digital Archive Letter of Instruction
Keep it Physical: A digital-only version of a legacy letter can be easily lost if the computer is encrypted. Edit this letter to suit your archive, then print it and keep it with your legal will.
Annual Review: Designate a “Legacy Day,” such as your birthday or New Year’s, to update the passwords or hardware locations on this sheet.
This template is designed to be an “Instruction Manual” for your heirs, transforming a confusing pile of hard drives and passwords into a clear, actionable mission.
I’ve designed this to be copy-paste ready; feel free to customize it to represent your own archive and workflow.
The Template
To my Successors/Heirs:
Attached to this letter are the keys to our family’s history. I have spent significant time digitizing, restoring, and archiving our vintage photographs and records using high-definition mirrorless camera capture. To ensure this work isn’t lost, please follow these instructions.
1. The Master Vault (Physical Hardware)
The primary “Master Archive” is located on:
Device: [e.g., Silver SanDisk SSD / Black Synology NAS]
Physical Location: [e.g., Top drawer of my office desk / Fireproof safe]
Computer Login: [e.g., Use my laptop with Username: Admin / Password: See Password Manager]
2. Digital Access (The Keys)
I use a Password Manager to store all credentials for our archival accounts.
Service: [e.g., Bitwarden / 1Password / Apple Keychain]
How to Access: [e.g., I have added you as an “Emergency Contact.” My Master Password is written on the back of this letter.]
2FA Recovery: If you are prompted for a phone code you cannot access, check the “Backup Codes” sheet. It is attached to this document.
3. Priority Cloud Accounts
If the hardware is damaged, the secondary copies are stored here:
Primary Cloud: [e.g., Google Photos / SmugMug / Backblaze]
Purpose: [e.g., Google Photos is for sharing; Backblaze is for RAW file backup.]
4. How the Archive is Organized
To help you find things, I have used the following system:
Folder/File Names: The Master Folder is Smith Family Archive. Files are named in the format SFA-AG07-Roll-01-img01. They directly cross-reference the label on the original media container, e.g.,
SFA-AG07-Roll-01
The actual folder structure on the drive looks like this:
Building this free educational archive is a labor of love! If this post helped you solve your problem today, please leave a Like below to let me know you enjoyed it. Your support helps keep this site 100% free and ad-free for the archiving community!
Loading…
These internal posts will guide you to create a digital archive succession plan and a letter of instruction to your heirs.
Confused by any technical jargon in this guide? Check out my [Full Jargon-Free Glossary] to get clear, simple definitions of all the archiving terms used here.
These groups specialize in the intersection of genealogy, technology, and estate planning.
National Archives (Archives.gov): While they focus on physical preservation, their guide on “Digitizing Family Papers and Photographs” provides the technical standards (like DPI and file formats) needed for an archive to last for decades.
Digital Legacy Association: An excellent resource for the “big picture” of your digital afterlife. They provide templates and guides for recording your digital wishes.
STEP (Society of Trust and Estate Practitioners): Their “Memories” project provides professional advice on digital assets, including a “Digital Assets Inventory” you can download to list where your archives are stored.
Here, you will learn the key steps to camera-digitizing tintypes and ambrotypes.
Review the steps below to learn how to camera-digitize tintypes and ambrotypes at museum quality. Discover identification tips, the black backing trick, polarization, lighting setups, and why these wet plates differ from daguerreotypes.
An AI generated infographic visually highlighting the steps to Camera-Digitizing Tintypes and Ambrotypes.
If you’ve worked with a family archive or vintage collection, you’ve likely encountered “cased images”—small, ornate folding cases containing a portrait on a dark surface. While it’s tempting to assume every Victorian-era image is a Daguerreotype, this isn’t always true. Often, these are tintypes or ambrotypes, which are much sturdier and easier to digitize.
💡 Looking for a different format?
If you are working with reflective physical media or specialty formats, explore my dedicated guides below:
Digitizing tintypes and ambrotypes presents different challenges than Daguerreotypes. To the untrained eye, these “wet plate” processes may appear similar to Daguerreotypes, but the physics of digitizing them differs significantly from the mirror-like silver surface of a Daguerreotype.
Before you set up your camera scanning gear, you must identify the substrate.
The Daguerreotype: A “mirror with a memory.” If you have to tilt the plate to see the image—alternating between a positive and a negative view—it’s a daguerreotype. This image is on a silver-plated copper sheet.
The Tintype: Tintypes are on thin sheets of iron (not actually tin). They are darker, less reflective, and—crucially—magnetic.
The Ambrotype: Ambrotypes are “positives” on glass. You are holding an ambrotype if you see depth in the image, or if the black background appears to be “flaking” away from behind the portrait.
A montage of camera digitized vintage images showing both the front image and writing on the backs of some prints.
Why Digitizing Wet Plates Is Different
While the workflow for a Daguerreotype is defined by managing extreme reflections, tintypes and ambrotypes require a different approach:
The flatbed scanner is often recommended for its simplicity, but a camera can actually be the superior method, provided you have the right setup.
There isn’t a single “best” method; it depends on what you prioritize. Do you value speed and consistency (scanner) or utmost detail and character (camera)? For camera and copy stand instructions, see my post. The Ultimate Guide to Digitizing Vintage Prints.
You should never put a Daguerreotpe in a flatbed scanner, as the direct light will usually create a blown-out, unviewable mess. Tintypes, however, often thrive on a scanner.
Why? The emulsion on a tintype is relatively matte compared to silver. A high-resolution photo scanner, like the Epson V-series, can capture the incredible “japanned” texture of the iron plate—something a camera can miss.
Tip: Always use a spacer or a thin frame. This ensures the metal plate doesn’t touch and scratch the scanner glass.
The “Backing” Trick for Ambrotypes
Ambrotypes are actually underexposed glass negatives. They only appear as “positives” because they were originally backed with black velvet or black paint. Over a century, this backing often degrades or peels.
The Fix: When digitizing, place a piece of high-quality black acid-free cardstock or black velvet directly behind the glass. This “re-activates” the image, providing contrast that makes the portrait pop for the camera lens.
Lighting and Polarization
Two vintage photographs showcasing an ambrotype and a tintype from the mid-1800s
Daguerreotypes need a specialized “copy stand” setup with black baffles to prevent the camera’s reflection from appearing in the silver. I have a post, digitizing-a-large-daguerreotype on this site that explains all of this.
I use two 96 CRI LED panels, each fitted with a softbox and tilted at a 45-degree angle to the print. This setup illuminates all my prints with a soft, even light, ensuring accurate colors and minimizing harsh shadows. I frequently adjust the distance between the panels to achieve the optimal light intensity and spread for each project.
If you plan to use polarizing sheets, mount them on a frame and position it a few inches in front of the softboxes, not behind them.
For Wet Plates: While standard 45-degree lighting can be used, heavily varnished tintypes often present “hot spots.” To mitigate glare from old varnish and preserve shadow details, I highly recommend using circular polarizers on your lens in conjunction with polarizing sheets on your lights. For more information, please see my post on polarizing lens filters and sheets..
Remember, your goal isn’t just to capture the face; it’s to capture the history. When digitizing tintypes, do not crop out the clipped corners or the rusty edges of the plate. These are the hallmarks of the 19th-century process and add “archival weight” to your digital collection.
Disclaimer: Daguerreotypes, tintypes, and ambrotypes are incredibly fragile and valuable. If you are not comfortable handling the case or the plate, consult a professional conservator or photo archive service. Never clean the plate itself. Please see my Disclaimer & Copyright page.
Was This Post Helpful?
Building this free educational archive is a labor of love! If this post helped you solve your problem today, please leave a Like below to let me know you found it useful. Your support helps keep this site 100% free and ad-free for the archiving community.
Loading…
Explore More Photo Digitizing Guides On This Site
In this section, you will find other professional media digitizing guides.
Confused by any technical jargon in this guide? Check out my [Full Jargon-Free Glossary] to get clear, simple definitions of all the archiving terms used here.
I’ve curated a list of the most authoritative sources below. These range from high-level museum standards to practical “how-to” guides from modern wet-plate practitioners.
Why it’s great: This is arguably the best “ID Guide” online. It provides high-res photos and technical specs to help you distinguish between Daguerreotypes, Ambrotypes, and Tintypes.
Why it’s great: This section is focused on Dags. It explains the Library’s historical digitization workflow, including their use of copy negatives and color transparencies.1
Why it’s great: This is the “Bible” of archival imaging. It contains the technical tables for resolution, bit depth, and color space used by federal archivists when digitizing historical photographs.
Why it’s great: The NEDCC is the gold standard for conservation. This session covers the risks specific to glass supports (Ambrotypes) and metal supports (Tintypes), like iron rust and emulsion flaking.
Why it’s great: This provides a fascinating behind-the-scenes look at a modern professional studio setup. It is used specifically for cased images. The setup includes their lighting and camera configurations.
Why it’s great: It bridges the gap between the 19th-century process and modern digital conversion. It is written by people who still make these plates today.
Why it’s great: It offers a more “commercial” but highly practical perspective on scanning versus camera capture. Additionally, it includes tips for post-processing these images in Photoshop to keep their “vintage” feel.
Dual monitors display the migration of data from Windows 11 to Linux Mint desktop systems.
Many photographers rely on older, high-performance workstations that lack the specific microchips required for Windows 11. My advice: Migrate to Linux from Windows!
Don’t throw away your hardware; change your engine!
Beyond the Hardware Wall: My Migration from Windows 11 to Linux Mint 22.2, a Retired IT Systems Engineer’s Journey.
I spent decades in the Microsoft ecosystem. I’ve watched the landscape change—not always for the better. Recently, I found myself increasingly frustrated with Windows, specifically Microsoft’s decision to abandon perfectly capable hardware by requiring TPM 2.0. This situation made me feel a dwindling sense of user agency over the machines we’ve paid for and own. I reached a conclusion: Migrating to Linux was the only solution!
Today, I am solely using Linux Mint. It serves as a beautifully designed “bridge” for Windows refugees. It offers the stability required for precision work like camera digitizing and archiving. Best of all? It avoids the long, drawn-out “update-induced” interruptions that plague Windows 11.
“Why Linux?”
Many photographers rely on older, high-performance workstations that lack the specific microchips required for Windows 11. My advice? Don’t throw away your hardware; change your engine. Linux offers superior memory management and rock-solid stability for the intensive batch-processing sessions required when archiving vintage photos. By switching to Linux, photographers can extend the lifespan of their equipment. They can utilize a platform that respects their workflow rather than interrupting it.
TheLinux Learning Curve
Linux Mint has a desktop layout that is easy for people switching from Windows to use. However, new users will still need to learn its interface because Linux and Windows are very different. For example, getting my HP convertible laptop to work in tablet mode with Linux has been a challenge for me. Despite these difficulties, I’ve found the community support and online resources for Linux to be very helpful.
Linux Mint has a desktop layout that is easy for people who are switching from Windows to use.
Gemini AI
Gemini AI is the best online support tool, and I use it constantly. When I briefly explain my Linux problem, Gemini always tells me what to do, even providing the exact commands to type into the terminal. It is much better than the old style of support pages. With time, AI, and trial and error, I’ve started to learn about the many unique things Linux can do.
Professional Editing Tools: Filling the Gap
I use Panasonic/Lumix mirrorless cameras. While manufacturers often neglect native Linux support for tethering apps, the open-source community has stepped in with professional-grade alternatives. These tools allow for seamless connections, live view, and remote shooting, free from manufacturer-imposed limitations.
Linux editing application shortcuts on my Linux Mint 22.2 desktop
Digital Asset Management (DAM)
digiKam: The powerhouse. It handles libraries of 100,000+ images with ease and offers professional-grade metadata tools (EXIF/IPTC/XMP).
Rapid Photo Downloader: Built by a photographer for photographers, it automates renaming and subfolder sorting during ingestion.
Tethering & Capture
Darktable: My primary “editing command center,” it also replaces the LUMIX Tether app by integrating capture directly into the editing pipeline.
Entangle: This serves as a lightweight alternative for those who prefer a dedicated, simple interface for capture tasks. It also works perfectly with my Lumix cameras. Captured files save by default to home/pictures/capture.
Scanning & Restoration
VueScan: The “savior” of legacy hardware. If you have an old Nikon CoolScan or Epson scanner, Windows may no longer recognize it, but VueScan on Linux almost certainly will.
GIMP + G’MIC: The gold standard for restoration. The G’MIC plugin offers “Repair” and “De-noise” filters that rival expensive AI-based subscription software.
Negative Inversion: FilmLab Desktop will convert your negatives to high-quality positive images and includes many other editing features. An excellent beta version is available for Linux.
Navigate to the Linux Menu → Software Updater → Settings → Additional Drivers. Ensure the “Proprietary/Tested” driver is selected for your graphics card. This step enables OpenCL, which can accelerate photo exports in Darktable by up to tenfold.
Step 2: Install via Flatpak
In the Software Store, select the Flatpak versions of Darktable and digiKam. This guarantees access to the latest RAW camera support and updated lens profiles.
In digiKam, go to Settings → Configure digiKam → Metadata. Enable “Write to Sidecar Files (XMP).” This action embeds your tags and descriptions directly with your photo files, ensuring your archive remains readable on any operating system for decades.
The tools above enhance connectivity and support various image formats and editing options, making it easier for photographers to process their work directly on their computers. This integration not only saves time but also opens up new creative possibilities for both amateur and professional photographers.
If Linux Doesn’t Detect Your Camera for Tethering:
The “Ghost in the Machine”: When you plug in your camera, the file manager may automatically “grab” it. To resolve this, right-click the camera icon on your desktop and select “Unmount.” Linux only allows one program to communicate with the USB port at a time.
The Handshake: Ensure your Lumix camera is set to “PC(Tether)” mode, not “Mass Storage.”
Permissions: If the above steps don’t work, open the Terminal and type: sudo usermod -aG plugdev $USER. Then, log out and log back in. This command grants your user profile permission to access specialized USB hardware.
Pro Tip: Troubleshooting Connection Issues: Tethering Lumix cameras in Darktable can initially be finicky, especially if gphoto2 was not included during the initial setup. If your camera isn’t showing up, use the Terminal to install the missing libraries with sudo apt install gphoto2 libgphoto2-6. Afterward, run gphoto2 –auto-detect to confirm the connection. For a more “plug-and-play” experience, I suggest using the Flatpak distribution from Darktable’s official site, as this package includes these dependencies out of the box.
If even then you initially cannot see your camera in Darktable’s tethering interface, return to the Lighttable panel. Click on ‘import’ in the top-left corner. If everything is working correctly, your camera should be listed, confirming its connection.
Here Is a Great Series of Videos to Quickly Get You Started on Photo Editing with Darktable.
Migrating to Linux in 2026 is easier than ever because the “compatibility gap” has narrowed significantly. Modern Linux distributions (distros) now feature excellent hardware support. “Proton” technology also allows almost all Windows games to run natively.
2. Essential Migration Guides
Before you format your drive, these guides will help you prepare:
The 2026 Linux Roadmap (MackeyTech): This practical video provides a 5-step roadmap. It covers hardware checks and data preparation before you make the jump.
WinBoat: A 2026 tool that makes running a Windows Virtual Machine effortless.8 If you have one “must-have” Windows app that won’t run on Linux, WinBoat sets up a bridge for you.9
Heroic Games Launcher: Use this to run your Epic Games library on Linux. You do not need the official (Windows-only) launchers. It also supports your GOG library.10
4. Pro Tip: The “Live USB” Test
The best part about Linux is that you can try it without installing it.
Use a tool like Rufus or Etcher to “burn” it to a USB stick.
Restart your PC and boot from that USB.
Try Before You Wipe: You will be booted into a fully functional Linux desktop running directly from your USB drive. This is your chance to test everything—verify your Wi-Fi, test your printer, and ensure your camera digitizing setup functions as expected—before modifying your Windows hard drive.
⚠️ Critical Safety Check: Before choosing the option to “Erase disk and install Linux” (or replace your Windows installation), stop and double-check your backups! Ensure all your essential passwords, files, photos, software licenses, and project archives are safely backed up to an external drive or cloud storage, and verify that those backups actually open. Once you confirm the installer to overwrite your drive, your Windows operating system and all unbacked-up data will be permanently erased. Please refer to my Disclaimer and Copyright page.
Was This Post Helpful?
Building this free educational archive is a labor of love! If this post helped you solve your problem today, please leave a Like below to let me know you enjoyed it. Your support helps keep this site 100% free and ad-free for the archiving community!
Loading…
Here you will discover other informative and interesting internal posts.
Confused by any technical jargon in this guide? Check out my [Full Jargon-Free Glossary] to get clear, simple definitions of all the archiving terms used here.
The first step is picking a version of Linux that matches your comfort level.2 In 2026, these are the top recommendations for Windows switchers:
Linux Mint: The “Gold Standard” for Windows refugees. Its interface is nearly identical to Windows 7/10/11, and it comes with everything you need (media codecs, drivers) pre-installed.
Pop!_OS: If you have an NVIDIA graphics card, this is the best choice. It comes with the tricky NVIDIA drivers already baked into the installer.5
AnduinOS: A newer 2026 favorite created by a former Microsoft engineer.6 It mirrors the Windows 11 aesthetic while prioritizing privacy.
This Beginner’s 3-2-1 Guide to Secure Digital Photo Archive Backup is your guardian against the dread of losing your precious vintage family heirlooms!
The Problem: You’ve spent countless hours digitizing your family’s legacy. Losing that data to a hard drive crash, fire, or theft means losing the originals forever. This 3-2-1 Guide to Secure Digital Photo Archive Backup offers a solution. This introduction explains the 3-2-1 process and why backup is the vital final step in digitizing and archiving your camera’s contents.
Continue with Care: Archiving is a manual process. Before starting, make sure your workspace is stable, your gear is secured, and your original files are backed up. You are the steward of your own history!
The Problem: You’ve spent countless hours digitizing your family’s legacy. Losing that data to a hard drive crash, fire, or theft means losing the originals forever.
The Solution: The 3-2-1 Backup Rule—the gold standard for data security. This means you will use 3 backup copies, 2 media types, and one of those must be an off-site backup.
Starting Point: We start the journey the moment you click the shutter during tethered shooting.
Part 1: The Primary Copy (Copy 1 on Medium 1)
The First Folders Created by Tethered Shooting.
Concept: Tethered shooting is more than just fast; it’s your crucial first backup step. The image is instantly saved to your computer’s working drive.
Workflow:
The tethering software (e.g., Lightroom, Capture One) promptly creates an initial image file on your computer’s (C:) drive. Alternatively, you can use your camera manufacturer’s own tethering application, which will offer the best compatibility with your camera.
Crucially, you should configure your tethering software to save to a designated, descriptive folder (e.g., KFA-AG07_Roll01).
Initial Security: The photo now exists on both your camera’s memory card and your computer’s hard drive. This is your first copy.
Part 2: The Secondary Automatic Backup (Copy 2 on Medium 2)
Automated nightly sync from computer to NAS. Displaying the NAS and second device.
Secondary and Automatic Backup to Network-Attached Storage (NAS)
Concept: This secondary backup system copies data from your primary “tethered capture” drive to a dedicated, separate hardware device. This fulfills the “2 Media Types” requirement (External Hard Drive + External NAS Drive).
NAS for Beginners: A NAS is essentially a personal, secure, and always-on “cloud” in your home. It typically houses multiple hard drives configured in a RAID array. This redundancy ensures that if one drive fails, your data remains safe, though the failed drive will need replacement.
Workflow: Schedule a simple synchronization tool (e.g., SyncBackFree, or built-in Windows/Mac backup features) to copy the contents of your tethering folder to the NAS folder nightly.
Automation is Key: Automating this step eliminates the potential for human error.
Benefit: Protects against the failure of your primary computer’s hard drive.
Part 3: The Offsite Security (Copy 3 and 1 Offsite)
Backup to the Cloud (Offsite Copy)
Concept: This strategy fulfills the “one offsite copy” requirement, safeguarding your entire archive against local disasters such as fire, flood, or theft.
Cloud Services for Archiving: Prioritize services specifically designed for large-scale backup rather than general file sharing. Recommended services include Backblaze, CrashPlan, pCloud, iDrive, or Amazon Drive. While services like Google Drive or Dropbox are excellent for sharing, they often do not provide true backup functionality unless specifically configured for that purpose.
Workflow:
Install the chosen cloud service client on the computer hosting your archive.
Configure the software to back up the master folder located on your NAS.
Security Note: Employ strong, unique passwords and enable two-factor authentication (2FA) for all cloud services.
Example (My Setup):I use iDrive, configured directly on my NAS to automatically back up its folders. I receive email notifications confirming the success or failure of each backup.
Part 4: Crucial Supplementary Measures
A. Periodic Physical Offsite BackupA. Periodic Physical Offsite Backup
Conclusion: The 3-2-1 Backup Checklist
A Periodic Physical Offsite Backup
Concept: For maximum security, I suggest periodic backups to a dedicated external USB hard drive. This approach robustly satisfies the 3-2-1 rule.
Action: Once a quarter, copy the entire archive to this drive. Afterward, disconnect it and store it physically offsite (e.g., in a bank safety deposit box or at a trusted relative’s house). This protects against sophisticated threats like ransomware, which can sometimes encrypt both local and networked backups.
Concept: A backup is useless if the files are corrupted.
Action: I recommend checksumming or verification. Use specialized software like FastCopy or professional archiving tools to compare the original file and the copy, ensuring they are bit-for-bit identical. While often an advanced feature, this step is crucial for true archival quality.
Rule
Backup Location
Location
3 Copies
Working PC Drive (Tethered Source)
Onsite
NAS (Network Storage)
Onsite
Cloud Service / External Drive
Offsite
2 Media Types
Internal/External HDD/SSD
Physical Device
NAS/Cloud Server
Different Physical/Logical Device
1 Offsite
Cloud or Physically Stored HDD
Remote Location
Was This Post Helpful?
Building this free educational archive is a labor of love! If this post helped you solve your problem today, please leave a Like below to let me know you enjoyed it. Your support helps keep this site 100% free and ad-free for the archiving community!
Loading…
To build a professional and sustainable archiving workflow, start with these essential guides, carefully sequenced in order of importance.
Confused by any technical jargon in this guide? Check out my [Full Jargon-Free Glossary] to get clear, simple definitions of all the archiving terms used here.
Here are two authoritative sources on the 3-2-1 backup rule. These range from government security standards to industry-leading backup providers and the original creator of the rule.
Best For: Official government authority and “gold standard” validation. CISA (the U.S. government’s lead agency for cybersecurity) formally recommends the 3-2-1 rule as a primary defense against data loss and ransomware. Linking to a .gov source provides the highest level of trust for your readers.
Best For: Modern, practical application for digital media. As a leader in cloud storage specifically popular with photographers and creative professionals, Backblaze offers a highly readable and comprehensive breakdown of how the rule applies to modern digital life (Cloud + Physical media).
The negative that almost wasn’t – A huge light leak had bleached half the frame
In the summer of 2023, I received a small shoebox containing a brief note and approximately forty 120-roll film negatives from the late 1940s. A faded and crumbling rubber band held the box shut. Most of the negatives were badly faded to a sickly orange-brown and covered in small scratches. One particular frame, “the negative that almost wasn’t,” was in even worse condition.
A huge light leak had bleached half the frame, and a deep, crescent-shaped crease ran right through the middle. The little density that remained was difficult to discern. Most people would have deemed it “unrecoverable” and moved on. I almost did.
However, something prompted me to hold it up to the light one last time. In the partially visible area, I discerned the silhouette of a small girl wearing a winter coat and scarf, holding a balloon, and standing next to what appeared to be a soldier or sailor. The image was so faint it seemed almost a lost cause. Despite the challenges, it intrigued me, and I decided to persevere.
First, I used a re-wetting agent to soften the emulsion. Then, I carefully taped the worst crease with repair tissue designed for archival film, which is almost invisible under enlargers. Cleaning up the digital files from all the negatives took hours. The process involved removing dust and scanning them with a mirrorless digital camera. Afterward, I worked slowly in Photoshop, channel by channel, carefully coaxing what little silver remained from the haze.
My chosen picture slowly came into view.
The year was 1946. On a train platform at London’s Paddington Station, a little girl named Lily, dressed in her winter best, clutched a red balloon. It was not only her birthday, but her daddy had also come home from the war just three days earlier. She stood beside her father, who, in his sailor’s hat, held a cake with red icing that read, “Happy Birthday Lily.” The family had saved sugar for months to create this special treat for the dual celebration.
For years, Lily’s father kept the original print of this moment in his old wallet, carrying it daily until the wallet disintegrated. Light, heat, humidity, and time had taken their toll, and no one in the family knew this picture still existed.
When I sent Lily the digital images and a restored 16×20 print of her and her father, she called me, crying so hard she could barely speak. Now eighty-six and living in Cornwall, she explained that her father had died in 1988, and she had never seen a picture from the day he returned home. Her children and grandchildren had only heard stories about it.
A week later, a second package arrived. It contained a plate of homemade oatmeal raisin cookies and a shakily written note that read:
“Thank you for giving me back the best day of my life.”
Occasionally, the most painful experiences can lead to the moments people cherish the most.
Was This Post Interesting Or Helpful?
Building this free educational archive is a labor of love! If this post helped you solve your problem today, please leave a Like below to let me know you enjoyed it. Your support helps keep this site 100% free and ad-free for the archiving community!
Loading…
This section presents a small series of my internal ancestry/genealogy stories, some fictional and some that are part tutorial and part fiction.
Confused by any technical jargon in this guide? Check out my [Full Jargon-Free Glossary] to get clear, simple definitions of all the archiving terms used here.
The Image Permanence Institute (IPI): Guide to Acetate Film Degradation and Vinegar Syndrome *Why it’s essential: This world-renowned research laboratory is the leading global authority on film preservation and the creators of “A-D Strips” (acid-detecting test strips). Their preservation briefs explain exactly why 1940s acetate “safety” film chemically breaks down, warps, shrinks, and shifts into severe amber or orange-brown discolorations when exposed to moisture and trapped by decomposing materials like old rubber bands.
A detailed view of a scrapbook showcasing memories, perfect for capturing complex scrapbooks and framed media.
Creating a top-notch essential family photo archive for your family photos doesn’t have to be complicated. The core idea is to create a perfect cross-reference system.
Creating a top-notch, essential family photo archive doesn’t have to be complicated. The core idea is to establish a perfect cross-reference system, allowing you to instantly find the digital copy of any physical photo and vice-versa. This “quick browse” post is based on a Gemini AI interpretation of my original post.Essential Archive Structure & Priorities.
This system is the most important step in your whole digitizing and archiving journey.
1. 🥇 The Golden Rule: Don’t Name Files by What They Show
This is the single most crucial concept to understand.
❌ AVOID: Naming a file Uncle_Joe_at_the_beach_1965.TIFF. This method is slow, messy, and difficult to manage.
✅ USE: Naming a file based on where the physical photo is stored.
Example:KFA-AG01-ALB01-IMG01.TIFF
Where Does the Information Go? (IPTC Metadata)
Do not use the filename for identification. Instead, record all the rich details about the image (who, what, when, where) in the IPTC Metadata inside the digital file.
Think of Metadata as a digital index card that travels with the photo wherever it goes.
Your photo editing program manages this data (descriptions, keywords, dates).
Crucial Step: Always include the file’s Archive Reference (e.g., KFA-AG01-ALB01-IMG01) in the metadata description field to ensure it’s always linked.
2. 🧱 Building Your Naming System (The File Prefix)
Every file needs a unique, consistent name that acts as a location indicator. This name is built in three main parts:
A. Create the Archive Prefix (KFA)
This is how the name of your entire family archive is formatted.
Format: [First Letter of Surname] + FA
Example: For the Klein Family Archive, the prefix is KFA.
B. Define Archive Groups (AG01, AG07)
You must sort your physical media (albums, loose prints, film) into Media Groups and assign each group a code.
Code
Media Group
What It Means
AG01
Albums
Photos glued/slipped into books.
AG02
Curated/Organized Prints
Prints sorted into envelopes/boxes.
AG05
Mounted Slides
Individual slides in frames.
AG07
Loose Film (35mm)
Rolls of 35mm film.
AG12
Artworks/Newspaper Articles
Non-photographic items.
📋 The 5-Step Family Archive Kick-Off Checklist
Matching the media container label to the computer folder structure.
Follow these steps to ensure every digital file is perfectly linked to its physical original.
Step 1: 🤝 Recruit Your Storytellers
This is the most important step before you touch a photo!
Action: Immediately talk to your parents and grandparents.
Goal: Get them to tell the stories behind the photos. Record everything—who, what, when, and where.
Priority: This information is irreplaceable and must be captured now.
Step 2: 🏗️ Establish Your Archive Naming Code
Create a unique identification system for your entire archive.
Prefix: Choose a code for your family archive (e.g., KFA for Klein Family Archive).
Group Codes: Sort your physical items and assign a code to each media type:
AG01: Albums
AG07: Loose Film/Negatives
AG03: Print Wallets (no negatives)
Result: Every container will have a unique label, such as KFA-AG01-ALBUM01.
Step 3: 🏷️ Label the Physical Media
Create the vital link between your computer and your physical collection.
Create Label: Print out the full container code (e.g., KFA-AG07-ROLL01).
Attach Label:Affix this label directly to the physical container (the album, the film sleeve, the box).
The Golden Shot: Before you capture the first print or negative image, take a photo of this label. This photo is the first file in your new digital folder.
Step 4: 📸 Digitize and Name Files by Location
Focus on quality and consistency during the capture process.
Prioritize Film: Capture negatives and slides over prints whenever possible, as they offer the best quality.
Name Files: When saving the digital image, do not use a descriptive name. Use the location code plus a sequence number.
Example Name:KFA-AG07-ROLL01-IMG001.TIFF
Folder Structure: Save the files into a computer folder that matches the first part of the name (e.g., folder KFA-AG07-ROLL01).
Step 5: 📝 Embed the Story (Metadata)
Finally, put all the stories you gathered in Step 1 inside the digital image file.
Description Field: Enter the full story and details gathered from your family members.
Keywords Field: Extract important names, years, and locations from the description and enter them as keywords (separated by commas).
Crucial Cross-Reference: Always include the file’s Location Name (e.g., KFA-AG07-ROLL01-IMG001) in the description field. This ensures the digital file always knows where its physical twin is.
Following this checklist will ensure your archive is organized, searchable, and preserved for future generations!
⚠️ Dealing with Naming Conflicts (Multiple Archives)
When you’re only working on your own family archive, your unique prefix (like KFA) works perfectly.
However, if you start archiving photos for other families whose surnames begin with the same letter (e.g., the Klein Family and the Keefer Family), you’ll have a conflict because both would start with KFA.
The Simple Solution: Adding a Unique Identifier
To solve this, you need to add a unique “fingerprint” right after the prefix. This step ensures that every archive is distinct.
The Problem Archive: → KFA-Keefer Family Archive
The Conflict: It clashes with KFA-Klein Family Archive.
We can modify the prefix by adding unique, reliable geographic data, such as a partial postal code and street number (or similar local identifier):
Original: KFA—Klein Family Archive
Modified: KFA—Keefer Family Archive RG6122
By incorporating a few characters from a postal code and/or street number, you make sure every archive prefix is unique. This remains true even if the surnames share the same starting letter.
Tip: If you’re in a country without postal codes, use a unique identifier. It should be reliable and permanent. For example, combine the first three letters of the street name with the house number.
This step ensures your system can handle multiple family collections separately. It will never confuse one file for another!
🧭 Next Step: Media Assessment and Grouping
Before the camera comes out, you need to understand exactly what you have. Organize your media for the most efficient workflow.
1. 🖼️ Take Inventory (Assess Scope)
Gather all the boxes, albums, envelopes, and containers of media you plan to digitize.
Action: Conduct a quick survey to see the scope of your project.
Questions to Answer:
How many albums do you have?
How many boxes of loose prints (with and without negatives)?
How many rolls of film and slide carousels?
Goal: This helps you estimate the time required and maintain motivation.
2. 🗂️ Divide into Media Groups
Sort all your media into the categories (Archive Groups) you defined earlier (AG01, AG02, AG07, etc.).
Action: Physically divide the items into piles or areas based on their media type and size.
Example: Put all albums in one pile (AG01). Place all 35mm film in another pile (AG07). Put all large-format prints in a third pile.
Why? This is a huge time-saver. By keeping similar media together, you reduce the frequency of changing camera setups. There is less need to adjust film carriers or scanner settings during capture.
3. 🎯 Determine Capture Priorities
Based on your archive’s purpose (genealogy and preservation), you need to decide what to capture first.
High Priority
Rationale
Film (Negatives & Slides)
Best Quality: These are the original, highest-detail images. Capturing them first ensures you have the best master file.
Albums & Curated Collections
Best Stories: These items were intentionally organized. They often contain handwritten notes and context. These are vital for metadata and family history.
Fragile/Damaged Items
Highest Risk: Media that is deteriorating or fragile should be captured immediately to prevent further loss.
🎞️ Workflow for Capturing Negatives (AG07)
This procedure focuses on obtaining the best quality image and correctly linking it to its original print or container.
Step 1: Preparation and Sorting
Organize your workspace and materials to prevent confusion.
Create Piles: Establish two clear, separate areas on your desk for each media type you are currently working on (e.g., all 35mm film):
“To-Do” Pile: For all media sleeves/wallets that need to be captured.
“Done” Pile: For all media sleeves/wallets that have been digitized and labeled.
Gather Wallet: Take the first wallet/sleeve from the “To-Do” Pile.
Identify Contents: Check the wallet to see if it contains only negatives, or negatives and matching prints.
Step 2: The Capture Process
Regardless of whether prints are present, always capture the negatives first for the best digital master.
Capture the Label: Before capturing the film, take a high-resolution photo of the physical archive label (e.g., KFA-AG07-ROLL01) before you attach it to the sleeve/wallet. This is the first file in your new digital folder.
Digitize the Film: Capture the negatives using your camera-digitizing setup.
Process to Positive: Use specialized software (like FilmLab Desktop) to convert the negative image into a positive for clear viewing. This allows you to confirm the images easily.
Name and Save: Save the files using your location-based naming convention (e.g., KFA-AG07-ROLL01-IMG001.TIFF).
Step 3: Handling Prints and Finalizing Labels
After the negatives are captured, you need to deal with the prints and update your inventory.
A. If the Wallet Contains ONLY Negatives:
Label and Done: Attach the new, finalized archive label to the sleeve (if not already done). Place the entire sleeve directly into the negatives “Done” Pile.
B. If the Wallet Contains Negatives AND Matching Prints:
Capture Only Negatives: You’ve already captured the negatives for the master image.
Label Negatives: Label the negative sleeve and place it into the negatives “Done” Pile.
Label Prints: Label the print envelope/container and place it into the prints “Done” Pile.
**Optional Nostalgia: ** If you specifically want to preserve the unique color shifts or blemishes of the old vintage print, you can capture that print as an extra file, saving it with the same prefix but a ‘P’ identifier (e.g., -PRT001).
C. If the Negatives and Prints DO NOT Match:
Separate and Re-label: Physically separate the mismatched prints and negatives into two new, different containers.
Assign New Labels: Give each new container a unique archive label (e.g., the prints might become KFA-AG03-WAL02).
Process Piles: Capture the negatives (as planned) and place them in the negatives “Done” Pile. Place the newly labeled prints container in the prints “To-Do” Pile for later capture.
Step 4: Metadata and Filing
The final critical step is embedding the information you gathered from family members.
Embed Data: Open the new digital file and enter all historical details (stories, names, dates) into the IPTC Metadata fields.
Cross-Reference: Crucially, enter the file’s location-based name (e.g., KFA-AG07-ROLL01-IMG001) into the description field as a permanent cross-reference.
Move Folder: Once the entire roll/container is digitized and metadata is entered, move the computer folder (e.g., KFA-AG07-ROLL01) to your main archive storage location.
This structured approach ensures you capture the best quality image. It helps keep a perfect cross-reference between your digital files and the physical film.
📚 Workflow for Albums and Curated Collections (AG01)
This procedure focuses on capturing not just the pictures, but the context and stories that make these collections special.
Step 1: Physical Assessment and Labeling
Before you start photographing, you need to understand the item and make sure it’s labeled correctly.
Review: Look through the album or collection (AG01) for any inscriptions, dates, or, notes on the cover or first page. These are vital metadata clues!
Label: Make sure the unique archive label (e.g., KFA-AG01-ALB01) is affixed to the back cover or the media container.
Handle with Care: Note any fragility, loose photos, or damaged pages. Do not remove photos that are glued or tightly mounted, as this can destroy them.
Step 2: The Contextual Capture
The goal is to capture the whole story, not just the individual images.
Capture the Label: Take a high-resolution photo of the physical archive label (e.g., KFA-AG01-ALB01). This is the first file in the digital folder.
Capture the Notes: Photograph any handwritten notes, dates, inscriptions, or decorated pages before the first photo. These are crucial metadata sources.
Capture the Pages: Photograph the album pages, grouping the individual photos and any surrounding text together as one single image. This preserves the original creator’s context and grouping.
Digitize Loose Photos: If there are loose, easily removable photos in the album, carefully remove them. Capture each photo individually for better detail. Save these files sequentially within the same folder.
Step 3: Naming and Metadata
This is where you integrate the context you just captured with the stories from your family.
Naming: Use your standard location-based naming convention, making sure the sequence reflects the order in the album:
Example File:KFA-AG01-ALB01-IMG01.TIFF
Metadata is Key: This is where the effort pays off.
Description: Enter the full description and story gathered from family members.
Context Clues: Include any notes or inscriptions you photographed from the page/album cover.
Cross-Reference: Always include the file’s location name (e.g., KFA-AG01-ALB01-IMG01) in the description field.
Step 4: Finalizing the Album
The initial complete capture has been completed. If you plan to additionally capture individual prints close up (as discussed in my full post, DSLR-scanning-vintage-photo-albums-the-ultimate-guide) then now is the time to do that.
“Done” Pile: Capture every page, image and note. Enter the metadata for each one.
Digital Folder: Move the finished computer folder (e.g., KFA-AG01-ALB01) to your main archive storage location.
This comprehensive approach ensures you turn an album into a vibrant historical record, not just a collection of pictures!
💾 Managing Different File Types in Your Archive
You will typically work with two main file types: the original captured file and the archival master file.
1. The Archival Master File: TIFF (.TIFF)
The TIFF (Tagged Image File Format) file should be your chosen format for the final image. It will be stored permanently in your archive folders.
Feature
Why Use TIFF?
Lossless Quality
TIFF uses lossless compression, meaning no image data is thrown away when the file is saved. This preserves every detail from your original capture.
Industry Standard
It’s a widely accepted professional format for archiving, preservation, and high-quality printing.
Move the folder containing the TIFF files (and only the TIFF files) to your main storage location.
TIFF
In summary: Capture and edit in RAW, but save/export the permanent archive file as a TIFF.
Was This Post Helpful?
Building this free educational archive is a labor of love! If this post helped you solve your problem today, please leave a Like below to let me know you enjoyed it. Your support helps keep this site 100% free and ad-free for the archiving community!
Loading…
Here you will discover other informative and interesting internal posts.
Confused by any technical jargon in this guide? Check out my [Full Jargon-Free Glossary] to get clear, simple definitions of all the archiving terms used here.
Why it’s great: This is a digitized version of an original Eastman Kodak handbook from the era. It’s perfect for readers who want to understand the “chemistry” behind the images they are digitizing.
This is the gold standard for preservation. It offers deep dives into the science of storage, explaining why certain temperatures and humidity levels matter. It’s perfect for readers who want to ensure their physical originals last for centuries, not just decades.
While the National Archives focuses on physical care, the Library of Congress is the leader in digital preservation. They provide excellent, simple brochures on how to name files, where to back them up, and how to “refresh” your digital media so your photos don’t get trapped on obsolete hardware like floppy disks or old CDs.
FamilySearch is one of the most popular genealogy sites in the world. Their guide is very user-friendly and focuses on the storytelling aspect of archiving—how to use scanned photos to enrich your family tree and share memories with distant relatives.
This resource is highly actionable. It includes a specific list of “trusted archival suppliers” (where to buy acid-free boxes and pens) and provides a clear workflow for beginners who might feel overwhelmed by a large mountain of old shoeboxes.
This blog post from the Smithsonian’s own archivists offers “pro tips” that are easy for hobbyists to follow. One of their best pieces of advice included here is the “dental floss trick” for safely removing old photos that are stuck to “magnetic” (sticky) album pages without tearing them.
Achieving a true vintage film look with digital images involves more than just a color shift. It requires manipulating contrast, adjusting colors, and adding grain i.e. color correction hacks for a vintage film look.
This ‘color correction hacks for a vintage film Look’ post will guide you through the steps to editing a digital image so that it has that ‘clasiic film look’. Follow the steps below for that ‘vintage’ look.
1. Desaturate Colors (The Ektachrome Look)
The Hack: Reduce the overall Saturation or use the HSL (Hue, Saturation, Luminance) tools to selectively desaturate vibrant colors like greens and blues.
Why it works: Many older film stocks, especially as they age, lose some of their color purity and vibrancy, resulting in a more muted, pastel-like, or faded appearance.
2. Crush Blacks and Lift Shadows (Faded Contrast)
The Hack: In your Tone Curve (RGB or Luma), move the black point (bottom-left) up to make your darkest areas lighter (a “crushed black” or “lifted shadow” look). Then, slightly flatten the curve overall.
Why it works: This is the most essential element of the vintage or “faded film” look, mimicking how old prints lose true deep black over time due to exposure or processing.
3. Add Color Shift to Shadows and Highlights
Comparison of modern digital photo before and after vintage film color grading
The Hack: Use Color Wheels/Color Balance or the Tone Curve (in individual R, G, B channels) to introduce complementary color casts.
Shadows: Add a slight Cyan/Blue tint (move the shadow wheel toward Blue/Cyan).
Highlights: Add a slight Yellow/Warm tint (move the highlight wheel toward Yellow/Orange).
Why it works: Film stock chemistry often reacted differently to light and dark areas, creating a subtle split-tone effect. Cyan in the shadows adds depth, and warmth in the highlights suggests old, sun-baked film.
4. Introduce Film Grain and Dirt/Scratches
The Hack: Apply a Film Grain/Noise effect and a Dust and Scratches overlay. Ensure the grain is visible but not distracting (often set to a ’35mm’ or ’16mm’ style).
Why it works: Digital video is too clean. Real vintage film has texture. Grain is inherent to the chemical process, and scratches/dirt mimic the imperfections of physical film projection.
5. Control the White Balance/Temperature
The Hack: Slightly adjust the Temperature to make the image a little warmer (yellow/orange), and sometimes nudge the Tint toward Magenta.
Why it works: This is the base color correction to set the overall mood, often reflecting the slightly warmer look of older camera lenses or the characteristic color profile of classic film
Some useful External Links
Here are two highly authoritative links that provide both technical standards and creative professional insights:
1. The American Society of Cinematographers (ASC): ACES Workflow
The ASC is the premier professional organization for cinematographers. This resource explains the Academy Color Encoding System (ACES), which is the industry standard for managing color.
Why it’s authoritative: It covers the transition from photochemical “color timing” (how vintage film was actually made) to modern digital grading. It is essential for understanding how to maintain “image integrity” when trying to emulate the organic look of film in a digital environment.
2. Blackmagic Design: Official DaVinci Resolve Training
DaVinci Resolve is the industry-standard software for color grading. This link directs to their official certified training documentation.
Why it’s authoritative: Rather than a casual tutorial, this is the official manual and workbook used by professional colorists. It provides the technical “how-to” for critical steps mentioned in your hacks, such as maximizing dynamic range, setting tonal contrast, and using film emulation LUTs correctly within a node-based workflow.
Was This Post Helpful?
Building this free educational archive is a labor of love! If this post helped you solve your problem today, please leave a Like below to let me know you enjoyed it. Your support helps keep this site 100% free and ad-free for the archiving community!
Loading…
Here you will discover other informative and interesting internal posts.
Confused by any technical jargon in this guide? Check out my [Full Jargon-Free Glossary] to get clear, simple definitions of all the archiving terms used here.
Here are two excellent, highly authoritative external links for this post:
The Federal Agencies Digital Guidelines Initiative (FADGI): Still Image Digitization GuidelinesWhy it’s essential: FADGI explicitly outlines the professional rules for manipulating color and tone during digitization. Their guidelines strictly warn against using global, blunt-force tools like “brightness and contrast” because they easily clip fine image data. Instead, they mandate using high-bit depth editing spaces and precise, numeric tools like Levels and Curves. Linking to this perfectly validates your technical hacks by showing that professional museum archivists rely on the exact same precise color-curve workflows you are teaching.
The National Archives (US) Motion Picture and Film Preservation Reformatting ApproachesWhy it’s essential: This official overview from NARA’s preservation labs explains how they handle color correction across different tiers of film archiving. It breaks down the difference between a raw “preservation file” (which preserves the film exactly as it currently sits) and a “distribution or reproduction master”. For public viewing, they routinely employ precise “color timing” and scene-by-scene color correction to optimize the viewing experience. This is an awesome reference to show your readers how real-world institutions actively correct color shifts to restore a film’s original intent.
Museums and professional archivists use a light source commonly known as a Dichroic Color Head. When a film enlarging system is repurposed for digital capture, it is called a Color Filter Head.
Unlock superior color accuracy. Understand how a Dichroic Color Head physically neutralizes the orange mask of color negatives. This is done before the light hits your camera sensor.
Museums and professional archivists use a light source commonly known as a Dichroic Light Source. When a film enlarging system is repurposed for digital capture, it is called a Color Filter Head. It is also known as a Dichroic Color Head..
Here is a brief overview of the topic:
1. The Name and Role
When professionals use a Dichroic head, they are often using it as a specialized, high-precision light source.
Dichroic Filters: These filters work by reflecting away unwanted colors. They send the desired ones, and this offers superior color saturation and purity compared to older gelatin filters.
Purpose: The primary purpose of this system is to physically neutralize the color cast of the film’s base. This includes addressing the prominent orange mask found on all color negative film. It also aims to correct severe color shifts. These shifts include blue, red, or magenta fading found in ancient, vintage slides and negatives.
2. Overview of the Process
When digitizing film, especially with a camera (DSLR/mirrorless scanning), the setup under the film acts as the light source. To achieve precise colors for classic and vintage film, professional bodies use a method called color compensation or pre-capture neutralization.
How It Works:
The Problem: Modern camera sensors struggle to accurately separate the color channels. This issue arises when imaging a color negative directly, especially when the orange mask or the film’s dyes have degraded over time. This leads to blotchy colors, poor white balance, and difficulty achieving a clean inversion in post-processing.
The Solution (The Filter Box): The Dichroic light source has adjustable filters, which include Cyan (C), Magenta (M), and Yellow (Y) filters.
For a color negative, the operator will dial in a specific combination of cyan, magenta, and yellow filters. This adjusted light color (often appearing bluish-green) is designed to be the opposite (complementary color) of the film’s orange mask.
Result: When this color-compensated light passes through the negative, the orange mask is effectively “canceled out” before the light ever hits the camera sensor. This results in a cleaner, more neutral RAW file capture, which is much easier to invert and color-correct digitally. These steps lead to archival-quality results.
Kaiser Connection: The Kaiser company (Kaiser Fototechnik) is well-known for its high-quality copy stands and light boxes (slimlite plano). These form the physical structure of a digitization setup. Their standard light boxes have fixed 5000K light sources. Yet, a common, professional-level upgrade for their copy systems is the ability to mount a filter holder. Another upgrade choice is to use a modified enlarger head as a light source.
Camera scanning with optional dichroic head alternative.
For museum work, this physical color filtering is often preferred over relying purely on software. It preserves more color data in the first RAW file capture.
A physical enlarger-style dichroic head (like the Kaiser models) is not a typical light source for film holders. This includes an Essential Film Holder and other similar setups. However, there are a few ways to achieve similar color control in camera scanning.
High CRI White Light + SoftwareIs The Solution
This is the most common method. You use a very color-accurate white light source (high CRI). Then, you capture a RAW image. Finally, you use software. Options include FilmLab Desktop or Negative Lab Pro. These programs handle the complex color inversion and orange mask removal. This approach is generally the fastest and most accepted method.
Some advanced DIY users or specialized products take three separate exposures. They use Red, Green, and Blue (RGB) LED light sources for this purpose. They capture one for each color channel. This is a more complex technique that simulates the color separation of high-end scanners but requires combining the images later. This method is the closest functional equivalent to using dichroic filters.
No commonly available commercial dichroic light source fits perfectly under the Essential Film Holder. Similar other holders also also lack a perfect fit. In the United Kingdom, there is a company called Edmund Opticsthat supplies Dichroic lighting and filters.
Building this free educational archive is a labor of love! If this post helped you solve your problem today, please leave a Like below to let me know you enjoyed it. Your support helps keep this site 100% free and ad-free for the archiving community!
Loading…
These are posts that are ancillary to the actual digitizing process but still important.
Confused by any technical jargon in this guide? Check out my [Full Jargon-Free Glossary] to get clear, simple definitions of all the archiving terms used here.
Spectral Power Distribution Analysis: This article explains why the specific wavelengths of your light source matter more than simple “whiteness” when dealing with film emulsions.
A faster and more interactive alternative for labelling image collections: Smart Tags using NFC and QR codes.
Creating physical labels that match your digital folder names is a proven, reliable method. However, technology now offers an even faster and more interactive alternative: Smart Tags using NFC and QR codes.
This option is ideal for those looking to future-proof their archive. It allows instant, tap-and-go access to digital files without manually typing a single character.
What’s the goal? (The Digital Bridge)
Instead of the physical label containing the folder name (e.g., 1965_Smith_Wedding_Scan_001), the smart tag contains the folder’s direct URL link (e.g., https://mycloud.com/archives/1965_Smith_Wedding).
🏷️ Option 2: Using NFC and QR Codes for Container Labeling
You can use either QR codes or NFC tags (or both!) as an advanced labeling system for your media containers (boxes, albums, sleeves, etc.). This instantly connects the physical container to its digital contents.
Feature
QR Code
NFC Tag
Visibility
Visible, printed square
Discreet, small sticker (often hidden)
Access Speed
Requires opening camera/scanner app
Tap-and-Go (instant on modern phones)
Durability
Print quality-dependent
Highly durable and resistant to fading
Ease of Use
High recognition, universal access
Slightly more tech-savvy to program
The Workflow: Physical Container to Digital Folder
Generate a Shareable Link: Upload the contents of your capture session folder (e.g., all files from 1965_Smith_Wedding_Scan_001) to a private cloud storage service (Google Drive, Dropbox, etc.).
Create the Link: Get the public, read-only URL for that entire cloud folder.
Apply the Smart Tag:
For QR Codes: Use an online generator to convert the folder URL into a QR code, print it onto a sticky label, and place it on the container.
For NFC Tags: Use a simple programming app (like “NFC Tools”) to write the folder URL directly onto a blank NFC sticker tag and place it on/inside the container.
The Result: Anyone with a smartphone can simply tap the box (NFC) or scan the code (QR) to instantly open the digital folder containing all the high-resolution files, without having to search or type a single file name!
1. Requirements for Reading QR Codes (The Easiest Option)
Reading a QR code is extremely simple and supported by almost all modern devices.
Requirement
Details
Hardware
A smartphone or tablet with a working camera.
Software
No separate app required for most phones built in the last 5+ years.
* iPhones (iOS 11+): The native Camera app reads QR codes automatically.
* Android: The native Camera app or Google Lens usually reads QR codes automatically.
Connection
A Wi-Fi or cellular connection (required for the device to open the link to the cloud folder, but not to read the code itself).
Summary: QR codes are the most universal and low-tech solution. If a user can take a photo, they can scan a QR code.
2. Requirements for Reading NFC Tags (The “Tap-and-Go” Option)
NFC (Near Field Communication) requires a specialized chip in the phone, but the user experience is faster.
Requirement
Details
Hardware
A smartphone or tablet with a built-in NFC chip (most modern mid-range and premium phones have this).
Software
Varies by Phone/OS:
* Newer iPhones (iPhone XS, XR and newer): NFC reading is native and works automatically without opening an app (called “Background Tag Reading”).
* Older iPhones (iPhone 7, 8, X): May require the user to enable the NFC Reader in the Control Center or use a free third-party app to scan.
* Android: NFC reading is typically native and automatic, as long as the phone is unlocked and the NFC setting is enabled.
Connection
A Wi-Fi or cellular connection (required to open the link).
Tag Type
NFC tags must be a common type like NTAG213, NTAG215, or NTAG216 (these are NFC Forum compliant and work reliably with all modern phones).
Was This Post Helpful?
Building this free educational archive is a labor of love! If this post helped you solve your problem today, please leave a Like below to let me know you enjoyed it. Your support helps keep this site 100% free and ad-free for the archiving community!
Loading…
These are internal posts that are ancillary to the actual digitizing process but still important.
Confused by any technical jargon in this guide? Check out my [Full 55-Term Jargon-Free Glossary] to get clear, simple definitions of all the archiving terms used here.
Old shoeboxes, tattered photo albums, and forgotten envelopes lie tucked away in attics or closets. They hold the ghosts of your family’s past and the timeless gift of family history.
These fragile relics—fading paper and curling edges—are more than mere objects; they embody the timeless gift of family history. How often have you glanced at them, promising yourself, “I’ll come to it later”? These silent, smiling testaments to your origins preserve the stories of those who shaped you and hold the laughter of those now gone.
An old photo’s heartbreak lies not in its faded hues but in the untold stories within. As the paper yellows and memories fade, the voices that once brought those times to life grow quieter. Likewise, the more we uncover about our ancestors, the deeper we understand ourselves. As the saying goes.
“Life is a collection of moments—photographs preserve them.”
The Magic of Sharing Memories
Boxes and albums of old family photos and memories stored in an attic
Transform Delicate Keepsakes into a Lasting Legacy
By digitizing, tagging, and organizing these treasures, you transform delicate keepsakes into a lasting legacy. It’s a way to honor those who came before and demonstrate your care. Yet, ensuring their safety is only half the challenge. The real magic happens when you share them. Imagine your child’s amazement upon seeing their great-grandparents as young newlyweds, or the delight an older person would feel remembering a childhood moment.
Sharing these pictures connects people of all ages, bringing the past into the present. This fosters a sense of belonging that endures, enriching lives and drawing families closer. It creates a tapestry of stories passed down through the years, with every generation contributing unique memories and experiences, ensuring the eternal presence of loved ones.
The Four Step Plan of Family Archive Action
Start now, before your family memories vanish forever. You are the custodian of your family’s legacy. You guarantee that the individuals and occasions that shaped its path will endure forever.
1. – Week 1: “Shoebox Rescue” Locate a single photo container. For now, resist the urge to look through all of them. Instead, move the container to a temperature-controlled room, avoiding basements and attics, to prevent further damage.
2. – Week 2: The Ten-Photo Challenge Select only ten pictures for digitization. Ideally, use a mirrorless digital camera, a 1:1 macro lens, and a copy stand. Focus on photos where faces are recognizable, even if the full story isn’t immediately apparent. Capture, post-edit and save all ten photos.
3. – Week 3: The Phone Call Share these ten digital pictures with a grandparent, aunt, or uncle. Ask them three key questions: “Who is this?” “Where was this picture taken?” and “What do you remember about that day?” Take immediate notes or record the conversation.
4.- Week 4: The Digital Share Create a private social media group or a shared digital folder. Invite your family and upload your first batch of photos. Watch as memories and comments begin to flood in.
By taking this first step, you become the proactive steward of your heritage. As the custodian of your family’s legacy, you ensure that the individuals who shaped its path will endure forever, and the occasions that molded it will never be forgotten.
Technology makes this mission accessible. Don’t let the scope of the task intimidate you—start small.
Technology makes this mission accessible. Don’t let the task’s scope intimidate you—start small. This weekend, scan ten photos from one album. With that first step, you become the active guardian of your heritage, ensuring that faces and stories endure. All the information you need to achieve your goal is right here on this website.
By embracing this role, you weave a vibrant tapestry of history that honors your ancestors and enriches future generations. Your family’s legacy isn’t meant to fade into obscurity—it’s yours to celebrate and share.
Building this free educational archive is a labor of love! If this post helped you solve your problem today, please leave a Like below to let me know you enjoyed it. Your support helps keep this site 100% free and ad-free for the archiving community!
Loading…
This section presents a small series of my ancestry/genealogy stories, some fictional and some that are part tutorial and part fiction.
Confused by any technical jargon in this guide? Check out my [Full Jargon-Free Glossary] to get clear, simple definitions of all the archiving terms used here.
Here are two highly authoritative, beginner-friendly options:
The National Archives (US): How to Preserve Family Archives (Papers and Photographs)Why it’s essential: This is a magnificent “boots on the ground” guide for someone staring at a tattered shoebox. It explicitly teaches beginners how to sort, handle, and flat-store fragile historic papers, curling snapshots, and delicate albums safely without damaging them. It perfectly backs up the physical preparation steps of your four-step action plan.
The Library of Congress: Low-Cost Ways to Preserve Family ArchivesWhy it’s essential: This official resource hub is specifically designed for the everyday family historian. It provides highly practical, low-cost strategies for moving family treasures out of unsafe attics and closets and into stable digital formats. It provides the ultimate institutional validation that any beginner can step up and become the official steward of their family’s legacy.
Adding images of old buildings and places to a family photo archive provides a lot of depth. Combining these images with IPTC metadata and information about historic places reveals how your ancestors lived in these locations.
Strengthen The Connection To Your Family Heritage
Learn how to create a deep, personal family archive. Discover the power of incorporating images with IPTC metadata and historical places to create a powerful connection that will enrich your family heritage. When correctly embedded, IPTC metadata stays with your image forever.
Places: The Tangible Links to Your Family’s Past
A family archive is more than just a collection of faces; it is a map of the spaces those faces inhabited. Adding images of historic buildings, ancestral villages, and local markets where your relatives once walked transforms your archive from a simple photo album into a vivid historical narrative. These sites act as physical anchors for your family history, bridging the gap between who your ancestors were and where they belonged.
By capturing these spaces through archival and contemporary photographs, families can deepen their connection to their heritage, envisioning the lives of those who came before them. They can also appreciate how landscapes have changed over time.
Certain Places Hum with the Faint Vibrations of History
“We are not the MAKERS of History, We are MADE By History!“
To see this in practice, we can look at a city with a deep story, like Coventry, England.
Yes, certain places hum with the faint vibrations of history. You can hear the subtle creak of old floorboards whispering tales. The worn contours of steps lead to doorways etched with familiarity. Intangible shadows carry the presence of former inhabitants.
Coventry, England, is a city with its own deep story.
The past here is palpable. Now, picture this: Coventry is your heritage. You discover your grandfather was a Spitfire pilot stationed at RAF Baginton (now Coventry Airport) during the Second World War. Suddenly, a wealth of historical connection opens up.
You now have the potential to unearth original World War II-era images and other tangible links to his service. These can be integrated directly into your family archive with descriptions and keywords via IPTC metadata.
Shoreham-by-sea, UK – September 1, 2013: Supermarine Spitfire IXT PV202 in flight at the Shoreham Airshow 2013
Yet, the true power of these images is unlocked when you move beyond the visual. Detailed IPTC metadata allows you to embed specific stories, incorporating coordinates and historical context directly into the digital file itself.
IPTC metadata surpasses dry facts. It enables you to embed rich narratives about his character and vital duties, including specific locales around Coventry and anecdotes of significant wartime encounters.
To learn the exact step-by-step process for setting up these headers on your own computer, see my full tutorial: The Essential Guide to IPTC Metadata.
To elevate your archive from a simple collection of pictures to a deeply personal and informative historical document, you need to adopt this meticulous approach.
The ‘Description’ field, as shown in the screenshot below, is where the magic happens; it’s where your ancestors’ stories live.
Seek Authentic Visual Records: Actively search for original WWII-era photographs, documents, or maps related to his service. These will become the cornerstones of your archive.
Utilize Detailed IPTC Metadata: Go beyond simple captions by embedding rich narratives directly into the image files. Include information about his daily life, descriptions of the specific areas he knew, and the human stories behind his service. Offer brief accounts of critical moments or challenges he faced.
An Example Description
My Grandfather (John Smith) stands by a Spitfire IX at RAF Baginton in 1941. He mentioned the ground crew were working double shifts that week.
Use these for searchability. Include the place name (Coventry, Baginton), the event (WWII), and the subject (Spitfire, Pilot).
Unlike a filename or folder name, IPTC metadata is embedded directly within the image file. This means that when you share the photo, its history and stories travel with it. If you move it to a different computer, this information will never be lost.
To truly unlock the potential of these powerful features within your photographic records, you need a well-structured archive as laid out in my post, Camera Scanning – Archive Structure & Priorities. The consistent use of IPTC metadata is an invaluable tool for this. If you’re keen to implement such a system, you’ll find comprehensive guidance on creating and utilizing it on this website.
Was This Post Helpful?
Building this free educational archive is a labor of love! If this post helped you solve your problem today, please leave a Like below to let me know you enjoyed it. Your support helps keep this site 100% free and ad-free for the archiving community!
Loading…
This section presents a small series of my ancestry/genealogy stories, some fictional and some that are part tutorial and part fiction.
Confused by any technical jargon in this guide? Check out my [Full Jargon-Free Glossary] to get clear, simple definitions of all the archiving terms used here.
As the International Press Telecommunications Council, this is the organization that actually creates and maintains the IPTC standards.
Why it’s relevant: It provides the most accurate technical definitions for the Information Interchange Model (IIM) and how it has evolved into the modern XMP format.
This site is a dedicated resource managed by the IPTC to help photographers and archivists understand the practical “why” behind metadata.
Why it’s relevant: It specifically addresses the “secret diary” aspect you mentioned—how metadata protects copyright and ensures a photo’s history stays with the file. It is a very user-friendly resource for those moving from physical to digital archives.
The Library of Congress is the gold standard for archival practices. Their documentation on digital preservation often highlights the necessity of embedded metadata for historical context.
Why it’s relevant: The Library of Congress adds significant weight to the argument that metadata is essential for keeping history alive and searchable for future generations.
Polarizing Sheets and Lens Filters: The Key to Glare-Free Digitizing
When digitizing glossy prints, tintypes, or silver-mirrored photos, surface glare often obscures fine detail. The most effective way to eliminate these reflections is through cross-polarization, a technique that uses polarizing sheets and lens filters. This method leverages physics to “filter out” direct reflections, capturing only the diffuse light that carries the image data.
Cross-Polarization: Rotate the lens polarizer perpendicular to the polarizing sheets on the lights. This eliminates “hot spots” and captures deep color saturation, revealing colors otherwise hidden by surface glare.
Polarizing Sheets: When placed over light sources, these sheets align the light. Use them with a circular polarizer on a camera lens to remove almost all reflections from non-metallic surfaces, such as glass or oil paintings.
Lens Filters: These filters physically block a portion of the light spectrum, thereby reducing the total “exposure value” reaching your camera sensor.
The Physics of the Fix
Unpolarized light from your LEDs vibrates in all directions. When it hits a glossy surface, it reflects directly back into the lens, creating “hot spots.”
Polarizing Sheets: Placing these over your light sources forces the light to vibrate in a single plane (e.g., vertically).
Polarizing Filter (CPL): Adding a circular polarizer to your lens and rotating it 90 degrees to the lights (horizontally) blocks that specific plane of light.
The Result: The camera “ignores” the direct glare and only records the light scattered by the photo’s pigments—revealing the true colors and textures beneath the shine.
Essential Equipment
Linear Polarizing Sheets: High-heat resistant sheets to cover your LED panels or lamps.
Circular Polarizer (CPL): A high-quality glass filter for your macro lens.
Mounting Frames: Simple cardboard or plastic frames to keep the sheets a few inches away from the light source to prevent overheating and ensure even coverage.
Step-by-Step Setup
Mount the Sheets: Secure the polarizing sheets over your lights. Ensure the “grain” of the polarization is oriented identically on both light sources.
Attach the Lens Filter: Screw the Circular Polarizer (CPL) onto your macro lens.
The “Blackout” Test: Place a small mirror or a piece of highly reflective foil in the position your subject will occupy. Look through the viewfinder (or use Live View) and rotate the CPL.
Calibrate: When the reflection in the mirror appears dark or completely black, you have achieved “cross-polarization.”
Compensate for Light Loss:Polarization typically reduces light by 1.5 to 2 stops. Adjust your shutter speed or ISO to maintain your desired exposure.
Pro-Tips for Archival Precision
Avoid Over-Polarization: In some cases (e.g., textured paper), 100% glare reduction can make the image appear unnaturally flat. Experiment with slight rotations to retain just enough “sheen” to preserve the original’s character.
Check for Color Shift: Some lower-grade polarizing sheets can introduce a slight blue or magenta cast. Always perform a custom white balance or use a color checker after setting up your filters.
Heat Management: Even LEDs generate heat. Ensure an air gap exists between the light source and the polarizing sheet to prevent the plastic from warping during long sessions.
Improve lighting and use polarizing sheets effectively
Light normally vibrates in multiple directions. A polarizing sheet acts like a microscopic picket fence, allowing only light waves vibrating in a specific plane to pass through.
Cross-polarization when digitizing film
Cross-polarization can be introduced when digitizing film. Place an appropriate polarizing sheet directly over your LED light source and beneath the film holder. First, peel off any protective plastic films from both sides of the sheet. Ensure the polarizing sheet lies flat and directly under the film strip in the holder. Additionally, confirm that your lens-mounted polarizing filter is in place and correctly adjusted.
If you are using a device like the Essential Film Holder, which lacks integral lighting but includes a diffuser, place the polarizing sheet flat and directly on top of the EFH diffuser, securing it in place.
The Correct Layer Order
Light Pad: The base light source.
EFH Diffuser: The frosted acrylic sheet that evens out the light.
Polarizing Sheet:Placed flat on top of the EFH diffuser.
Essential Film Holder (EFH) Main Body: Already suitably elevated slightly above the light pad.
Diffusion Destroys Polarization: Diffusion works by scattering light in every random direction. If polarized light passes through a diffuser, it loses its alignment.
The Goal: The light must leave the EFH diffuser, pass through the polarizing sheet to become cleanly oriented, pass through your film, and then reach your lens filter.
Camera Lens with CPL Filter: Rotate the filter to adjust and cut the glare.
Tip: Use Aperture Priority mode. The camera automatically compensates for the light loss. It does this by slowing down the shutter speed. This ensures your exposure remains consistent despite the filters.
Other Vital Tips on Using Polarizing Filters and Sheets
Aesthetic Enhancement: Sometimes, they can deepen color saturation and enhance contrast, improving the visual and capture experience.
I use two 96 CRI LED panels angled at 45 degrees to the print, each equipped with a softbox or other diffusion. This setup illuminates all of my prints, ensuring accurate color representation and emitting a soft, even light that minimizes harsh shadows. I also frequently adjust the distance between the panels to achieve the optimal brightness and diffusion for each project.
Points To Be Aware of With Polarizing Filters & Sheets
Polarizing Sheets: When using softboxes on lights, place the polarizing sheets on a frame a few inches in front of the softboxes, not behind them.
Light Loss:Polarizing sheets absorb some visible light, which reduces overall light output. For optimal viewing and capture conditions, choose sheets with lower light absorption. Your camera will compensate if set up correctly. Slow shutter speeds are not an issue when using a copy stand.
Color Cast: Some types of polarizing sheets introduce a slight color cast, while others are optically neutral. When choosing, consider the print or artwork and the desired visual effect.
Effects of Different Lighting Types on Polarizing Filters and Sheets
The recommendations below apply to the digitization of images and the protection of prints displayed in a gallery.
Incandescent Bulbs: While incandescent bulbs emit minimal UV radiation, their heat output can be detrimental to displayed prints. Using polarizing sheets over these lights can help mitigate heat and filter infrared (IR) radiation.
Fluorescent Lights: Some fluorescent tubes emit significant UV radiation. For these, the use of UV-filtered polarizing sheets is highly recommended.
LED Lights: LED lights emit minimal UV and IR, making them ideal for digitizing or illuminating artwork. Employing low-absorption polarizing sheets can further reduce visible light damage. LED lighting is also the optimal solution for digital capture.
Sunlight: Sunlight presents the most significant threat to displayed prints due to its intense UV and IR radiation. Combining UV-filtered window films with polarizing sheets on interior light fixtures provides enhanced protection. While sunlight can be used for capturing prints and artworks, diffused and more controllable light is considered best practice.
Summary
Use polarizing filters and sheets strategically: Combine them with other light control measures to create a safe and comfortable environment for digitizing (or displaying) your precious prints or artwork. This will guarantee their lasting beauty and historical significance.
Great for budget-conscious setups using cardboard and inexpensive sheets.
Was This Post Helpful?
Building this free educational archive is a labor of love! If this post helped you solve your problem today, please leave a Like below to let me know you enjoyed it. Your support helps keep this site 100% free and ad-free for the archiving community!
Loading…
To build a professional and sustainable archiving workflow, start with these essential guides—carefully sequenced in order of importance.
Confused by any technical jargon in this guide? Check out my [Full Jargon-Free Glossary] to get clear, simple definitions of all the archiving terms used here.
Larry Jordan: Recovering Old Photos with Polarized LightLink to ArticleWhy it’s great: This is a very recent (2025) guide. It specifically focuses on using polarized sheets and lens filters. These tools help eliminate “silver mirroring” on old black-and-white prints. It includes a clear “assembly line” workflow.
Cultural Heritage Science Open Source: Polarized Light for Art DocumentationLink to ResourceWhy it’s great: This resource provides a technical, museum-grade look at the use of circular polarizers on the lens. The resource offers an in-depth explanation of how linear sheets are used on the lights. It explains the physics of how diffuse light (the image) loses its polarization. Specular light (the glare) keeps it.
Resolve Photo: Understanding Cross-Polarization for ArtLink to Article Why it’s great: A concise breakdown of the effects on texture. It also shows the impact on color saturation before and after.
Content-based filenames are no longer suitable when naming genealogy files and creating a solid photo archive.
Are you still naming vintage photos based on image content alone? Naming images based solely on their contents is an outdated process. This post will provide carefully researched evidence to demonstrate why this method is no longer effective.
This is especially true for family photo archives focused on genealogy, where context and storytelling play a crucial role in preserving memories.
By incorporating details like dates, locations, and the relationships between individuals, we can create a richer narrative. This approach honors our ancestors and enhances our understanding of our family history.
The Problem with “Content-Based” Filenames
Content-based or ‘date-taken’ filenames are no longer suitable for naming genealogy files or creating a solid photo archive. We’ve all done it: naming an image“Grandma and her dog at the beach.jpg.” While intuitive, this approach becomes problematic when you have fifty “Grandma” photos.
Such filenames are fragile and limited because:
They are restricted in length and character usage (e.g., no commas or slashes).
They do not remain with the image if it is renamed by a sharing service.
They only contain a fraction of the necessary information (e.g., date, place, people).
Here’s the solution: IPTC Metadata and Your Archive
These standard fields include captions, keywords, creators, and dates. Almost all professional photo software, archives, and online platforms recognize this searchable data. Instead of sifting through folders, you can search your photo software for “Coventry.” You can also add “1950” and “Aunt Doris” to obtain instant results.
3. The Power of a Structured Archive
Filenames and folder structures should be functional, not descriptive; descriptions belong in the metadata.
Suggested Structure (The “Functional” Filename):
Base your folder structure on your media archive. You can learn more about structuring your archive in my post, Essential Archive Structure & Priorities. The filename’s purpose is specifically to point to the original vintage media container.
Tools: Common tools like Adobe Bridge, Lightroom, specialized genealogy software, and free tools such as XnView or IrfanView allow for easy bulk editing of IPTC fields.
Start Small: You don’t have to reorganize your entire archive today. Begin with all new camera scans and then work backward, one folder at a time.
Professional genealogists, archivists, and photo preservation experts universally advocate for using IPTC and XMP metadata standards over simple file naming.
This recommendation is supported by key industry organizations and leading experts in the field:
Was This Post Helpful?
Building this free educational archive is a labor of love! If this post helped you solve your problem today, please leave a Like below to let me know you enjoyed it. Your support helps keep this site 100% free and ad-free for the archiving community!
Loading…
To build a professional and sustainable archiving workflow, start with these essential guides—carefully sequenced in order of importance.
Confused by any technical jargon in this guide? Check out my [Full Jargon-Free Glossary] to get clear, simple definitions of all the archiving terms used here.
Leading genealogy and archival resources strongly recommend this practice:
Family Tree Magazine, Family Search, and other prominent ancestry/genealogy sites regularly publish guides that advocate for embedding metadata. They teach users to differentiate between EXIF data. This is the automatic camera data. They also explain IPTC/XMP data, which is the data a genealogist adds, like captions and keywords.
Archivists’ Perspective: Experts emphasize that a file name is too limited and fragile for long-term preservation. They recommend using the IPTC Caption/Description field as the modern-day equivalent of “writing on the back of the photo.”
Why it’s essential: This is the ultimate institutional blueprint for structural file naming. NARA explicitly lays out why content-based naming fails at scale, and instead details the mandatory rules for creating unique, persistent file names. It covers why you must use leading zeros (e.g., 001 instead of 1), avoid spaces or special characters, and rely on a strict schema (like a combination of collection IDs, box numbers, and sequential identifiers). It perfectly validates your argument for a solid, standardized photo archive.
Why it’s essential: This Ivy League academic resource is a phenomenal, highly practical guide on how to build an alphanumeric naming system from scratch. It breaks down the exact anatomy of a professional file name, explaining how to balance context and brevity, use underscores (_) or hyphens (-) as delimiters, and implement standardized date formats (like ISO 8601: YYYYMMDD). It is an incredible reference for showing your genealogy readers exactly how to structure their new naming system.
To camera-digitize a large daguerreotype, one needs a mirrorless digital camera, a 1:1 macro lens, and other key items.
Discover why camera-digitizing is the optimal method for preserving and scanning fragile, vintage images like daguerreotypes. This step-by-step guide will help you achieve superior results when camera-digitizing a large daguerreotype.
What is a daguerreotype? The “mirror with a memory.”
A daguerreotype is the earliest type of photograph, introduced by Louis Daguerre in 1839.
Key Characteristics:
A Unique Object: A daguerreotype is a one-of-a-kind image—there is no negative.
The Image Substrate: The photograph is created directly onto a polished, silver-plated copper sheet.
Appearance (The “Mirror Effect”): The finished surface has a mirror-like sheen. When viewing a daguerreotype, the image appears as a positive (correctly visible) only under specific conditions. Reflected light must hit the plate at a specific angle, usually a dark, non-reflective angle. From other angles, the plate simply reflects the light. It also reflects the viewer. This phenomenon is why it’s often called a “mirror with a memory.”
Fragility and Presentation: The image layer is extremely fragile. It can be easily wiped away. Thus, daguerreotypes are almost always sealed behind glass. They are housed in a protective case. This is often a hinged case made of wood, leather, or a composite material called a union case.
💡 Looking for a different format?
If you are working with reflective physical media or specialty formats, explore my dedicated guides below:
The main task is to manage the object’s extreme reflectivity, as well as the reflections from the protective glass and polished silver plate.
A mirrorless digital camera, complemented by a 1:1 macro lens, is ideal for digitizing this fascinating but fragile media type. First, I will describe what a daguerreotype is and outline its key characteristics.
Mirrorless Digital Camera: Higher resolution (megapixels) is recommended.
Macro or Flat-Field Copy Lens: Essential for corner-to-corner sharpness and minimal distortion. A 50mm 1:1 macro lens is ideal for this purpose.
Sturdy Copy Stand or Tripod with Horizontal Arm: Necessary for precise camera positioning, ensuring it is perfectly square and parallel to the daguerreotype, shooting straight down or straight on depending on your setup.
Lighting: Two off-camera, continuous LED lights (or strobes/flashes) with adjustable brightness and color temperature are recommended. A 5000K or daylight-balanced setting is a good starting point.
Alignment Tools: A leveling bubble or a specialized alignment tool (e.g., a mirrored target) is highly recommended to ensure the camera sensor is perfectly parallel to the daguerreotype.
Reflectance Control Material (THE MOST IMPORTANT STEP): Use large sheets of non-reflective material, such as black foam core, black velvet, or black matte card stock, to construct a “black tent” around the daguerreotype.
Remote Shutter Release: Eliminates camera movement. Alternatively, use the camera’s self-timer (e.g., a 2-second delay).
Tethering Cable (Optional but Recommended): Connects your camera to a computer, enabling live view, focus adjustment, and image review on a larger screen.
B. Setup and Alignment: Eliminating Reflections
The goal is to remove all reflections except for the dark-angled light that makes the image visible.
Square-On Setup:
Place the daguerreotype flat on a stable surface (or mount it vertically, perfectly plumb).
Use a copy stand or a high-quality tripod. Ensure the lens is exactly centered over the daguerreotype.
Crucially, use a leveling or alignment tool to guarantee the camera sensor plane is absolutely parallel to the daguerreotype’s plane. Even a slight angle will cause focus fall-off and exacerbate reflections.
Surround the daguerreotype with large sheets of black material to create a non-reflective environment. Black foam board is ideal for this.
Cut a small, circular hole in one piece of the black material, just large enough for the camera lens to poke through.
Drape or attach this piece of black material to cover the camera body and tripod/stand. This ensures the daguerreotypeonly “sees” black surfaces and the lens.
Focusing:
Use the camera’s Live View and zoom in to the highest magnification (5x or 10x) on a detailed area of the image (e.g., eyes).
Manually focus to achieve the utmost sharpness. Since the daguerreotype is a low-relief image behind glass, a macro lens with a narrow depth of field requires perfect focus.
If the case prevents sharp focus: Consider carefully removing the daguerreotype from its case (Please read the disclaimer below). This should only be attempted if you have archival experience and tools. Alternatively, try focus stacking (see Advanced Techniques). Never force or touch the plate itself.
Disclaimer: Daguerreotypes are incredibly fragile and valuable. If you are not comfortable handling the case or the plate, consult a professional conservator or photo archive service. Never clean the plate itself. Please review my Disclaimer & Copyright page.
C. Lighting Technique (Raking Light)
This is the most critical step for revealing the positive image.
The “Sweet Spot” Light Angle:
The daguerreotype image becomes visible when light reflects from a dark, non-reflective area.
Position one of your lights at a low, raking angle—ideally 10° to 20° from the plane of the daguerreotype. This angle makes the image visible while allowing the camera to remain within the “black tent” (non-reflective zone).
Further explanation:Based on best practices for digitizing reflective objects like daguerreotypes, the lights are typicallyoutsidethe black tent/enclosure. The light shinesthrougha diffusing material (often white) that forms part of the tent’s sides.
Here’s why and how the setup often works – Black Enclosure: The daguerreotype is placed inside a black enclosure. It is sometimes called a “black tent,” though it can be a box or simple foam core walls. The black color is crucial for eliminating reflections, especially the camera’s reflection, on the highly polished silver plate.
Adjusting for Evenness:
Place a second light on the opposite side at the same angle, ensuring the intensity is identical. This provides even illumination across a large plate.
Adjust the light distance until the illumination is consistent from the center to the edges. A slight angle difference between the two lights can help maximize the visibility of the low-relief image.
File Type:RAW mode is recommended for the highest quality, functioning like a digital negative.
ISO: For the cleanest image and minimal noise, use your camera’s lowest native ISO (typically ISO 64 or 100).
Aperture: Select a mid-range aperture, such as f/8 or f/11, to achieve an optimal balance between sharpness and depth of field.
Shutter Speed: In Aperture Priority [A] or Manual [M] mode, allow the camera to determine the shutter speed. Since the camera will be mounted on a tripod or stand, a longer shutter speed will not negatively impact the image.
White Balance: Set a custom or preset White Balance, such as Daylight or 5000K, to ensure accurate color representation. Although daguerreotypes are largely monochromatic, precise White Balance is still good practice.
E. Advanced Technique: Multi-Shot Stitching (for Large Plates)
For very large daguerreotypes, a single shot from your camera may not capture sufficient resolution.
Grid Shooting: With the camera secured in a fixed copy stand, photograph the daguerreotype in overlapping sections (e.g., a 2×2 or 3×3 grid). Ensure there is at least a 20% overlap between frames.
Post-Processing: Utilize stitching software such as Adobe Photoshop or Lightroom, or specialized panorama software. This software will combine your high-resolution RAW images into a single, massive final digital file.
F. Post-Processing
Cropping and Straightening: Crop the image to remove the black tent borders and ensure the final image is perfectly straight.
Tone Adjustment: Adjust the exposure, contrast, and black/white points to enhance the subtle details of the low-relief image.
Artifact Removal: Use cloning or spot healing tools to carefully remove any dust or dirt on the glass and fix minor flaws in the plate.
Building this free educational archive is a labor of love! If this post helped you solve your problem today, please leave a Like below to let me know you enjoyed it. Your support helps keep this site 100% free and ad-free for the archiving community!
Loading…
Explore More Photo Digitizing Guides On This Site
In this block you will find other professional media digitizing guides.
Confused by any technical jargon in this guide? Check out my [Full Jargon-Free Glossary] to get clear, simple definitions of all the archiving terms used here.
Why it’s essential: This deep-dive from the University of Texas photograph conservation lab explains exactly how professional conservators use specialized lighting setups—such as normal, specular (reflective), and ultraviolet (UV) light—to capture daguerreotypes. It details the exact physics of how a daguerreotype changes from a positive to a negative image depending on the angle of the lens, providing perfect technical backing for your camera positioning instructions.
Why it’s essential: This comprehensive preservation manual highlights why the daguerreotype contains the most fragile of all sensitized photo image layers. It provides strict handling protocols—such as removing jewelry that could scratch the plate, avoiding touching the delicate paper tape seals of the “daguerreotype package,” and checking for “glass disease” on the original cover glass. This is the ultimate institutional link to back up your safety warnings before a reader sets up their copy stand.
Taylor, S. (2021, May 3). Guide to shutter speed. Parallax Photographic Coop. HTTPS://parallaxphotographic.coop/guide-to-shutter-speed/?srsltid=AfmBOoqp_sgRZQS9zIdlp71McFajivb4Cw4gOUgmFDJLWLX59oPjphXp
Shaw, D. (2024, June 30). Aperture and Landscape Photography: Why f/16 Isn’t (Always) Best. Digital Photography School. HTTPS://digital-photography-school.com/understanding-aperture-landscape-photography-f16-not-only-choice/


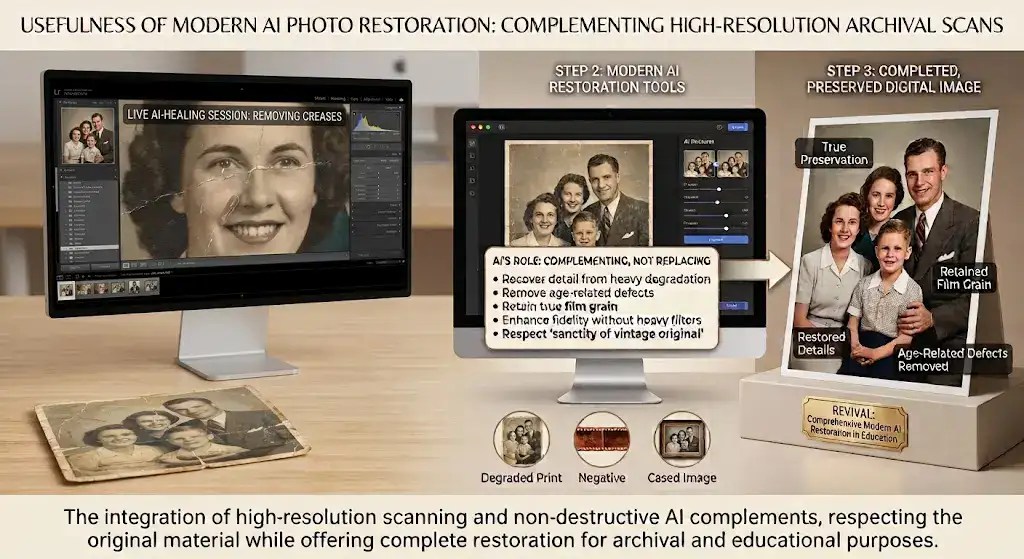


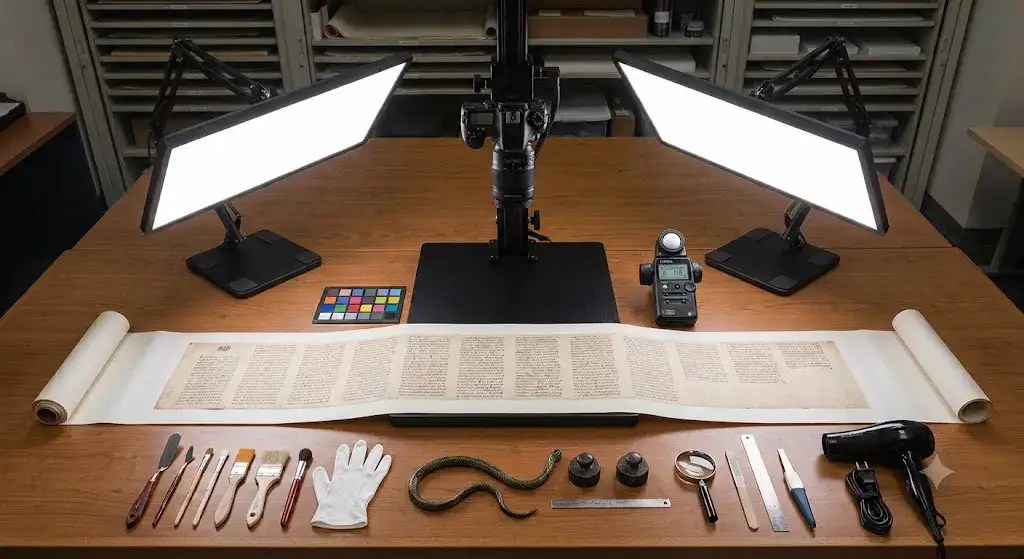


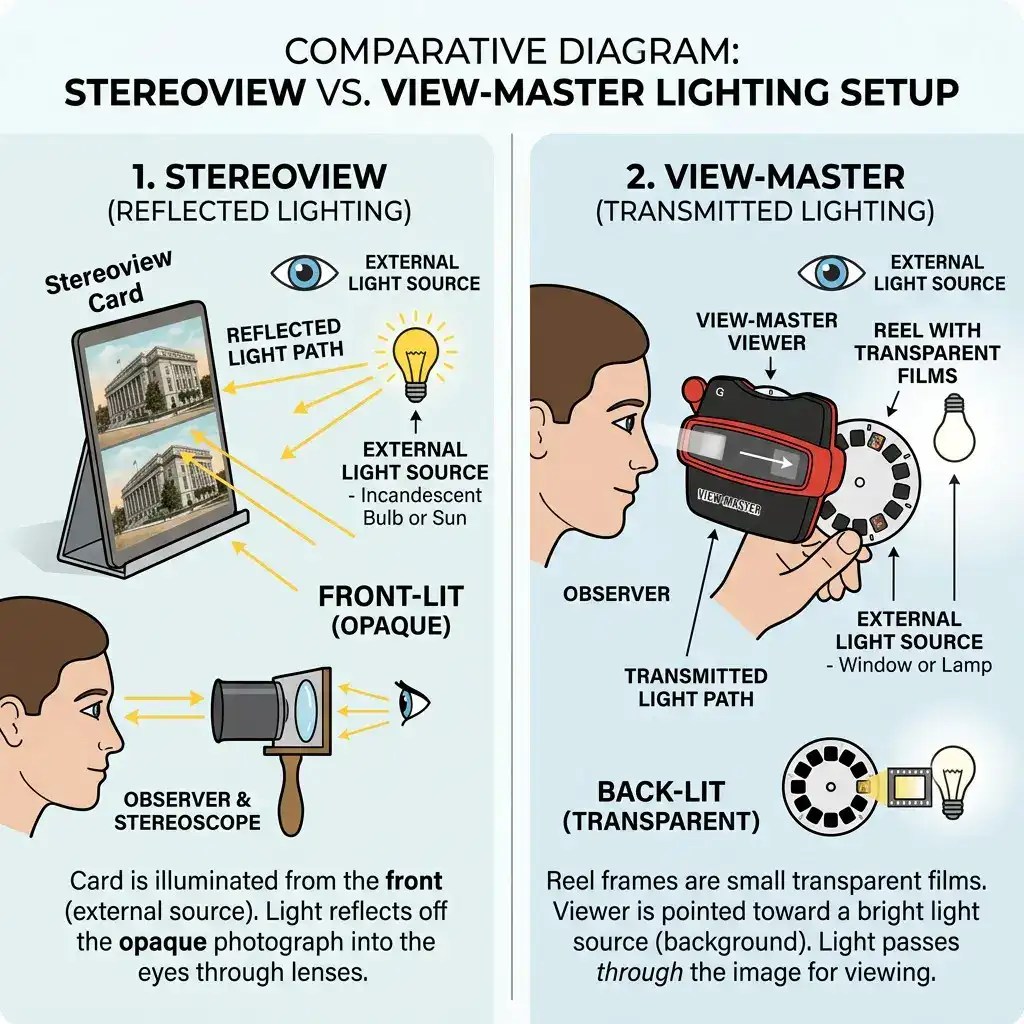


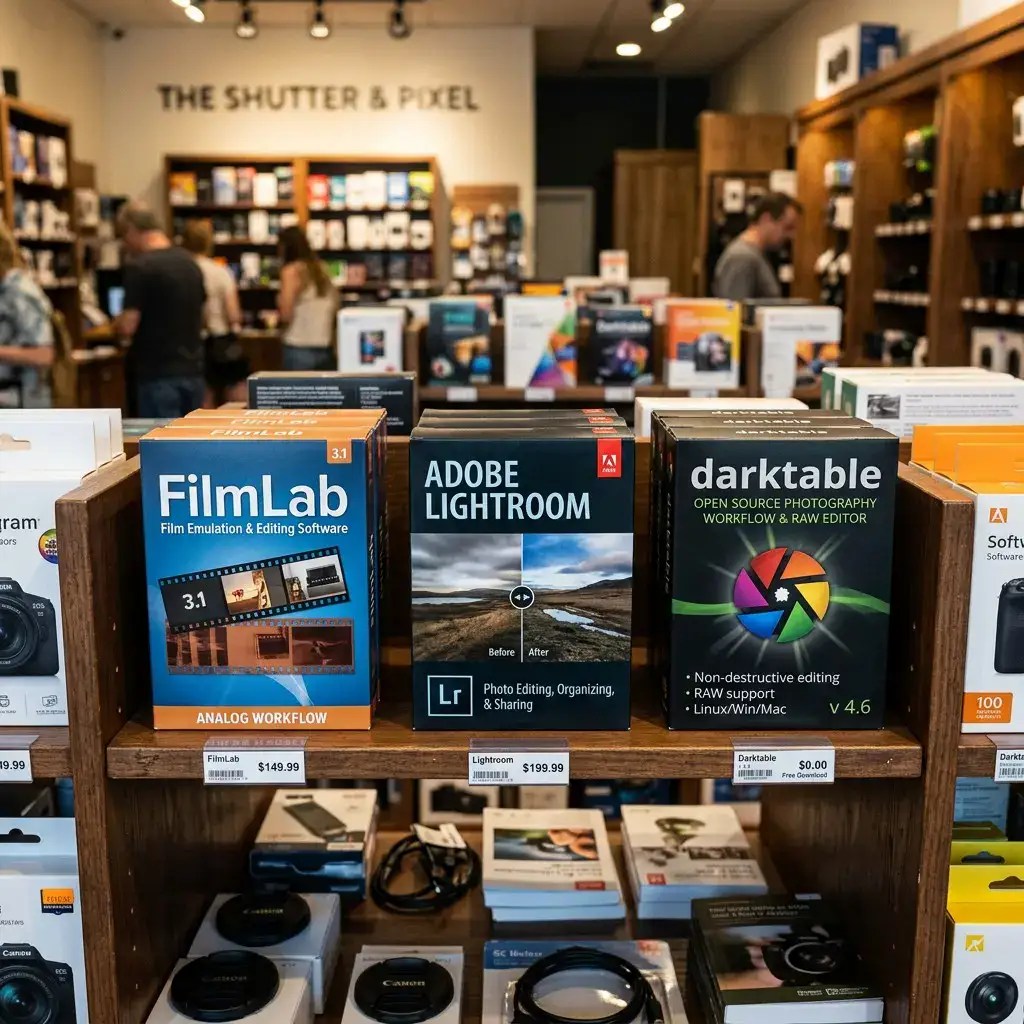


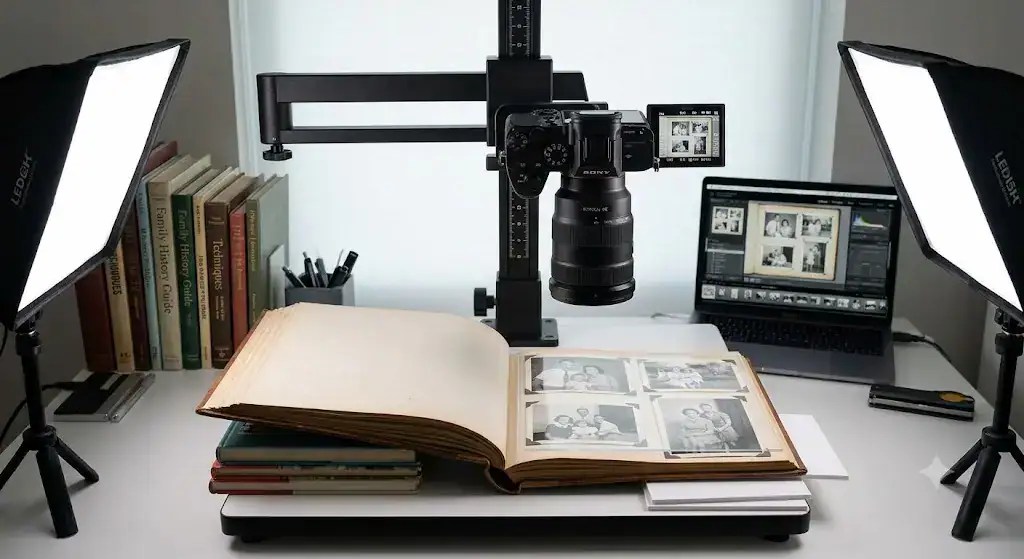


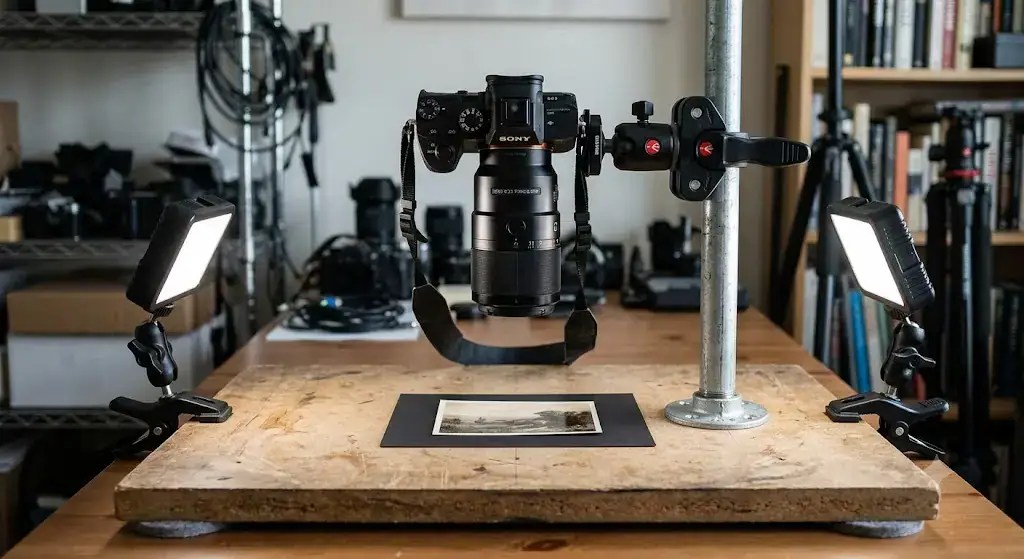


![High-Res Camera Mode [Pixel-Shift] Comparison. A NotebookLM infographic demonstrating High-Resolution Pixel-Shift comparisons of Sony, Panasonic Lumix and Olympus OM high definition mirrorless cameras.](https://i0.wp.com/camera-digitize-archive.com/wp-content/uploads/2026/02/High-Resolution-Pixel-Shift-Comparison.webp?resize=1024%2C572&ssl=1)
![High-Res Camera Mode [Pixel-Shift] Comparison. Lumix camera with braided strap beside an old worn book titled 'Our Memories' on a wooden table](https://i0.wp.com/camera-digitize-archive.com/wp-content/uploads/2026/05/camera-digitize-archive-6a0ac5b49fcff.png?resize=1024%2C1024&ssl=1)


