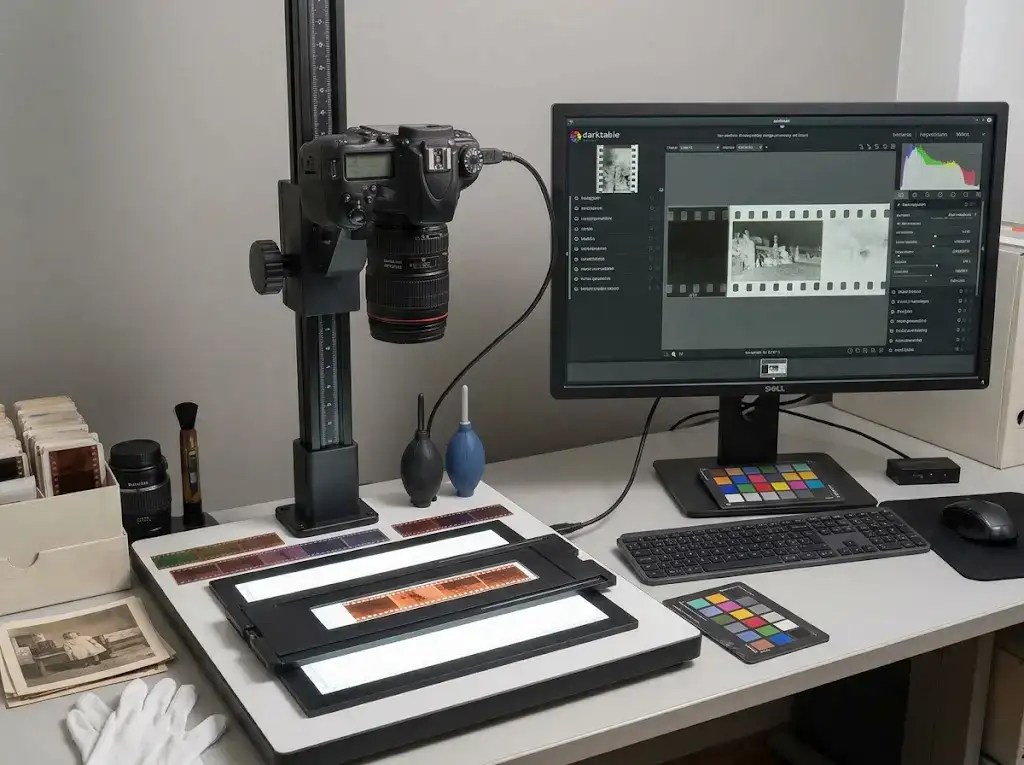
A Complete Darktable Open-Source Workflow
If You are seeking a specific tutorial subject on this site, please search below
👇
Preserving historical photographic media—whether 35mm color negatives, black-and-white film, or vintage reflective prints—demands precision, non-destructive editing, and consistent color handling. While commercial subscription software dominates many discussions around camera digitizing, you do not need recurring software fees to achieve lab-grade, professional archival results.
Darktable is a free, open-source raw processor and photographic workflow application. Built around non-destructive, high-precision processing pipelines, Darktable gives you complete control over your digitizing workflow from capture setup to final archival export.
This comprehensive guide walks through the complete end-to-end process of camera digitizing, inverting film negatives using Darktable’s built-in Negadoctor module, correcting aged color dyes, performing dust spot removal, and exporting master archival files.
Darktable Is Different To Other DAM Software
Once your image is loaded into the Darkroom, there’s one quick UI curve ball to keep in mind before you start tweaking sliders.When I first opened the Darkroom view in Darktable, I spent a few minutes looking for editing sliders along the top menu—where most traditional programs put them—only to find nothing there. In Darktable, all your editing controls are tucked away in the right-hand side panel instead. Once you know to look over on the right, finding and tweaking your image settings becomes much easier.

Example: To find a tool like Crop, make sure you are in the Darkroom view and look at the panel on the far right. Click on the Search icon (the magnifying glass) near the top of the panel, type “crop,” and click on the Crop module when it appears. Adjust your aspect ratio or drag the handles directly on your image, then double-click inside the crop area to apply it.

Why Darktable? A Note on My Recommendation Philosophy
My goal is to help you achieve professional-grade results on a realistic budget. I prioritize free, open-source software, high-value one-time purchase applications, and carefully chosen, moderately priced, yet durable equipment. By steering clear of high-cost “luxury” products and recurring software subscriptions, you retain complete control over your tools and budget.
Darktable perfectly embodies this approach. As a completely free, open-source 32-bit floating-point raw processor, it delivers lab-quality negative conversions and non-destructive archival tools without requiring a monthly subscription.
Section 1: Introduction & Non-Subscription Archival Philosophy

When camera digitizing (often called camera scanning), your digital camera acts as a high-resolution capture device, recording raw sensor data from light transmitted through film or reflected off physical prints.
Commercial software packages often lock essential tools—such as film inversion algorithms or advanced local retouching tools—behind ongoing monthly subscriptions. Darktable provides an alternative that matches or exceeds these capabilities:
- 32-Bit Floating-Point Processing Pipeline: Darktable performs image math in a high-precision color space, preventing banding and clipping during aggressive tonal curve adjustments.
- Built-In Non-Destructive Inversion: The
negadoctormodule models the real-world physical behavior of color film stock, film base orange masks, and photographic paper grades. - Complete Data Ownership: Your edits are stored in lightweight XMP sidecar files. You retain 100% control over your raw files and catalog without proprietary lock-in.
Section 2: Camera Capture Setup & RAW File Prep
Before opening Darktable, achieving a technically pristine raw capture is critical. Software cannot restore detail lost to mechanical misalignment, uneven illumination, or incorrect camera exposures.
Physical Alignment & Lighting
- Parallel Alignment: Position your camera on a rigid copy stand or copy setup. Ensure the camera sensor plane is strictly parallel to the baseboard or film stage to keep the entire frame within maximum lens depth-of-field.
- Illumination: Use a high-CRI (95+) daylight-balanced LED source (5000K–5600K). For film, pass light through a uniform diffuser beneath the negative stage. For reflective prints, position lights at 45-degree angles to minimize surface glare, using cross-polarization filters when handling glossy or textured surfaces.
- Lens Setup: Mount a dedicated macro lens capable of 1:1 reproduction. Stop down to its optical sweet spot (typically f/5.6 to f/8) to minimize diffraction and edge falloff.
In-Camera Exposure Strategy
- Format: Set your camera to uncompressed 14-bit RAW.
- ISO: Set the native base ISO (typically ISO 100 or 200) for lowest noise floor.
- Exposure Level: Expose the frame so the film histogram fills the dynamic range without clipping the highlight or shadow boundaries. For negative film, remember that dense highlights on the film represent shadows in the final positive image.
Importing into Darktable
- Open Darktable and navigate to the Lighttable view.
- Under the Import panel on the left, click Folder or Images to import your raw capture files into a new film roll.
- Apply initial IPTC metadata (author, copyright terms, archiving parameters) across the imported batch using the Metadata Editor module in the right panel.
[ Lighttable View ] ──> Import RAW Files ──> Apply IPTC Metadata Batch ──> Enter Darkroom
Section 3: Technical Corrections (Darkroom Base Setup)
Double-click an imported raw image to enter the Darkroom processing view. Before converting or color-correcting film, establish an accurate optical baseline.
1. Lens Corrections
Navigate to the Processing tab in the module panel on the right:
- Open the Lens Correction module. Darktable automatically reads the EXIF metadata of recognized camera and macro lens combinations to eliminate optical distortion, vignetting, and chromatic aberration.
- Open Raw Chromatic Aberrations to automatically clean up edge color fringing along high-contrast boundaries.
2. Cropping and Framing
Open the Crop module (or Crop and Rotate):
- Frame the image tightly around the active film image or print border.
- Critical Step: Exclude all unexposed outer borders, film sprockets, or light table background areas from the active crop. Leaving external light margins visible will distort Darktable’s automatic histogram and color calculation tools during subsequent steps.

Section 4: Negative Inversion using the Negadoctor Module
Darktable includes a dedicated module designed specifically for film inversion called Negadoctor (based on Kodak’s Cineon color system curves). It models the film substrate, color dyes, and paper print exposure characteristics.
Open Negadoctor (located under the Color or Technical module groups in Darkroom view) and follow these four steps sequentially.
┌─────────────────────────────────────────────────────────────┐│NEGADOCTOR WORKFLOW ││ ││[1] Film Properties ──> Sample film base orange mask ││[2] Corrections ──> Neutralize color cast in dyes ││[3] Print Properties ──> Adjust paper black, white & gamma │└─────────────────────────────────────────────────────────────┘
Step 1: Select Film Stock Type
At the top of the module, set the preset / stock type:
- Select Color Negative for orange-mask color film.
- Select Black & White for monochrome film stocks.
Step 2: The Film Properties Tab (Establishing the Baseline)
Switch to the Film Properties tab:
- Color of the Film Base (
D min):- Click the eyedropper icon next to Color of the film base.
- Drag a box over a unexposed section of clear film margin (the unexposed orange rebate area between frames).
- Result: Negadoctor measures and subtracts the exact orange/magenta film mask tint, establishing an accurate neutral color baseline.
- Dynamic Range of the Film (
D max):- Click the eyedropper icon next to Dynamic range of the film.
- Draw a box encompassing the entire cropped image area.
- Negadoctor calculates the total density range present on the film substrate to avoid clipping highlights.
Step 3: The Corrections Tab (Color Cast Neutralization)
Switch to the Corrections tab:
- Cast Highlight Drift:
- Use the eyedropper to sample a region of the image that should represent a true neutral white or light gray.
- Shadow Cast Adjustment:
- Adjust the channel sliders (Cyan, Magenta, Yellow) if aged color dyes have shifted shadow tones toward a color cast.
Step 4: The Print Properties Tab (Tonal & Contrast Finetuning)
Switch to the Print Properties tab. This section simulates exposing the inverted negative onto photographic paper.
- Paper Black: Click the eyedropper to automatically establish the deepest shadow point, or manually adjust the slider until shadow tones are rich without losing shadow detail.
- Paper Gamma / Grade (Contrast): Adjust the slider to set mid-tone density and overall contrast. Increasing gamma simulates a harder contrast grade paper; lowering it softens highlight-to-shadow transitions.
- Paper Exposure: Fine-tune overall image brightness to center mid-tones accurately.
Section 5: Fine Post-Editing, Tonal Control & Restoration
Once inverted, vintage media often requires secondary correction to address dye fading, shadow compression, or surface degradation.
Managing Dynamic Range with the Tone Equalizer
Vintage prints or thick negative emulsions often exhibit compressed shadows or blown highlights.
- Open the Tone Equalizer module.
- Hover your mouse cursor over specific luminance areas of the image in the main preview pane.
- Scroll your mouse wheel up or down directly on the preview to adjust the exposure band corresponding to that exact brightness level. This allows precise shadow lifting or highlight preservation without introducing harsh edge halos.
Correcting Dye Fading with Color Balance RGB
Color film produced between the 1950s and 1980s frequently suffers from cyan or yellow dye loss, causing heavy magenta shifts.
- Open Color Balance RGB.
- Use the Perceptual Saturation sliders to restore lost color vibrancy across mid-tones.
- Use the Hue Shift and Linear Chrominance controls under Highlights, Mid-tones, and Shadows to independently balance color temperatures across different exposure zones.
Non-Destructive Spot Retouching
Physical prints and vintage negatives accumulate dust, lint, and emulsion scratches over time. Darktable provides non-destructive retouching directly inside the Raw processing pipeline.
- Open the Retouch module.
- Select the Heal tool (represented by a band-aid icon) or the Clone tool.
- Choose your shape tool: Circle, Ellipse, Path, or Brush.
- Click over a dust spec or physical scratch in the main image preview.
- Drag the source region circle to a clean, adjacent area of similar texture and grain pattern.
- Darktable seamlessly blends the target pixel structure, removing the physical blemish while maintaining underlying continuous photographic film grain.
Section 6: Workflow Efficiency (Batch Processing with Styles)
Digitizing an entire roll of film shot on the same film stock under identical light table conditions does not require converting each frame from scratch.
Saving a Reusable Style
- Once you have perfected the
negadoctorbaseline and lens corrections on one representative frame from a roll, return to the Lighttable view (or use the history stack in Darkroom view). - In the right-side panel, open History Stack.
- Click Create Style.
- Name the style after the film stock (e.g.,
Kodacolor200_Negadoctor_Base). - Select the modules you wish to include (
lens correction,negadoctor,crop settings excluded). - Click Save.
Applying Styles in Batch
- In Lighttable view, select all images belonging to the same film roll or capture session.
- Open the Styles panel on the right.
- Double-click your saved style name. Darktable applies the inversion and optical baseline parameters instantly across all selected captures.
Section 7: Exporting Master Archival & Distribution Files
The final step is exporting master digital assets from Darktable’s 32-bit floating-point workspace into standardized file formats.
In Lighttable view, select your finalized images and open the Export panel on the right side of the screen.
| Target Purpose | File Format | Bit Depth | Color Space | Compression | Notes |
| Archival Master | TIFF | 16-bit | Adobe RGB / ProPhoto RGB | Uncompressed / ZIP | Uncompressed master preservation copy retaining full dynamic headroom. |
| Web & Sharing | JPEG | 8-bit | sRGB | Quality 90–95% | Universally compatible profile for family display, web, or print services. |
Export Settings Procedure:
- Target Storage Location: Choose your local or network storage path under Target Storage.
- File Structure: Set the file naming pattern to align with your personal archive directory framework.
- Metadata Handling: Ensure Export Metadata options are checked so that all embedded IPTC descriptions, copyright tags, and keywords remain permanently written inside the exported file headers.
- Click Export.
By leveraging Darktable’s negadoctor pipeline and non-destructive editing toolkit, you can digitize, invert, correct, and preserve entire vintage collections at the highest quality levels—completely free of subscription costs and fully under your control.
Quick-Reference Cheat Sheet: Inverting Film with Darktable’s Negadoctor
Prerequisites:
- Crop out all outer film borders, film sprockets, and light box background so only active film image area remains.
- Enable Lens Correction and Raw Chromatic Aberrations in the Processing tab.
4-Step Inversion Workflow
┌─────────────────┐ ┌─────────────────┐ ┌─────────────────┐ ┌─────────────────┐│1. PRESET │ ──> │ 2. FILM BASE │ ──> │ 3. CORRECTIONS │ ──> │ 4. PRINT ││Set Film Type │ │ Sample Dmin/Dmax│ │ Remove Shifts │ │ Set Black/Gamma │└─────────────────┘ └─────────────────┘ └─────────────────┘ └─────────────────┘
Step 1: Select Preset / Stock Type
- Open the Negadoctor module (found under the Color or Technical module tab).
- At the top of the module, set the stock type:
- Color Negative for standard orange-mask color negatives.
- Black & White for monochrome film stocks.
Step 2: Film Properties Tab (Establish Baseline)
- Color of the Film Base ($D_{\text{min}}$):
- Click the Eyedropper icon next to Color of the film base.
- Drag a selection box over an unexposed clear film margin (orange film rebate area between frames).
- Purpose: Measures and subtracts the exact orange/magenta mask tint.
- Dynamic Range of the Film ($D_{\text{max}}$):
- Click the Eyedropper icon next to Dynamic range of the film.
- Draw a selection box encompassing the entire cropped image area.
- Purpose: Calculates total film density to prevent highlight clipping.
Step 3: Corrections Tab (Neutralize Dye Casts)
- Cast Highlight Drift:
- Click the Eyedropper and sample a known neutral white or light gray area in the image.
- Shadow Cast Adjustment:
- Fine-tune the Cyan, Magenta, and Yellow sliders if aged dyes exhibit a color shift in shadow details.
Step 4: Print Properties Tab (Set Tone & Contrast)
- Paper Black:
- Click the Eyedropper to sample the deepest shadow point, or adjust manually until shadow tones are rich without losing detail.
- Paper Gamma / Grade (Contrast):
- Adjust slider to set overall image contrast (higher value = harder contrast grade; lower value = softer transitions).
- Paper Exposure:
- Fine-tune overall image brightness to center mid-tones accurately.
Quick Troubleshooting Tips
| Issue | Cause | Solution |
| Colors look washed out or inverted oddly | Unexposed border included in crop | Recrop image tightly to active film area before sampling D_{\text{max}}. |
| Heavy magenta / cyan color cast | Incorrect film base sample | Re-sample clear orange film rebate using D_{\text{min}}eyedropper. |
| Clipped shadow details | Paper Black set too high | Lower Paper Black slider or re-sample shadow area. |
If You are seeking a specific tutorial subject on this site, please search below
👇
Was This Post Helpful?
Building this free educational archive is a labor of love! If this post helped you solve your problem today, please leave a Like below to let me know you enjoyed it. Your support helps keep this site 100% free and ad-free for the archiving community!

To build a professional and sustainable archiving workflow, start with these essential guides—carefully sequenced in order of importance.
- Camera Scanning- Archive Structure & Priorities
- Camera Scanning Guide: The Essential Equipment Required
- Camera-Digitizing Mistakes That Ruin Your Archival Quality (And Fixes)
- The Ultimate Guide to LED Lighting for Camera Digitizing
- Polarizing Sheets & Lens Filters for Camera-Digitizing
- Unlocking the Hidden History on the Back of Family Photos
- Camera Digitization: Tethered Shooting Explained
- The Beginner’s 3-2-1 Guide to Secure Digital Photo Archive Backup
- Achieving Professional Color-Accuracy with Input Profiling
- Vintage Media Preservation and Storage
- FADGI Compliance for Amateurs: The FADGI-Lite Guide
- A Guide To Archival Digitization: 8 Critical Steps Often Overlooked in Digitizing Tutorials
- How to Safely Clean Precious Film
- Still Naming Vintage Photos Based On Image Content?
Confused by any technical jargon in this guide? Check out my [Full Jargon-Free Glossary] to get clear, simple definitions of all the archiving terms used here.
[Home]
External Links
Darktable Official Tutorial
These are the official Guides & Tutorials – developing monochrome images -batch-editing images and other resources.
The most authoritative and comprehensive non-official resource for open-source post-processing and editing workflows in darktable is PIXLS.US.
- Resource: PIXLS.US Community & Tutorials
- Why it is authoritative: PIXLS.US is the primary home of the open-source photography community. It serves as the primary hub where the lead darktable developers, color science engineers, and experienced photo archivists discuss scene-referred workflows, custom color science (including Negadoctor and AgX tone mapping), and specialized digital processing techniques.
I welcome comments and questions