
Digitizing 3D History & Complex Formats: Stereoviews, View-Master Reels, and Multi-Layered Ephemera
Digitizing vintage media often goes beyond single flat prints or standard film strips. Formats designed for 3D viewing—such as stereoview cards and View-Master reels—along with multi-layered physical objects like photo albums and fold-out maps, present unique capture challenges.
This guide details lighting protocols, mounting techniques, and optical settings for digitizing stereoscopic media and complex ephemera safely and accurately.
💡 Looking for a different format?
If you are working with reflective physical media or specialty formats, explore my dedicated guides below:
- Prints & Artwork: Vintage Prints ➖ Vintage Film ➖ Photo Albums ➖ Artwork
- Historical Documents: Vintage Documents & Letters ➖ Daguerreotypes ➖ Tintypes & Ambrotypes
- Moving Image & Editing: Cine Film ➖ Post-Editing Classic & Vintage Images ➖ Learn how tethered shooting will revolutionize your capture sessions Camera Digitization: Tethered Shooting Explained
Part 1: Capturing Stereoview Cards and View-Master Reels
Stereoscopic media relies on two slightly offset images side by side to create depth. To capture these items faithfully, you must maintain uniform lighting, precise alignment, and proper trans-illumination or surface illumination.
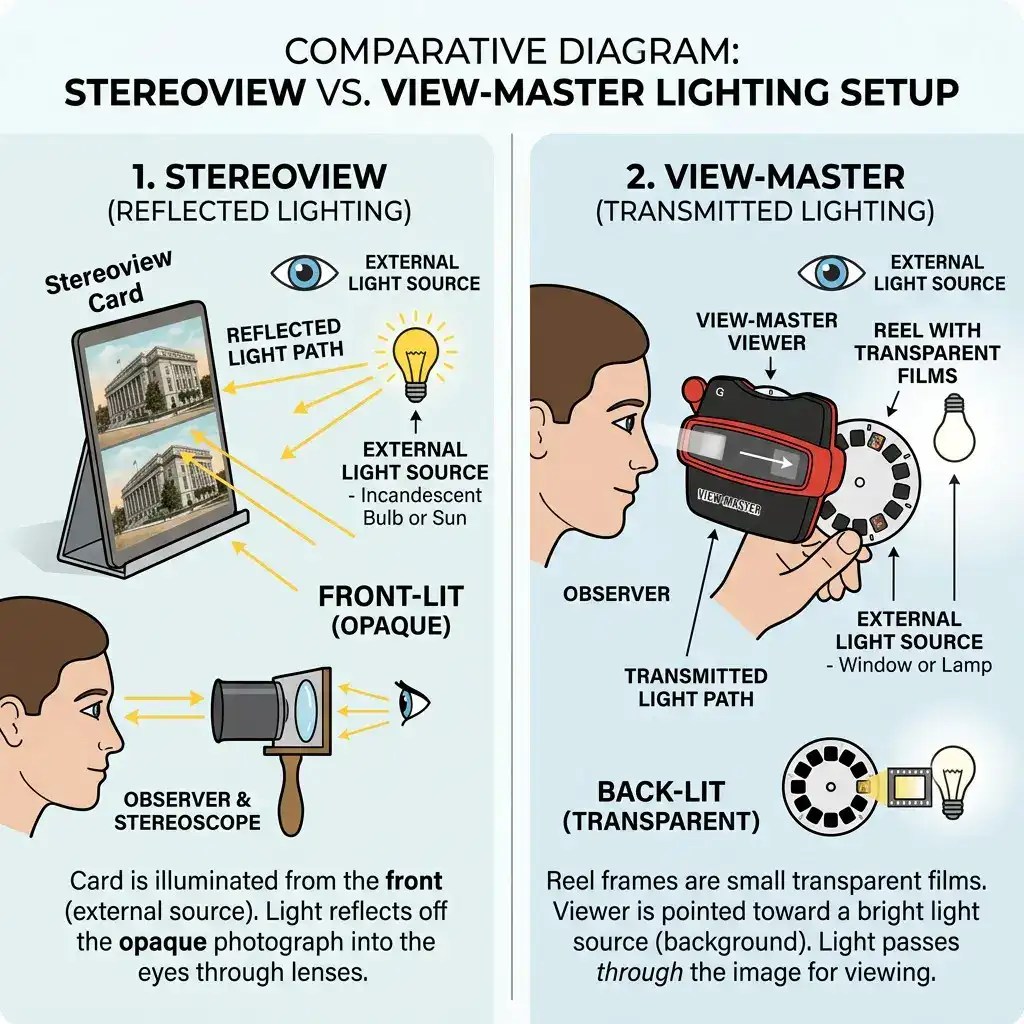
1. 19th and 20th-Century Stereoview Cards (Reflective Media)
Stereoviews (Holmes stereo cards, curved mounts, tissue stereoviews) often feature curved cardstock designed to fit vintage viewers.
- Managing Curved Cardstock: Never force curved stereo cards completely flat under glass, as this can crack the cardboard backing or emulsion. Use padded edge clamps or gently weighted archival strips along the outer margins only.
- Lighting Setup: Position dual diffuse LED lights at 45-degree angles to ensure even illumination across both left and right images. For tissue stereoviews (translucent prints designed for dual viewing), combine front reflective light with subtle rear trans-illumination.
- Digital Capture Strategy: Capture both left and right images in a single high-resolution frame to preserve the original card mount and publisher details, or frame each side individually at 1:1 magnification for full digital stereo alignment.
2. View-Master Film Reels (Transmissive Media)
View-Master reels contain seven pairs of tiny Kodachrome film chips (approximately 11.5 x 10.5 mm each) mounted in a circular paper disc.
- Backlighting Requirements: Use a high-CRI (95+) LED light panel underneath the reel to ensure true color rendering.
- Masking Flare: Cut a custom black matte card to cover all unused reel windows, exposing only the active stereo pair or individual film chip during capture. Light leaking through adjacent windows degrades contrast and creates stray reflections in the lens.
- Optics & Aperture: Because the individual film chips are extremely small, high magnification is required. Use a dedicated macro lens at 1:1 magnification or higher. Set your aperture to f/5.6 or f/8 to maximize center-to-edge sharpness while avoiding diffraction.
Part 2: Handling Scrapbooks, Ephemera, and Oversized Fold-Outs
Scrapbooks, photo albums with attached items (ribbons, clippings, dried flowers), and multi-page fold-out maps present variable depth across a single surface. Standard flatbed scanners or heavy glass plates will crush delicate items or fail to maintain focus across uneven planes.
Scrapbooks, photo albums with attached items (ribbons, clippings, dried flowers), and multi-page fold-out maps all present variable depth across a single surface. Standard flatbed scanners or heavy glass plates will crush delicate items or fail to maintain focus across uneven planes. I have found that capturing these types of media with a mirrorless camera and macro lens is the best—if not only—solution.

Managing Multi-Layer Albums
1. Managing Varying Plane Heights and Depth of Field
When photographing objects with multi-layered surfaces, strict flat-field macro rules must adapt to account for depth variation.
- Aperture Adjustment: While standard flat scanning relies on f/5.6 or f/8, multi-layered ephemera requires stopping down to f/11 to expand the depth of field. This keeps both the base page and elevated elements (such as glued photos or ribbons) in sharp focus without introducing severe diffraction artifacts.
- Focus Placement: Set your critical focus point on the mid-plane of the object’s height profile rather than the bottom paper page.
2. Gentle Stabilization Without Glass Pressure
- Book Cradles & Foam Blocks: Use acid-free foam wedges or an adjustable book cradle to support the album spine at a 90-to-120-degree angle. Never force a historic binding flat at 180 degrees.
- Archival Polyethylene Straps: Hold stubborn pages open using clear, inert polyethylene straps anchored around the support board, keeping pressure off delicate hinges.
- Raking Light for Texture: To showcase the physical construction and depth of scrapbooks, offset one light source slightly lower (around 30 to 35 degrees) to produce subtle shadows around raised edges, photo corners, and ephemera.
3. Capturing Oversized Fold-Out Maps and Inserts
Multi-page fold-outs attached inside books often exceed the coverage area of a single camera frame or exceed copy stand height limits.
- Sectional Grid Capture: Digitze oversized fold-outs in overlapping sections (grids) with 20% to 30% overlap between shots. Maintain fixed exposure, white balance, and lens settings across all frames.
- Stitching Alignment: Combine the grid sections using automated panorama/photomerge tools, making sure to select a flat/rectilinear projection setting to prevent perspective warping.
Was This Post Helpful?
Building this free educational archive is a labor of love! If this post helped you solve your problem today, please leave a like below to let me know you enjoyed it. Your support helps keep this site 100% free and ad-free for the archiving community.

Other posts in this new series – The Hardware & Optical Precision Loop.
Physical and Optical Precision: Masking, Alignment, and Newton’s Rings
Flatness Calibration & Depth-of-Field Precision
Capturing Complex Scrapbooks, Fold-Outs, and Framed Media
DNG vs. RAW: Safeguarding Your Digital Master Files
Protecting Your Archive Against Bit Rot
Sharing Your Archive with Non-Technical Family
Ethical Archiving: Handling Sensitive Secrets, Medical Records, and Personal Privacy
Open-Source Film Inversion: Mastering Darktable’s Negadoctor Module
Using AI Photo Restoration Whilst Retaining Authentic Detail
Camera-Digitize-Archive-Glossaryv
HOME
External Links
To support the techniques discussed in the previous section, the following links provide resources from leading archival institutions, preservation guidelines, and specialized equipment providers. They offer practical advice, technical standards, and institutional best practices for handling non-flat, fragile, and varied-depth items.
Institutional Guidelines and Standards
These resources define the high-level standards used by memory institutions like the Library of Congress and the National Archives to ensure preservation-quality digitization of complex materials.
- Federal Agency Digital Guidelines Initiative (FADGI): This is the paramount US standard for still-image digitization of cultural heritage. While technical, it establishes the quality metrics (the “star” ratings) that professional-grade overhead scanners strive to meet. It defines how sharp focus must be maintained across a depth plane.
- External Link: FADGI Still Image Working Group
- The Library of Congress – Preservation Guidelines for Digitizing Library Materials: A crucial resource detailing handling precautions. While it covers various scanning methods, it provides specific guidance on when to use book cradles, the risks of flattening brittle papers, and general preservation principles for items with weak joints or restricted openings.
- External Link: LoC Digitization Guidelines: Non-Destructive Techniques
- National Archives and Records Administration (NARA) Technical Guidelines for Digitizing Archival Materials: NARA provides comprehensive guidelines for creating digital surrogates of archival records. While focused on 2D, the guidelines address the complexities of bound materials and oversize items, emphasizing stabilization during capture.
- External Link: NARA Technical Guidelines (PDF link often available here)
- Northeast Document Conservation Center (NEDCC) – Preservation Leaflets: NEDCC is a leading preservation lab. Their leaflets offer very practical advice on digitizing fragile items, providing context on why non-contact methods are often the only safe option for unique artifacts.
- External Link: NEDCC Resources on Digitizing and Imaging
Specialized Equipment and Practical Solutions
The companies that build the hardware and software for high-end archival capture often publish case studies and technical papers explaining how their technology handles varied depth and delicate items.
- Digital Transitions (DT) Heritage: This is a prominent provider of overhead planetary scanners and digitization stands. Their resource library is invaluable for understanding the mechanics of capture—explaining how laser-guided focus, specialized lighting, and book cradles prevent damage to scrapbooks and maps.
- External Link: DT Heritage Resources & Case Studies
- Townsweb Archiving – “How to Digitise Large Format Maps, Plans and more”: This blog post offers practical, operational advice specifically focused on large, awkward, or multi-page fold-out materials, discussing large format book rests and scanner beds that provide necessary support.
- External Link: Townsweb Large Format Digitisation Guide
I welcome comments and questions